Last Updated on March 16, 2024

To measure temperature different types of sensors are available, if you want to detect temperature in non-contact method, the Infrared thermometer sensor comes first. MLX90614 infrared thermometer from melexis is a non contact temperature sensing device.
The LM35 temperature sensor gives output depends on fallen heat over the sensor device, but you can’t get into fire to detect accurate temperature value. This MLX90614 sensor gives non-contact temperature sensing.
MLX90614ESF-BAA Pinout
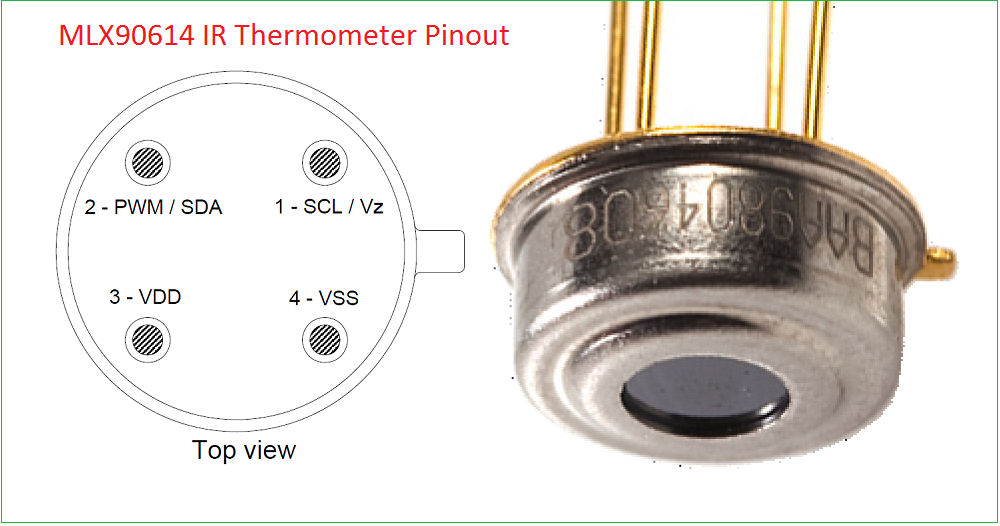
Pin Name,Function
VSS, Ground. The metal can is also connected to this pin.
SCL / Vz,Serial clock input for 2 wire communications protocol.
PWM / SDA,Digital input / output. pulse width modulation or Serial
data for 2 wire communications protocol.
VDD, External supply voltage.
The sensor internally contains 17-bit ADC and a powerful DSP contributed to the high accuracy and resolution, and this sensor provides two methods of output, PWM and I²C but these output has a resolution variations like if you taken output as PWM then 10-bit PWM output provides a resolution of 0.14 ºC, and the I²C method gives resolution of 0.02 ºC.
The MLX90614 is factory calibrated in wide temperature ranges, -40 ºC to 85 ºC for the ambient temperature and -70 ºC to 382.2 ºC for the object temperature.
how does a infrared thermometer work?
We know every object emits Infrared light rays, the concentration varies depends on temperature but those IR rays are not visible to the human eye. By detecting the IR rays we can quantize temperature range. By the way MLX 90614 thermometer sensor also works.
This sensor has two sections namely 1. Thermopile detector (this is responsible for to convert thermal energy into electrical energy), 2. Signal conditioning section (It process signal from thermopile detector and makes as readable signal by the external peripherals).
Signal Conditioning section has 17-bit ADC block to convert detected signal by the thermopile and Calibrated DSP (Digital signal processing) block quantize the entire signal after that output signal is travels through PWM and I²C/TWI terminals.
Application Circuit
The MLX 90614 thermometer sensor is plug & play device hence we can directly connect a alert device and easily make thermal alarm device.

Interfacing MLX90614
The micro controllers are have I2C communication way to get interfaced with external peripherals, The MLX90614 thermometer also has I2C communication lines so that we can interface this sensor with microcontroller with out any additional circuits.
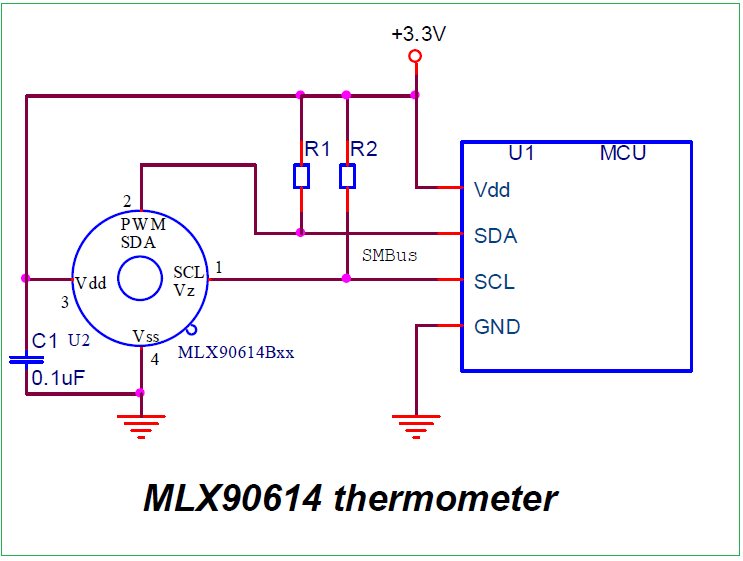
The sensor operates with 3.3V Dc supply, if the micro controller operates with 5V DC then we need pull up resistors between SDA and SCL lines to +3.3V DC line.
MLX90614 Thermometer with Arduino
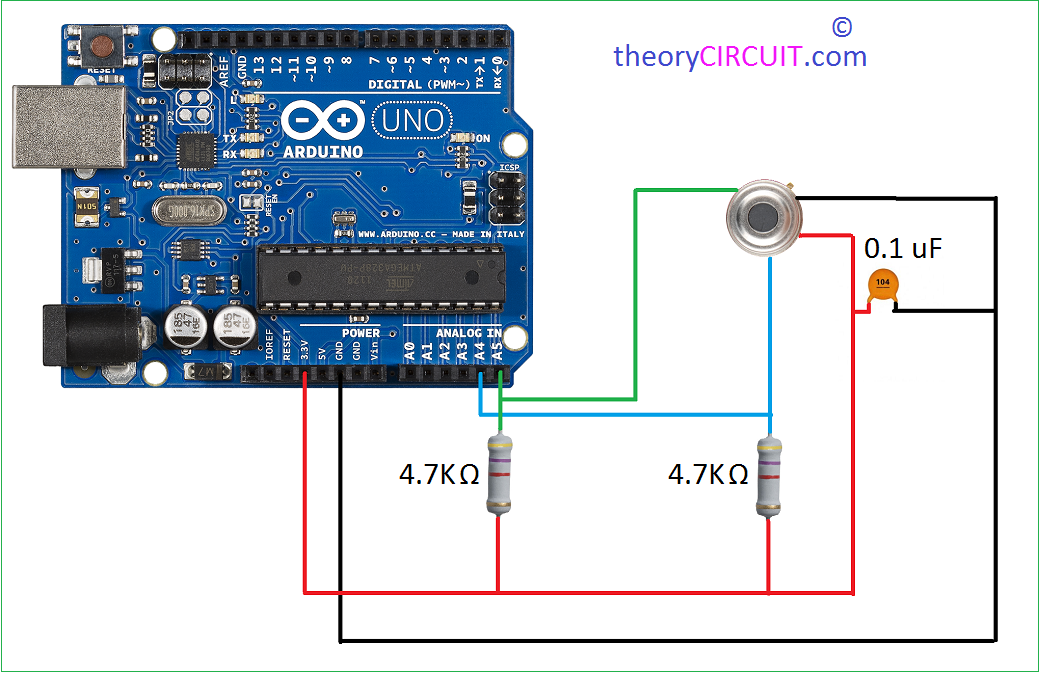
The Arduino Boards have I²C communication lines and it is easy to interface with I²C by wire header file. Here this Article uses Arduino uno board as example, if you are using different Arduino board and want to know I²C lines checkout here.
Connect the sensor as illustrated and provide +3.3V DC power source from Arduino board to sensor. Here 4.7KΩ resistors are used to provide pull-up over I²C lines.
Infrared Thermometer Arduino Code
/****************************************************MLX90614 ------------- Arduino  VDD ------------------ 3.3V  VSS ------------------ GND  SDA ------------------ SDA (A4 on older boards)  SCL ------------------ SCL (A5 on older boards)*****************************************************/

#include <Wire.h> // I2C library, required for MLX90614
#include <SparkFunMLX90614.h> // SparkFunMLX90614 Arduino library

IRTherm therm; // Create an IRTherm object to interact with throughout

const byte LED_PIN = 8; // Optional LED attached to pin 8 (active low)

void setup()
{
  Serial.begin(9600); // Initialize Serial to log output
  therm.begin(); // Initialize thermal IR sensor
  therm.setUnit(TEMP_F); // Set the library's units to Farenheit
  // Alternatively, TEMP_F can be replaced with TEMP_C for Celsius or
  // TEMP_K for Kelvin.

  pinMode(LED_PIN, OUTPUT); // LED pin as output
  setLED(LOW); // LED OFF
}

void loop()
{
  setLED(HIGH); //LED on

  // Call therm.read() to read object and ambient temperatures from the sensor.
  if (therm.read()) // On success, read() will return 1, on fail 0.
  {
    // Use the object() and ambient() functions to grab the object and ambient
	// temperatures.
	// They'll be floats, calculated out to the unit you set with setUnit().
    Serial.print("Object: " + String(therm.object(), 2));
    Serial.write('°'); // Degree Symbol
    Serial.println("F");
    Serial.print("Ambient: " + String(therm.ambient(), 2));
    Serial.write('°'); // Degree Symbol
    Serial.println("F");
    Serial.println();
  }
  setLED(LOW);
  delay(500);
}

void setLED(bool on)
{
  if (on)
    digitalWrite(LED_PIN, LOW);
  else
    digitalWrite(LED_PIN, HIGH);
}
Reference
Arduino Library for IR thermometer