Last Updated on March 16, 2024
L3G4200D the triple axis gyroscope is one of the MEMS sensor, this sensor is inexpensive and measures in degrees per second or revolutions per second the angular velocity.
It is mostly used in balancing position application, robotic application, drones stabilisation etc… the circuit given here is to measure the sensor output through serial port. By using condition statement we can control any electronic peripheral according the value of gyroscope sensor.
To use this Gyroscope L3G4200D sensor with arduino we need library file, get L3G4200D sensor library here.
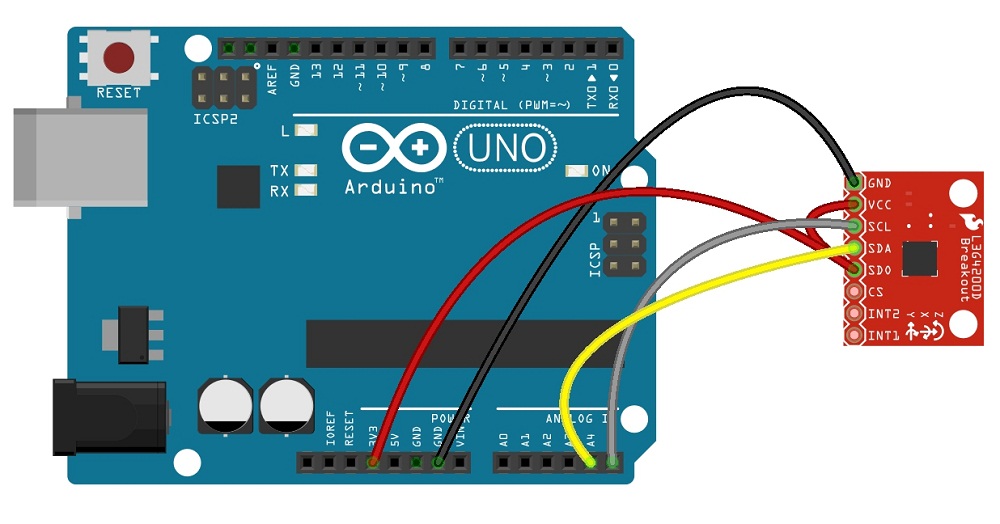
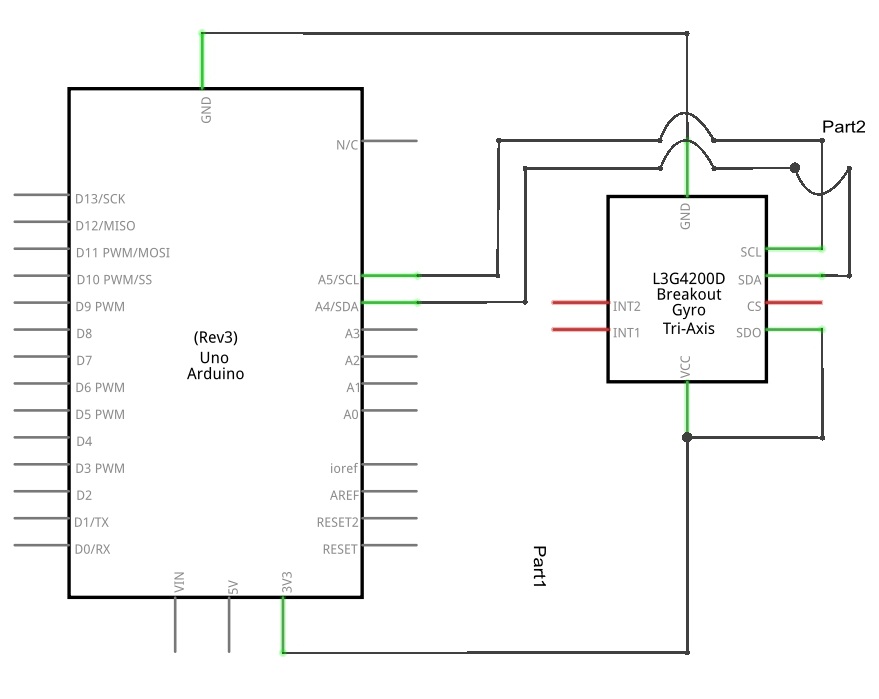
Circuit diagram
Arduino Gyroscope L3G4200D arduino Sensor sketch code
[code]
/*www.theorycircuit.com*/
#include <Wire.h>
#define CTRL_REG1 0x20
#define CTRL_REG2 0x21
#define CTRL_REG3 0x22
#define CTRL_REG4 0x23
#define CTRL_REG5 0x24
int L3G4200D_Address = 105; //I2C address of the L3G4200D
int x;
int y;
int z;
void setup(){
Wire.begin();
Serial.begin(9600);
Serial.println(“starting up L3G4200D”);
setupL3G4200D(2000); // Configure L3G4200 – 250, 500 or 2000 deg/sec
delay(1500); //wait for the sensor to be ready
}
void loop(){
getGyroValues(); // This will update x, y, and z with new values
Serial.print(“X:”);
Serial.print(x);
Serial.print(” Y:”);
Serial.print(y);
Serial.print(” Z:”);
Serial.println(z);
delay(100); //Just here to slow down the serial to make it more readable
}
void getGyroValues(){
byte xMSB = readRegister(L3G4200D_Address, 0x29);
byte xLSB = readRegister(L3G4200D_Address, 0x28);
x = ((xMSB << 8) | xLSB);
byte yMSB = readRegister(L3G4200D_Address, 0x2B);
byte yLSB = readRegister(L3G4200D_Address, 0x2A);
y = ((yMSB << 8) | yLSB);
byte zMSB = readRegister(L3G4200D_Address, 0x2D);
byte zLSB = readRegister(L3G4200D_Address, 0x2C);
z = ((zMSB << 8) | zLSB);
}
int setupL3G4200D(int scale){
//From Jim Lindblom of Sparkfun’s code
// Enable x, y, z and turn off power down:
writeRegister(L3G4200D_Address, CTRL_REG1, 0b00001111);
// If you’d like to adjust/use the HPF, you can edit the line below to configure CTRL_REG2:
writeRegister(L3G4200D_Address, CTRL_REG2, 0b00000000);
// Configure CTRL_REG3 to generate data ready interrupt on INT2
// No interrupts used on INT1, if you’d like to configure INT1
// or INT2 otherwise, consult the datasheet:
writeRegister(L3G4200D_Address, CTRL_REG3, 0b00001000);
// CTRL_REG4 controls the full-scale range, among other things:
if(scale == 250){
writeRegister(L3G4200D_Address, CTRL_REG4, 0b00000000);
}else if(scale == 500){
writeRegister(L3G4200D_Address, CTRL_REG4, 0b00010000);
}else{
writeRegister(L3G4200D_Address, CTRL_REG4, 0b00110000);
}
// CTRL_REG5 controls high-pass filtering of outputs, use it
// if you’d like:
writeRegister(L3G4200D_Address, CTRL_REG5, 0b00000000);
}
void writeRegister(int deviceAddress, byte address, byte val) {
Wire.beginTransmission(deviceAddress); // start transmission to device
Wire.write(address); // send register address
Wire.write(val); // send value to write
Wire.endTransmission(); // end transmission
}
int readRegister(int deviceAddress, byte address){
int v;
Wire.beginTransmission(deviceAddress);
Wire.write(address); // register to read
Wire.endTransmission();
Wire.requestFrom(deviceAddress, 1); // read a byte
while(!Wire.available()) {
// waiting
}
v = Wire.read();
return v;
}
[/code]
Components List
| S.No | Name | Quantity |
| 1. | Arduino uno | 1 |
| 2. | Gyroscope-L3G4200D-sensor | 1 |
| 3. | Connecting wires | as required |