
Last Updated on March 24, 2024
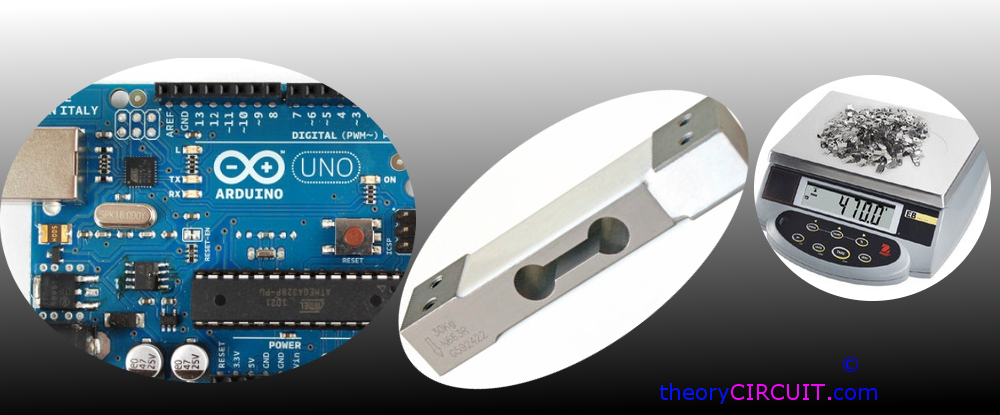
Electronic weighing machine uses load cell to measure the load or pressure produced by the load, here most load cells are follows the method of strain gauge, Which converts the pressure (force) into an electrical signal, these load cells have four strain gauges that are hooked up in a Wheatstone bridge formation.
When we apply load the strain gauge resistance will change and hence the output voltage from the load cell get changes by the way we can measure the load value.
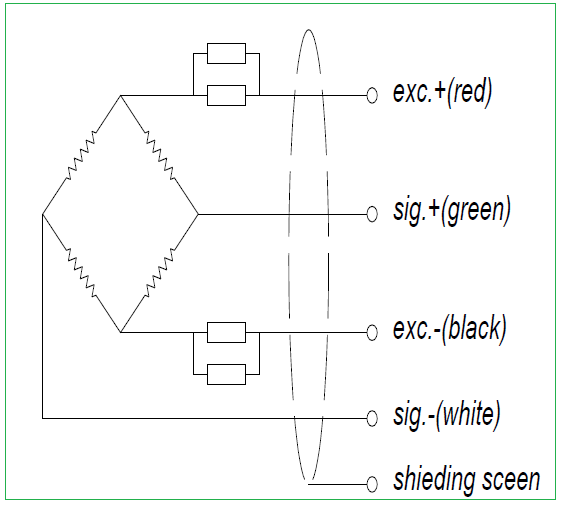
Wheatstone bridge formation of Load Cell
Instrumentation Amplifier
The output voltage changes from the load cell may vary between millivolt range, so that we need to magnify the changes occurs in output voltage, here we used instrumentation amplifier INA 125.
This is a low power, high accuracy instrumentation amplifier with a precision voltage reference. It provides complete bridge excitation and precision differential input amplification on a single integrated circuit.
Pinout diagram of INA125
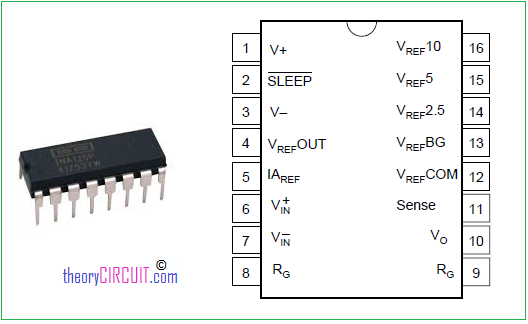
The INA125 is a 16 pin DIP (Dual Inline Package) IC. It has two stages of amplifier with reference amplifier.
Load Cell Interfacing Schematic
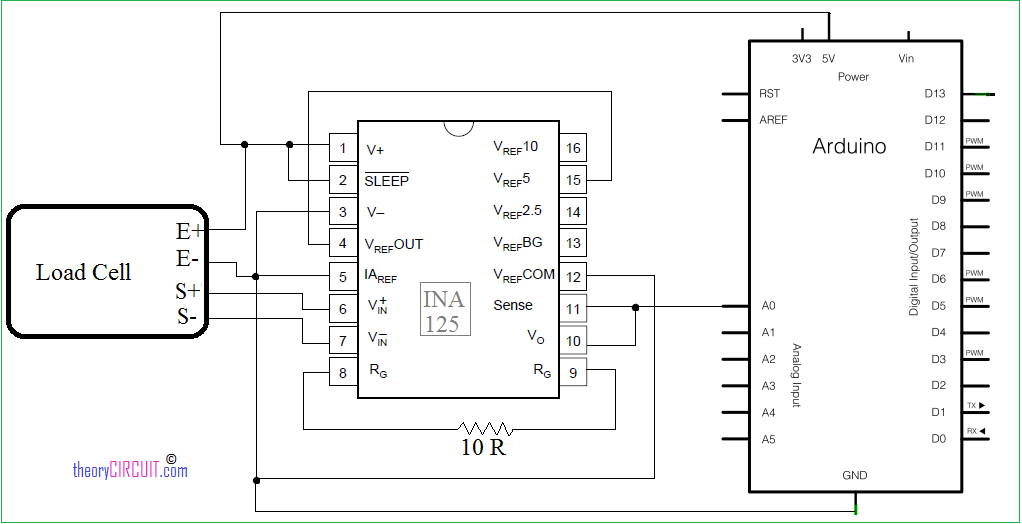
Hookup Diagram

Connect load cell pins to the instrumentation amplifier as shown in the schematic diagram.
RED : Excitation +
WHITE : Signal +
GREEN : Signal –
BLACK : Excitation –
The Resistor 10Ω connected between pin 8 & 9 is responsible for Gain of INA 125 instrumentation amplifier, the output is taken combined from Vo and Sense (Pin 10 & 11) and it is fed into Arduino analog pin A0. Here the need of power supply for load cell and instrumentation amplifier solved by Arduino power pins. This circuit is designed for getting reading at serial terminal if you need to add display refer LCD interface with Arduino.
Arduino Code for Load Cell
// Load cells are linear. So once you have established two data pairs, you can interpolate the rest.

// Step 1: Upload this sketch to your arduino board

// You need two loads of well know weight. In this example A = 10 kg. B = 30 kg
// Put on load A
// read the analog value showing (this is analogvalA)
// put on load B
// read the analog value B

// Enter you own analog values here
float loadA = 10; // kg
int analogvalA = 200; // analog reading taken with load A on the load cell

float loadB = 30; // kg
int analogvalB = 600; // analog reading taken with load B on the load cell

// Upload the sketch again, and confirm, that the kilo-reading from the serial output now is correct, using your known loads

float analogValueAverage = 0;

// How often do we do readings?
long time = 0; //
int timeBetweenReadings = 200; // We want a reading every 200 ms;

void setup() {
  Serial.begin(9600);
}

void loop() {
  int analogValue = analogRead(0);

  // running average - We smooth the readings a little bit
  analogValueAverage = 0.99*analogValueAverage + 0.01*analogValue;

  // Is it time to print?
  if(millis() > time + timeBetweenReadings){
    float load = analogToLoad(analogValueAverage);

    Serial.print("analogValue: ");Serial.println(analogValueAverage);
    Serial.print("             load: ");Serial.println(load,5);
    time = millis();
  }
}

float analogToLoad(float analogval){

  // using a custom map-function, because the standard arduino map function only uses int
  float load = mapfloat(analogval, analogvalA, analogvalB, loadA, loadB);
  return load;
}

float mapfloat(float x, float in_min, float in_max, float out_min, float out_max)
{
  return (x - in_min) * (out_max - out_min) / (in_max - in_min) + out_min;
}
Output will be displayed on serial monitor in Arduino IDE.
Hello, i want to ask if i want to make a weight scale. What amplifier i must use for get better precision, HX712 or INA125?
Thx
* HX712 is a precision 24-bit analog- to-digital converter (ADC) with on chip load-cell power supply switch and battery voltage detection.
* The INA125 is a low power, high accuracy instrumen- tation amplifier with a precision voltage reference.
Choose what suits you.
its really very useful !!! thankuu
Thanks for your Interest 🙂
What I have to do, if I need the output in buzzer based on weight, instead of serial output..?
Hi Karthick,
Put these code and you may expect buzzer beep !
#define Buzzer 13 // put at starting
//put the following code after void loop() { int analogValue = analogRead(0);
if (analogValue > 30) // change this value depends on your need
{
digitalWrite(Buzzer,HIGH); //value greater than 30 then buzzer will produce beep sound
}
else {
digitalWrite(Buzzer,LOW);
}
hey i need help , my project is load sensing seats using load. My project uses rf-module, load cell 200kg and ardunio. i need schematic and coding . can u help me?
hey bro
if i want to display the weight in an LCD (16X2 ) screen what would be the code ?
Hi, can i combine readings from 4 load cells and use the average as my final reading. I have a big base plate and want to mount the load cells on the four corners
I would like to use this circuit to simply read values from a strain gauge (and see fluctuation in the strain values from deformation). Therefore, I do not have a “known weight” to calibrate the code since I am not using this for its intended purpose of a weight scale load cell. How would I go about simply obtaining fluctuating strain values from the INA125?
How sensitive this circuit will be
i. can it sense 1 gram minimum.
ii. If power is made ON with a load on the loadcell will it show the old weight with power ON
Hi,
First it can detect loads above 10 gram and Secondly it will not show old weight when gets turn ON.
Is it possible to use load cell as a sensor? Can we use the load cell to detect objects passing over it? Also, how should the load cell connected to arduino uno board to use it as a sensor?
you have IAREF shorted to ground …. that looks wrong
Do you think that the system will work at 3.3V ? (Regarding the datasheet it will but i dnt really know..)