
Last Updated on March 16, 2024
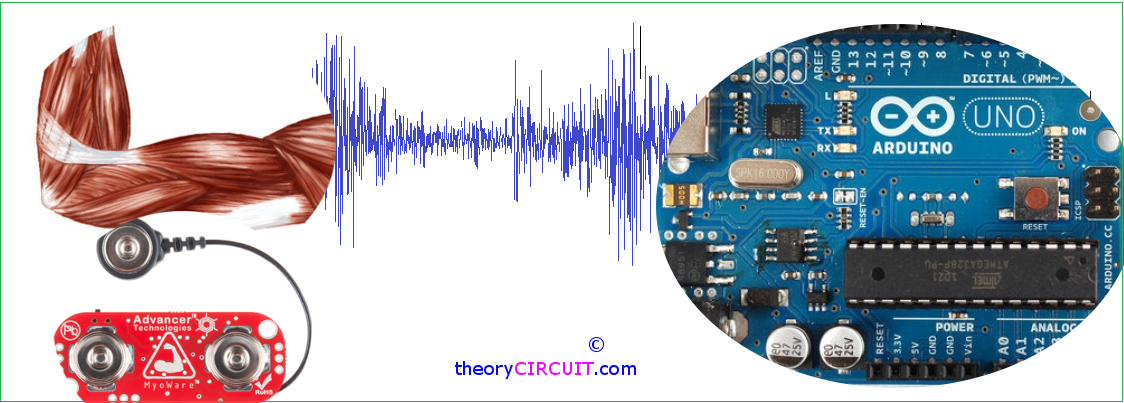
In this Article we are going to get information regarding Electromyography and Interfacing muscle sensor with Arduino, Electromyography technique is used in medical applications, wearable electronics, Robotics & prosthetics etc.., (applications continues). We can include this Electromyography in many application.
What is Electromyography ?
Measuring muscle activation via electric potential, referred to as electromyography (EMG), has traditionally been used for medical research and diagnosis of neuromuscular disorders. However, with the advent of ever shrinking yet more powerful microcontrollers and integrated circuits, EMG circuits and sensors have found their way into Prosthetics, Robotics and other control systems.(www.AdvancerTechnologies.com)
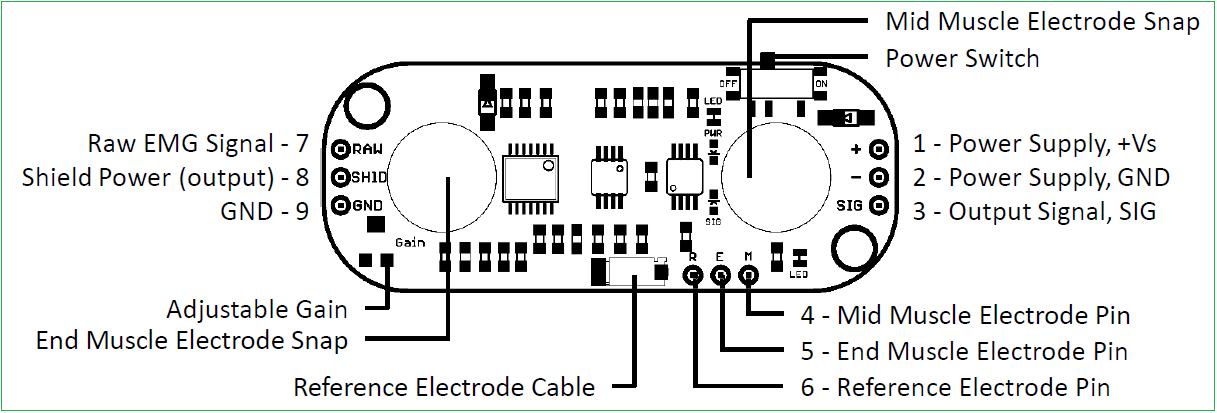
Myoware Muscle sensor (AT-04-001)

Here the sensor to read muscle activation signal, It is from Advancer technologies. It is suitable for producing raw EMG signal and Analog output signal for microcontroller based application, This sensor designed for reliable EMG output with low power consumption.
It operates with single power supply (+2.9V to +5.7V) with polarity reversal protection, additional feature in this sensor is that we can adjust the sensitivity gain.
Sensor Layout
Example setup Instructions :-
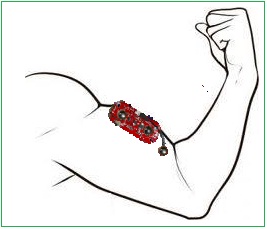
This sensor is suitable for wearable design and it is compact one, hence we can handle with ease to measure muscle activation signal, here the example illustration given for Bicep muscle measurement (we can use it on forearm etc..,)
Steps to be followed
- Thoroughly clean the intended area with soap to remove dirt and oil.
- Snap electrodes to the sensor’s snap connectors
(Note: While you can snap the sensor to the electrodes after they’ve been placed on the muscle, we do not recommend doing so due to the possibility of excessive force being applied and bruising the skin.) - Place the sensor on the desired muscle
a.After determining which muscle group you want to target (e.g. bicep, forearm, calf), clean the skin thoroughly.
b.Place the sensor so one of the connected electrodes is in the middle of the muscle body. The other electrode should line up in the direction of the muscle length.
c.Peel off the backs of the electrodes to expose the adhesive and apply them to the skin.
d.Place the reference electrode on a bony or nonadjacent muscular part of your body near the targeted muscle. - Connect to a development board (e.g. Arduino, RaspberryPi), microcontroller, or ADC. (source: www.AdvancerTechnologies.com)
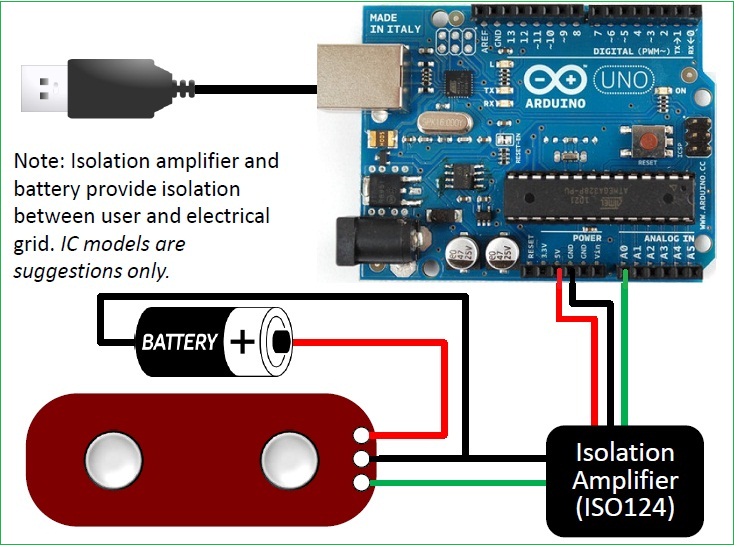
Arduino Myoware sensor Schematics
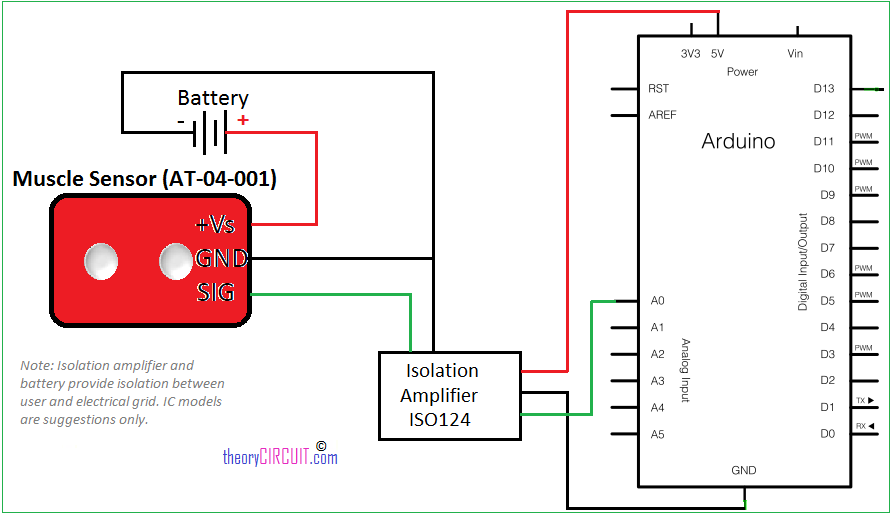
This sensor is simple like others which produce analog output voltage, connect battery to provide separate power supply to the sensor and isolation amplifier (ISO124) between Arduino board. Here isolation amplifier and battery provide isolation between user and electrical grid. (Recommended)
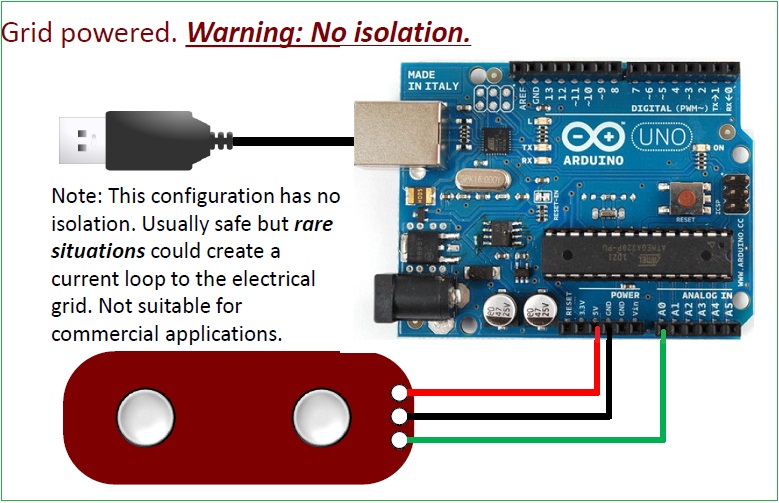
Arduino Myoware sensor Hookup
Without separate battery source to the sensor and Isolation amplifier
Arduino Code
/*  AnalogReadSerial  Reads an analog input on pin 0, prints the result to the serial monitor.  Attach the center pin of a potentiometer to pin A0, and the outside pins to +5V and ground. This example code is in the public domain. */

// the setup routine runs once when you press reset:
void setup() {
  // initialize serial communication at 9600 bits per second:
  Serial.begin(9600);
}

// the loop routine runs over and over again forever:
void loop() {
  // read the input on analog pin 0:
  int sensorValue = analogRead(A0);
  // print out the value you read:
  Serial.println(sensorValue);
  delay(1);        // delay in between reads for stability
}
Use this simple code from Arduino Examples to measure reading from sensor.
Going Further
Here we can use Processing IDE to plot the EMG graph.
After getting analog output..by using which technique we can convert to digital output
If you use a battery to power the Arduino or simply use a laptop running on battery power, then you get isolation without any extra isolation circuitry.
what are the specs of battery used in the isolation circuit?
sir i have question did myoware sensor can interface with the NodeMcu ESP8266
if your node MCU has an analog pin. you can use it directly. else you have to add analog to digital converter for myo sensor to node MCU.
how can i get schematics file?