
Last Updated on March 16, 2024
Speed of fan can be varied by changing the input supply, if w need to change the fan speed depends on temperature changes means we can implement the following application note with Arduino and temperature sensor LM 35.
Circuit diagram
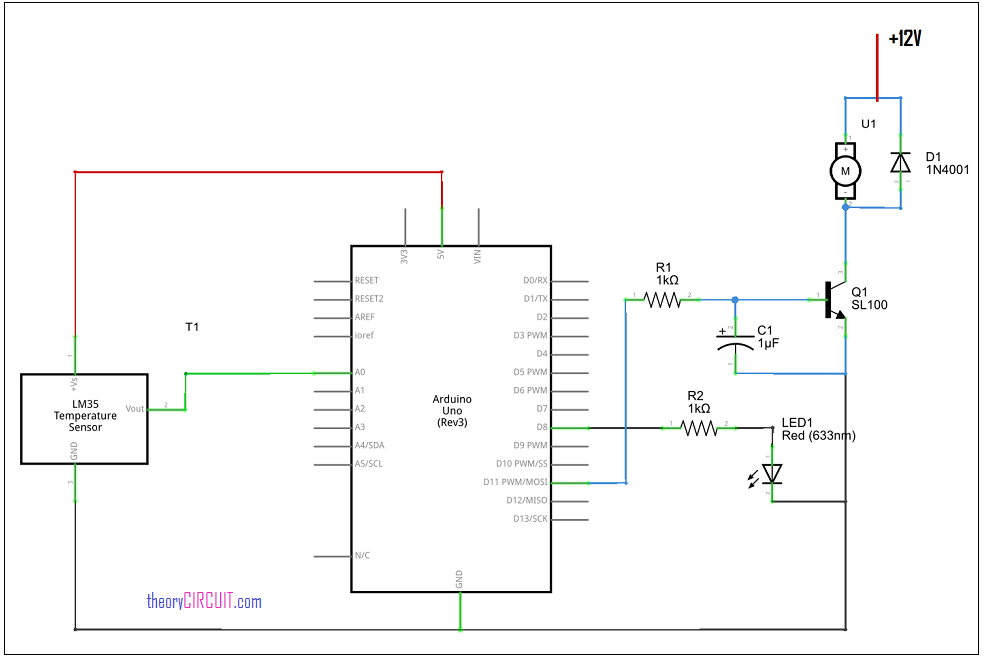
Construction and Working
This circuit constructed with Arduino uno board as a main part and LM35 as a temperature sensor. The output from sensor is directly connected with analog input A0 pin of Arduino board, and the LED1 is connected with digital pin D8, the output is taken from the D11 pin of arduino, here you can choose any digital pin with PWM function as a output pin, remember to make those changes in arduino program code, here the code given based on D11 pin as a output.
Whenever the temperature sensor detects the changes in temperature outside the Arduino varies the PWM output at D11 pin hence the speed of fan varies, here the SL100 transistor acts as a switching transistor.
Arduino Code
#include <LiquidCrystal.h>
LiquidCrystal lcd(7,6,5,4,3,2);
int tempPin = A0;   // connect Sensor output pin
int fan = 11;       // Output drive for fan
int led = 8;        // fan status led pin
int temp;
int tempMin = 25;   // Minimum temperature to start the fan
int tempMax = 75;   // Maximum temperature to turn fan at 100% speed
int fanSpeed;
int fanLCD;

void setup() {
  pinMode(fan, OUTPUT);
  pinMode(led, OUTPUT);
  pinMode(tempPin, INPUT);
  lcd.begin(16,2);
}

void loop() {
   temp = readTemp();     // read temperature
   if(temp < tempMin) {   // if temp is lower than minimum temperature
       fanSpeed = 0;      // fan is off
       digitalWrite(fan, LOW);
   }
   if((temp >= tempMin) && (temp <= tempMax)) {  // if temperature is higher than minimum temperature
       fanSpeed = map(temp, tempMin, tempMax, 32, 255);
       fanLCD = map(temp, tempMin, tempMax, 0, 100);  // speed of fan to display on LCD
       analogWrite(fan, fanSpeed);  // spin the fan at the fanSpeed speed
   }

   if(temp > tempMax) {        // if temp is higher than tempMax
     digitalWrite(led, HIGH);  // turn on led
   } else {                    // else turn off led
     digitalWrite(led, LOW);
   }

   lcd.print("TEMP: ");
   lcd.print(temp);      // display the temperature
   lcd.print("C ");
   lcd.setCursor(0,1);
   lcd.print("FANS: ");
   lcd.print(fanLCD);    // display the fan speed
   lcd.print("%");
   delay(200);
   lcd.clear();
}

int readTemp() {  // get temperature and convert it to celsius
  temp = analogRead(tempPin);
  return temp * 0.48828125;
}
Sir, it is very useful. I need more clear details of it as i am doing my first project. Can u please mail me. Thanking you sir.
hello sir
i cont able to run the fan but led is blinking .plz help me
Hello riya,
look at the output digital pin and fan connections, it might work.
sir, can i replace fan with a light bulb to control the amount of current to the light bulb?
assist me with the correct code please
Will the code work with without any errors and getting correct output?? So that I can proceed to take this project for my internals
how can i implement it in simulink matlab with arduino support package blocks.
please help
Is there any particular reason why the readtemp variable has been defined last? I am trying to adapt this to work so that the fan will run at cooler temps at varying speeds, slowing to a halt at ~24C.
Good day! is this applicable to 240-440VAC fan? Thanks!
what means
temp = readTemp(); // read temperature
this means?
temp = readtempPin();