
Last Updated on March 16, 2024
In this Arduino Stepper Motor Interface project we are going to control stepper motor using Arduino board and IC L293D (H bridge motor controller), yes this L293D IC and Shield can be used to control stepper motor, have additional DC power source depends on voltage rating of stepper motor you have.
Stepper Motor
A stepper motor or step motor is normal DC motor but the rotation of armature shaft in equally divided steps, and holds current position if the supply not given, the stepper motors have classification as Unipolar and Bipolar.
Unipolar Stepper motor

The unipolar comes with 5, 6 and 8 leads and operates one winding with the center tap per phase of input. this image shows different types of unipolar stepper motor and its leads configuration, refer datasheet of your stepper motor to know more.
Bipolar stepper motor

The bipolar stepper motor has single winding per phase and only 4 leads to connect two set of internal electromagnet coils, forward and reverse steps can be achieved by changing the direction of current through the motor coils, this might more complicated than unipolar but the H-bridge and stepper motor driver circuits makes it very simple.
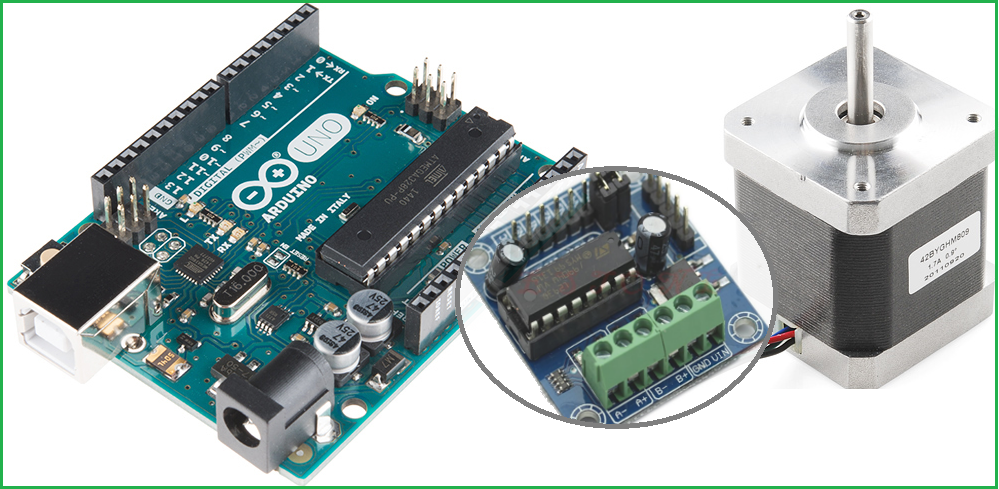
Stepper motor controller shield

The stepper motor coils need separate DC voltage to operate, it cannot run by using the micro controllers DC bias hence we need separate motor diver module to operate stepper motor speed and direction control. This module contains H bridge L2913D motor driver IC and provides connectors to motor bias Vin, GND and A-, A+ & B-, B+ connectors for bipolar stepper motor. You need to identify the stepper motor terminals and then connect with this module without tension, it has on board regulator and voltage limiter components. You can use Separate IC L293D without shield.
Arduino Stepper motor Hookup
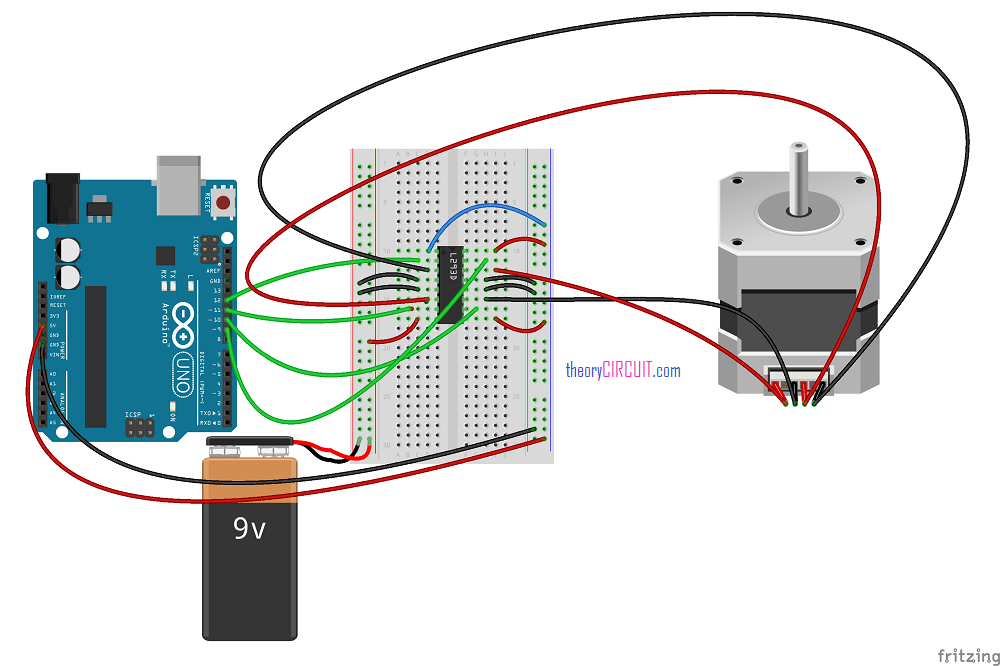
Connect the stepper motor’s first phase leads A+, A- to the motor driver module that is connect first phase of stepper motor to Pin3, 6 of IC L293D, this will give the output1 and 2 for first phase winding, connect phase two leads B+, B- to the module (second phase of stepper motor to pin 11, 14 of IC L293D) connect separate DC voltage in Vin, GND pin of Motor driver.

IC L293D Pinout

[stextbox id=”info”]Note: Refer datasheet of IC L293D and stepper motor to identify correct phase leads.[/stextbox]
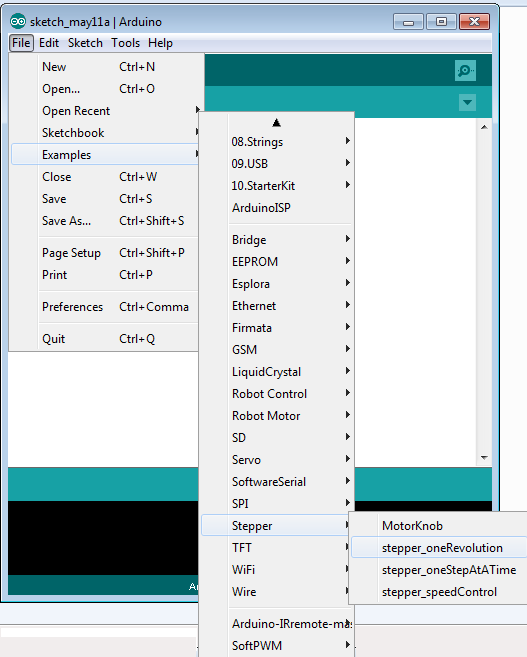
At last we can upload the Arduino sketch to control stepper motor, New Arduino IDE 1.6.9 has inbuilt library for stepper motor, you can use those example program to run stepper motor, if you don’t have then google it to download library and examples.
Arduino Code:
As Present in Example (Use this code when you use Bipolar stepper and L298N dual H bridge)
#include <Stepper.h>

const int stepsPerRevolution = 200;  // change this to fit the number of steps per revolution
// for your motor

// initialize the stepper library on pins 8 through 11:
Stepper myStepper(stepsPerRevolution, 8, 9, 10, 11);

void setup() {
  // set the speed at 60 rpm:
  myStepper.setSpeed(60);
  // initialize the serial port:
  Serial.begin(9600);
}

void loop() {
  // step one revolution  in one direction:
  Serial.println("clockwise");
  myStepper.step(stepsPerRevolution);
  delay(500);

  // step one revolution in the other direction:
  Serial.println("counterclockwise");
  myStepper.step(-stepsPerRevolution);
  delay(500);
}
Arduino Code As per the Hookup Made
(Use this code when you use Bipolar stepper motor and L293D IC)
#include <Stepper.h>

int in1Pin = 12;
int in2Pin = 11;
int in3Pin = 10;
int in4Pin = 9;

// change this to the number of steps on your motor
#define STEPS 512

Stepper motor(STEPS, in1Pin, in2Pin, in3Pin, in4Pin);

void setup()
{
  pinMode(in1Pin, OUTPUT);
  pinMode(in2Pin, OUTPUT);
  pinMode(in3Pin, OUTPUT);
  pinMode(in4Pin, OUTPUT);

  // this line is for Leonardo's, it delays the serial interface
  // until the terminal window is opened
  while (!Serial);

  Serial.begin(9600);
  motor.setSpeed(20);
}

void loop()
{
  if (Serial.available())
  {
    int steps = Serial.parseInt();
    motor.step(steps);
  }
}
Note: If the stepper motor not run properly then check the motor leads it may interchanged within polarity and make connections after referring datasheet.
Where can i get stepper motor header file?
Hi Ios lyen, you can get here: https://www.arduino.cc/en/Reference/Stepper
Refer here, https://www.arduino.cc/en/reference/stepper
This is link for stepper motor library
http://ugweb.cs.ualberta.ca/~c274/resources/arduino-ua/libraries-osx/Stepper/Stepper.h
Would it be possible to use this stepper motor shield as a dimmer for LED lights?