Last Updated on March 24, 2024
Most AVR chips (microcontrollers) have an internal temperature sensor, hence we can use this option to get temperature range in rare condition, this might show higher than external temperature. Before step into Arduino Internal temperature Sensor experiment make sure your Arduino board micro controller have internal temperature sensor.
List of AVR microcontrollers having internal temperature sensor given,
ATmega168A : Yes
ATmega168P : Yes
ATmega328 : Yes
ATmega328P : Yes
ATmega32U4 (Arduino Leonardo) : Yes
Refer your Arduino board chip to know about the internal temperature sensor.
The internal temperature of microcontroller varies depends on its work load.
To measure temperature in degree Celsius.
temperature = (ADCW – 324.31) / 1.22
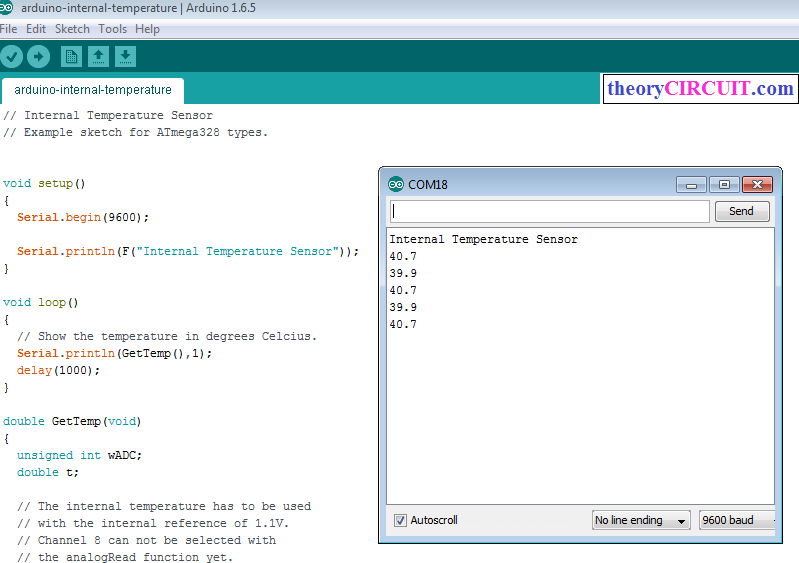
Arduino internal temperature sensor Code
// Internal Temperature Sensor
// Example sketch for ATmega328 types.
// www.theorycircuit.com
// Arduino Internal temperature sensor

void setup()
{
  Serial.begin(9600);

  Serial.println(F("Internal Temperature Sensor"));
}

void loop()
{
  // Show the temperature in degrees Celcius.
  Serial.println(GetTemp(),1);
  delay(1000);
}

double GetTemp(void)
{
  unsigned int wADC;
  double t;

  // The internal temperature has to be used
  // with the internal reference of 1.1V.
  // Channel 8 can not be selected with
  // the analogRead function yet.

  // Set the internal reference and mux.
  ADMUX = (_BV(REFS1) | _BV(REFS0) | _BV(MUX3));
  ADCSRA |= _BV(ADEN);  // enable the ADC

  delay(20);            // wait for voltages to become stable.

  ADCSRA |= _BV(ADSC);  // Start the ADC

  // Detect end-of-conversion
  while (bit_is_set(ADCSRA,ADSC));

  // Reading register "ADCW" takes care of how to read ADCL and ADCH.
  wADC = ADCW;

  // The offset of 324.31 could be wrong. It is just an indication.
  t = (wADC - 324.31 ) / 1.22;

  // The returned temperature is in degrees Celcius.
  return (t);
}
Steps to Use Arduino Internal Temperature Sensor:
Step 1: Check the Arduino board Chip about Internal temperature sensor.
Step 2: Connect Arduino with system.
Step 3: Upload the Arduino code for Internal temperature sensor.
Step 4: Obtain the temperature reading in Arduino Serial Monitor.
Prototype


how to calculate temperature offset value??explain in detail…
I used a digital thermometer on the Pro Mini chip and changed the 324.31 value untill the arduino read a temp close enough to the thermometer. In my case it was 328.31
Quite nice.
Please note ADSC will return to 0 at the end of a conversion, but before ADCL/ADCH registers are written, according to datasheet p 218.
On the other hand, ADIF will be set to 1 after the conversion result is written to registers.
Hi Vinz
Thank you for the clarification! You’re absolutely right. As per the datasheet (page 218), ADSC (ADC Start Conversion bit) will automatically reset to 0 when the conversion completes, signaling that the conversion process is finished. However, this occurs before the result is transferred to the ADCL/ADCH registers.
Additionally, ADIF (ADC Interrupt Flag) gets set to 1 only after the conversion result has been successfully written into the ADCL/ADCH registers. This behavior ensures that the interrupt flag isn’t raised until the result is ready to be read, preventing premature reads or race conditions.