
Last Updated on March 16, 2024
Making USB Rechargeable Mini Fan Circuit is Very easy than you think, Of course its funny yet very useful in different ways. It can be used as Tiny firewood blower in your camping, to dry something and
the breeze blower during hot sessions etc.., Use the Propeller Guard and handle with precaution during ON condition.
This Circuit constructed with different elements, after completing connections, use plastic box or cardboard to cover the electronic elements and leave proper space for plastic propeller.
Circuit Diagram

Components List
- Class A USB Cable
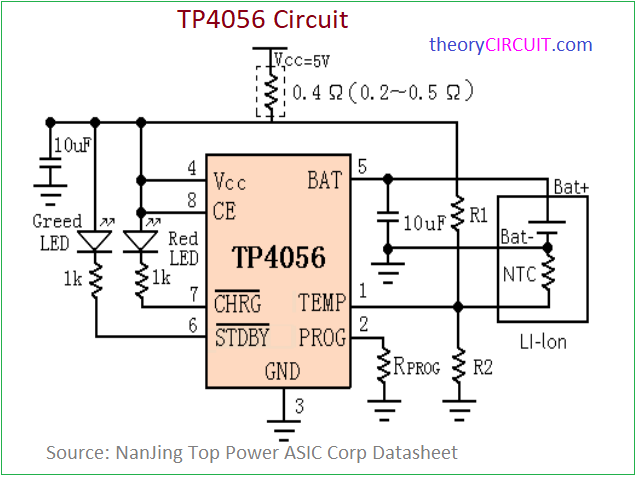
- TP4056 module
- ICR 18650 3.7V 2000mAh 7.4Wh Lithium Ion Rechargeable Battery Cell Flat Top
- Hobby DC Motor 3V to 6V Range.
- ON/OFF Switch
- Plastic Propeller8
Construction & Working
Starting with USB Cable, cut and remove sleeve and Take Red (+5V) and Black (Gnd) wire from the USB Cable, Trim the Green and White wires and make sure that two are not shorted. Bring Red Wire and Solder it on the + Terminal of TP4056 Module and Connect Black Wire at the – Terminal of TP4056 module, the TP4056 is a popular lithium-ion battery charger IC that has been used in various electronic applications. The TP4056 is specifically designed for single-cell lithium-ion or lithium polymer rechargeable batteries. It provides a reliable and efficient charging solution, incorporating features like overcharge protection, over-discharge protection, and short-circuit protection. Its compact size and low external component count make it suitable for integration into various projects.
At the output Terminal of TP4056 Module B+ (Battery +) and B- (Battery -) Connect an ICR 18650 3.7V 2000mAh 7.4Wh Lithium Ion Rechargeable Battery Cell. Connect Load, that is Hobby DC Motor + Terminal at the Out + and – Terminal at the Out -, Check the motor rotating direction before soldering the terminals with battery charger module. Connect ON/OFF switch between Negative or Positive terminal of Motor.
By connecting the USB cable to computer or laptop or any other USB port we can charge the batter and two LEDs in the module indicates the status of battery charging and we are ready to go fun with mini fan.
Steps to Follow
- Use any +5V/500mA power source to power the Battery charger module. (Here we use USB)
- Connect the 3.7V Li-ion 18650 battery in proper polarity (Bat+ to +V) and (Bat- to -V).
- Connect the Hobby DC Motor at the Out+, Out- terminals.
- Use any ON/OFF switch to control the DC Motor.
Handle Li-ion Batteries with extra Care, Never short terminals of battery, don’t overcharge or overheat it may lead to thermal runaway, igniting the cell’s internal materials and forcibly expelling burning contents, resulting in fires, explosions, serious injuries.
موقع الكتروني جيد جدا
شكرًا لك