
Last Updated on October 13, 2024
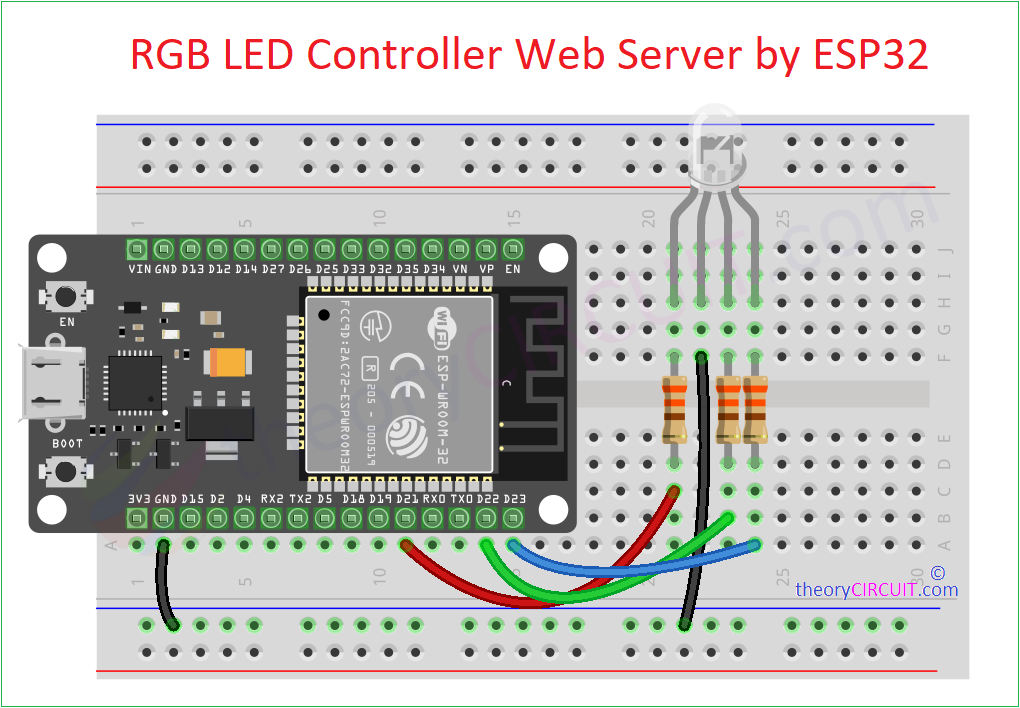
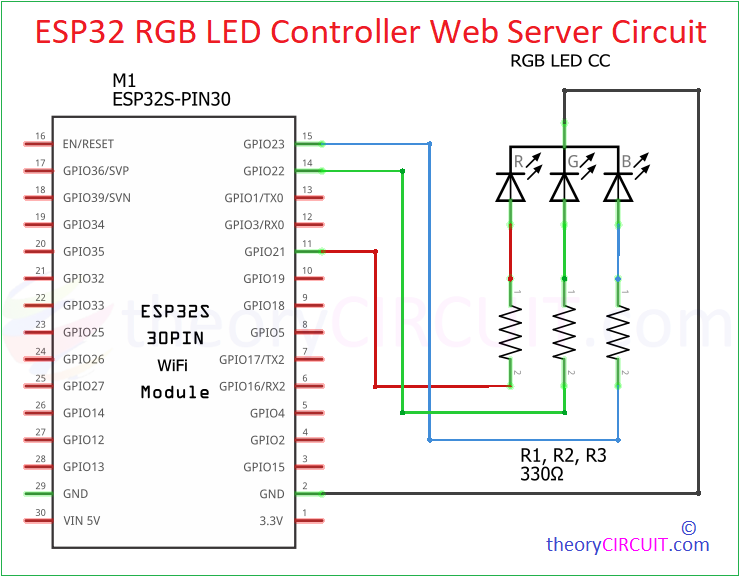
RGB LED Web server using ESP32 board helps you to control output color of connected RGB LED by choosing from color spectrum. Here we have used Common Cathode RGB LED and made Arduino Code for it. As we know this LED have three primary color semiconductor chip like Red, Green and Blue. Each color channel terminal of RGB LED is connected with ESP32 PWM enabled pins (here GPIO 21, 22, 23) and common Ground pin is connected with Gnd.
A simple color picker user Interface is made by using HTML language, and it is fetched to ESP32 memory through Arduino Code. After uploading code, When the Wi-Fi connected to ESP32 (you have to Enter Wi-Fi Name and Password in Arduino Code), then it will show the connection status and IP address of Web user interface in serial monitor of Arduino IDE. If it is not showing press EN (enable) button of ESP32 board.
In browser of end device, By choosing & clicking set color button, the value of color (Hex Code) is read by ESP32 via Wi-Fi connection and respective PWM signal is generated and then given to the color channel terminals of RGB LED, so the LED glows respective color.
Circuit Diagram
Components Required
- ESP32 Dev Kit V1 (DOIT)
- Common Cathode RGB LED
- 3x 220 Ohm Resistors
- Jumper wires
- Breadboard
- System with Arduino IDE
- USB Cable (micro b)
- Wi-Fi
Working Video
Arduino Code
#include <WiFi.h>
#include <WebServer.h>

// Replace with your network credentials
const char* ssid = "Wi-Fi SSID Name";         // Enter your Wi-Fi SSID
const char* password = "Wi-Fi Password"; // Enter your Wi-Fi Password

// Set GPIOs for the RGB LED
const int redPin = 21;
const int greenPin = 22;
const int bluePin = 23;

WebServer server(80);

// HTML webpage as a constant global variable
const char* webpage = R"rawliteral(
<!DOCTYPE html>
<html>
<head>
<title>RGB LED Control</title>
</head>
<body>
<center>
<h2><font color="blue">theory</font><font color="Magenta">CIRCUIT</font></h2>
<h1>RGB LED Control</h1>
<p>Select a color:</p>
<input type="color" id="colorPicker" value="#ff0000">
<br><br>
<button onclick="sendRGB()">Set RGB LED Color</button>

<script>
function sendRGB() {
  var color = document.getElementById("colorPicker").value;
  var r = parseInt(color.substr(1, 2), 16);
  var g = parseInt(color.substr(3, 2), 16);
  var b = parseInt(color.substr(5, 2), 16);

  var url = "/setrgb?r=" + r + "&g=" + g + "&b=" + b;
  var xhr = new XMLHttpRequest();
  xhr.open("GET", url, true);
  xhr.send();
}
</script>
</center>
</body>
</html>
)rawliteral";

void handleRoot() {
  server.send(200, "text/html", webpage);
}

void handleRGB() {
  String redValue = server.arg("r");
  String greenValue = server.arg("g");
  String blueValue = server.arg("b");

  int red = redValue.toInt();
  int green = greenValue.toInt();
  int blue = blueValue.toInt();

  analogWrite(redPin, red);
  analogWrite(greenPin, green);
  analogWrite(bluePin, blue);

  server.send(200, "text/html", webpage);
}

void setup() {
  // Start the Serial communication
  Serial.begin(115200);

  // Initialize GPIOs for RGB LED
  pinMode(redPin, OUTPUT);
  pinMode(greenPin, OUTPUT);
  pinMode(bluePin, OUTPUT);

  // Connect to Wi-Fi
  WiFi.begin(ssid, password);
  Serial.print("Connecting to Wi-Fi");

  // Wait for the connection to establish
  while (WiFi.status() != WL_CONNECTED) {
    delay(1000);
    Serial.print(".");
  }

  // Print the local IP address once connected
  Serial.println();
  Serial.println("Connected to Wi-Fi!");
  Serial.print("ESP32 IP Address: ");
  Serial.println(WiFi.localIP());

  // Start the web server
  server.on("/", handleRoot);
  server.on("/setrgb", handleRGB);
  server.begin();
  Serial.println("Web server started!");
}

void loop() {
  server.handleClient();
}