Last Updated on March 16, 2024
Building electronic compass using HMC6343 gives lot of advantages like Heading / Tilt output, 3-axis MR Sensors, Accelerometers and a Microprocessor in a Single Package and gives A complete compass solution including compass firmware. You can find basic HMC6343 Arduino Interface and code in this article.
The HMC6343 Three-axis Compass with Algorithms module from honeywell is a fully integrated compass module. It can handle magnetic distortion also with better calibration. This module comes in LCC ( Leadless Chip Carrier ) package and its better to play with Breakout board, here we taken HMC6343 Breakout board from sparkfun for prototype.
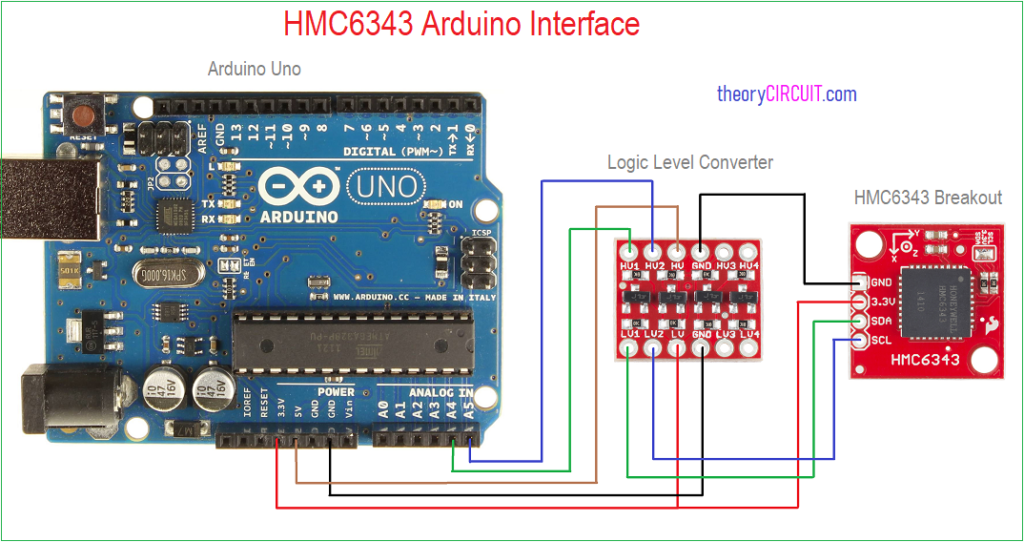
Arduino HMC6343 Hookup
Tools Need
Construction & Working
The Sensor HMC6343 works in 3.3 Volt Logic level and the Arduino UNO works in 5 Volt Logic level hence we need a Logic Level Converter Here so the Arduino UNO board and HMC6343 Breakout board Interfaced through bi-directional logic lever converter board.
| Arduino UNO — | Logic Level Converter — | HMC6343 Breakout |
| 3.3 V | LV | 3.3 V |
| GND | GND | GND |
| 5V | HV | N/A |
| SDA (A4) | <– HV1 LV1–> | SDA |
| SCL (A5) | <– HV2 LV2 –> | SCL |
After completing the Hookup upload the following Arduino Code and obtain the Compass output at serial monitor.
To connect this HMC6343 breakout board with Arduino board we need Library and you can get it here.
Arduino Code for HMC6343
// Libraries for I2C and the HMC6343 sensor
#include <Wire.h>
#include "SFE_HMC6343.h"

SFE_HMC6343 compass; // Declare the sensor object

void setup()
{
  // Start serial communication at 115200 baud
  Serial.begin(115200);

  // Give the HMC6343 a half second to wake up
  delay(500);

  // Initialize the HMC6343 and verify its physical presence
  if (!compass.init())
  {
    Serial.println("Sensor Initialization Failed\n\r"); // Report failure, is the sensor wiring correct?
  }
}

void loop()
{
  // Read, calculate, and print the heading, pitch, and roll from the sensor
  compass.readHeading();
  printHeadingData();

  // Read, calculate, and print the acceleration on the x, y, and z axis of the sensor
  compass.readAccel();
  printAccelData();

  // Wait for two seconds
  delay(2000); // Minimum delay of 200ms (HMC6343 has 5Hz sensor reads/calculations)
}

// Print both the raw values of the compass heading, pitch, and roll
// as well as calculate and print the compass values in degrees
// Sample Output:
// Heading Data (Raw value, in degrees):
// Heading: 3249  324.90°
// Pitch:   28    2.80°
// Roll:    24    2.40°
void printHeadingData()
{
  Serial.println("Heading Data (Raw value, in degrees):");
  Serial.print("Heading: ");
  Serial.print(compass.heading); Serial.print("  "); // Print raw heading value
  Serial.print((float) compass.heading/10.0);Serial.write(176);Serial.println(); // Print heading in degrees
  Serial.print("Pitch: ");
  Serial.print(compass.pitch); Serial.print("  ");
  Serial.print((float) compass.pitch/10.0);Serial.write(176);Serial.println();
  Serial.print("Roll: ");
  Serial.print(compass.roll); Serial.print("  ");
  Serial.print((float) compass.roll/10.0);Serial.write(176);Serial.println();
  Serial.println();
}

// Print both the raw values of the compass acceleration measured on each axis
// as well as calculate and print the accelerations in g forces
// Sample Output:
// Accelerometer Data (Raw value, in g forces):
// X: -52    -0.05g
// Y: -44    -0.04g
// Z: -1047  -1.02g
void printAccelData()
{
  Serial.println("Accelerometer Data (Raw value, in g forces):");
  Serial.print("X: ");
  Serial.print(compass.accelX); Serial.print("  "); // Print raw acceleration measurement on x axis
  Serial.print((float) compass.accelX/1024.0);Serial.println("g"); // Print x axis acceleration measurement in g forces
  Serial.print("Y: ");
  Serial.print(compass.accelY); Serial.print("  ");
  Serial.print((float) compass.accelY/1024.0);Serial.println("g");
  Serial.print("Z: ");
  Serial.print(compass.accelZ); Serial.print("  ");
  Serial.print((float) compass.accelZ/1024.0);Serial.println("g");
  Serial.println();
}
You can find basic and advanced example arduino code for HMC6343 in Library file.

