Last Updated on March 24, 2024
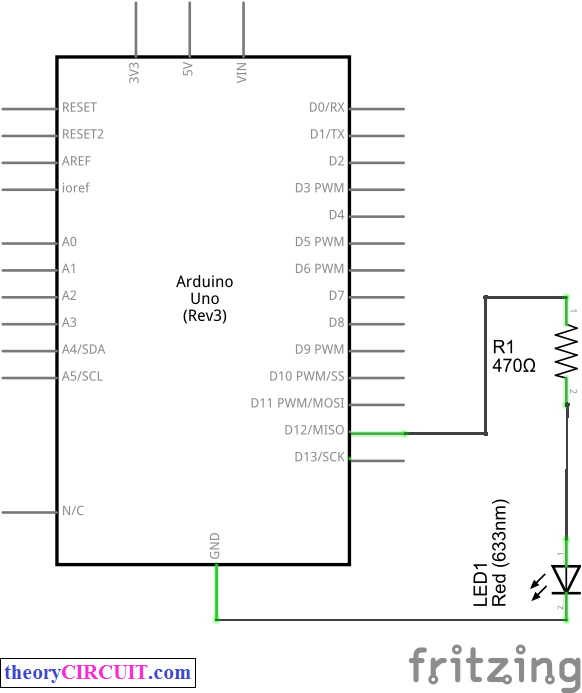
In this project we used Arduino serial monitor to command the LED On/Off and know the status of LED condition. By using simple measurement switch case codes and alpha numeric key we can drive digital pins of Arduino.
Here we programmed arduino to turn On/Off LED that is connected in digital pin 12. Then the arduino sketch reads the status of digital pin 12 and serial prints value as either “LED is now Activated or Deactivated”. You can use this concept to control any output device connected with arduino digital pin.
Arduino Code
#define LED 12
char rxChar= 0;

void setup(){
  Serial.begin(9600);
  pinMode(LED, OUTPUT);
  Serial.println("--- Command list: ---");
  Serial.println("! -> Print this HELP");
  Serial.println("o -> LED On  \"activate\"");
  Serial.println("f -> LED Off \"deactivate\"");
  Serial.println("s -> LED     \"status\"");
  Serial.flush();
}

void loop(){

  if (Serial.available() >0){
    rxChar = Serial.read();
    Serial.flush();

  switch (rxChar) {

    case 'o':
    case 'O':
  if (digitalRead(LED) == LOW){
          digitalWrite(LED,HIGH);
          Serial.println("LED turned On");
  }
        else Serial.println("LED already On!");
        break;

    case 'f':
    case 'F':
  if (digitalRead(LED) == HIGH){
          digitalWrite(LED,LOW);
          Serial.println("LED turned Off");
  }
        else Serial.println("LED already Off!");
        break;

    case 's':
    case 'S':
  if (digitalRead(LED) == HIGH)
          Serial.println("LED status: On");
        else Serial.println("LED status: Off");
        break;

    case '!':
        Serial.println("--- Command list: ---");
  Serial.println("! -> Print this HELP");
  Serial.println("o -> LED On  \"activate\"");
  Serial.println("f -> LED Off \"deactivate\"");
  Serial.println("s -> LED     \"status\"");
        break;

    default:
      Serial.print("'");
      Serial.print((char)rxChar);
      Serial.println("' is not a command!");
    }
  }
}
Prototype


can you make this for 3leds? i did try but did not succeeded
You need to connect 3 LEDs to the Arduino Pin and need to change the case for three leds in Arduino code by the way you can control 3 leds through serial command.
Yeah its late reply but every questions to be answered 🙂