Last Updated on November 11, 2025
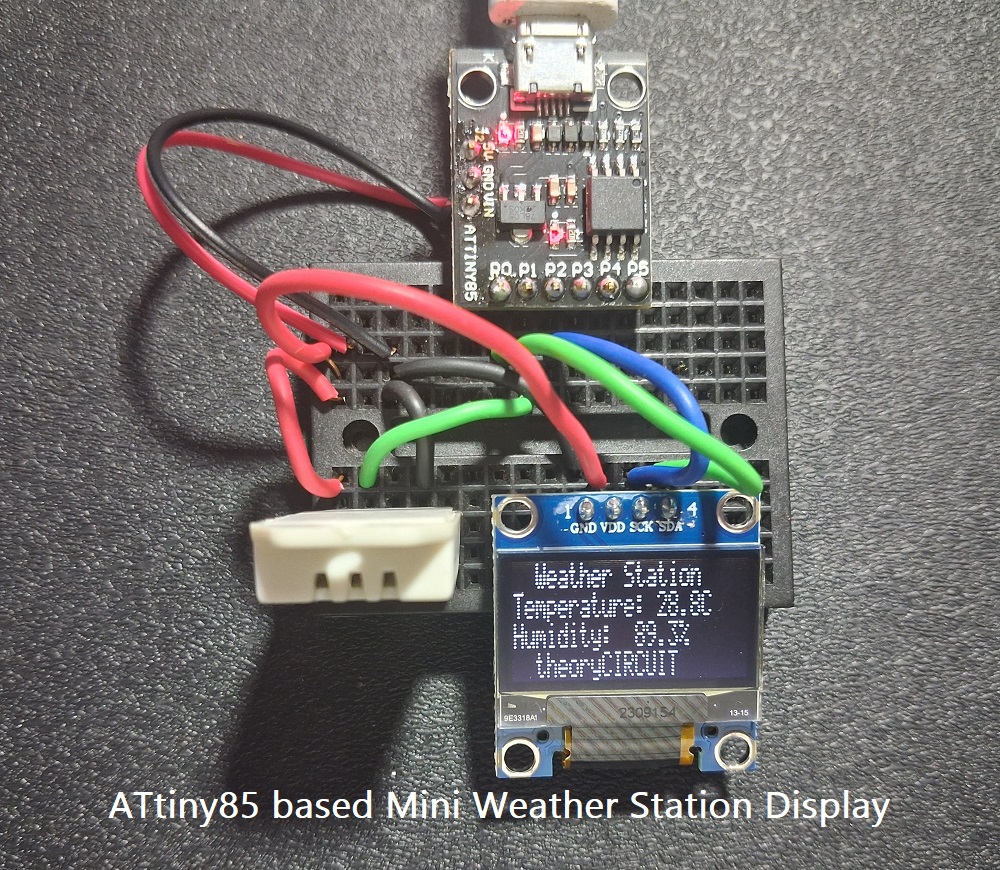
Monitoring Temperature and Humidity around us is very helpful in may ways, We can now easily build a small and compact weather station using ATtiny85 microcontroller, DHT22 sensor and 0.96″ inch SSD1306 OLED display. ATtiny85 is a tiny powerful 8 bit microcontroller in a 8 pin package and it can run in minimum power with very less components. Here we using DHT22 sensor to measure temperature and humidity and then display it on OLED screen. This setup is simple and suitable for DIY desk weather monitor and compact environment sensing.
We can code ATtiny85 Digispark board using Arduino IDE or you can use bare ATtiny85 chip with micronucleus bootloader to code it through Arduino IDE. If you are new to ATtiny85 Read here. for initial setup with Arduino IDE.
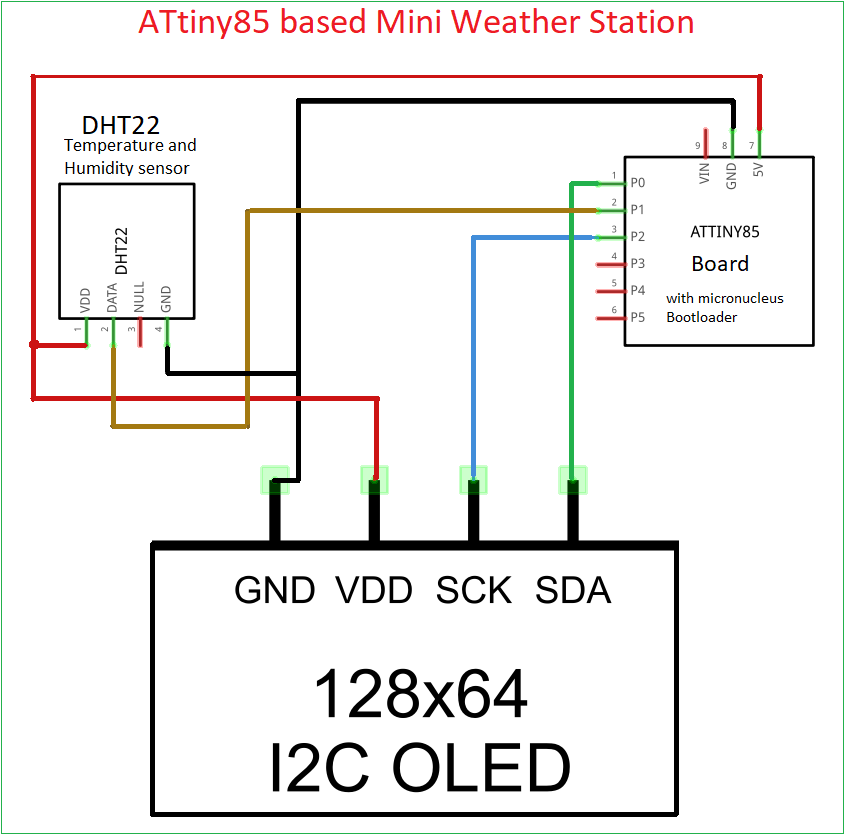
Circuit Diagram
Wiring

Components Required
- ATTiny85 Digispark board or with Micronucleus bootloader
- DHT22 Temperature & Humidity Sensor
- OLED Display 0.96″ (SSD1306, I2C)
- Jumper Wires
- Micro USB Cable ( check your ATtiny85 board )
Working Video
Construction & Working
Just connect DHT22 sensor and SSD1306 OLED display with ATtiny85 board as shown in table,
| DHT22 | ATtiny85 |
| Pin 1 (VCC) | 5V |
| Pin 2 (Data) | P1 |
| Pin 3 (X-null) | – |
| Pin 4 (GND) | GND |
| SSD1306 OLED | ATtiny85 |
| GND | GND |
| VDD | 5V |
| SCK | P2 (SCL) |
| SDA | P0 (SDA) |
DHT22
This is a digital sensor and it can sense humidity between 0% to 100% and Temperature between -40°C to +80°C. It is suitable for indoor environment applications.
After wiring just upload Arduino code without connecting ATtiny85 board with computer and then Arduino IDE will say “Now connect the Device” then connect ATtiny85 board USB to computer, Arduino code will automatically uploaded to microcontroller through virtual USB port. ATtiny85 reads data from DHT22 sensor and sends display data to OLED through I2C Pins and makes real time display temperature in degree Celsius and humidity in percentage. If there is a communication issue or wrong reading then display shows sensor error message.
ATtiny85 mini weather Station Arduino Code
/* Code by theoryCIRCUIT
for to Interface DHT22 and SSD1306 0.96" Inch I2C OLED with ATtiny85 board (digispark or with Micronucleus bootloader)
*/
#include <avr/io.h>
#include <util/delay.h>
#include <TinyWireM.h>
#include <Tiny4kOLED.h>
#include <avr/pgmspace.h>

#define DHTPIN PB1   // PB1 = Pin 6 on Digispark
#define DHT_DDR  DDRB
#define DHT_PORT PORTB
#define DHT_PIN  PINB

uint8_t data[5];

void dhtRead() {
  DHT_DDR |= (1 << DHTPIN);
  DHT_PORT &= ~(1 << DHTPIN);
  _delay_ms(18);

  DHT_PORT |= (1 << DHTPIN);
  _delay_us(40);

  DHT_DDR &= ~(1 << DHTPIN);
  while (DHT_PIN & (1 << DHTPIN));
  while (!(DHT_PIN & (1 << DHTPIN)));
  while (DHT_PIN & (1 << DHTPIN));

  for (uint8_t i = 0; i < 5; i++) {
    uint8_t result = 0;
    for (uint8_t j = 0; j < 8; j++) {
      while (!(DHT_PIN & (1 << DHTPIN)));
      _delay_us(30);
      if (DHT_PIN & (1 << DHTPIN)) result |= (1 << (7 - j));
      while (DHT_PIN & (1 << DHTPIN));
    }
    data[i] = result;
  }
}

void setup() {
  TinyWireM.begin();
  oled.begin();
  oled.clear();
  oled.on();
  oled.setFont(FONT6X8);
  oled.setCursor(12,0);
  oled.print(F("Weather Station"));
  oled.setCursor(12,3);
  oled.print(F("by theoryCIRCUIT"));
  _delay_ms(1500);
}

void loop() {
  dhtRead();

  uint16_t rawHumidity = (data[0] << 8) | data[1];
  uint16_t rawTemp     = (data[2] << 8) | data[3];

  float humidity = rawHumidity / 10.0;
  float temp = rawTemp / 10.0;

  oled.clear();

  if (data[4] != ((data[0] + data[1] + data[2] + data[3]) & 0xFF)) {
    oled.setCursor(0,0);
    oled.print(F("Sensor Error"));
  } else {
    oled.setCursor(12,0);
    oled.print(F("Weather Station"));

    oled.setCursor(0,1);
    oled.print(F("Temperature: "));
    oled.print(temp,1);
    oled.print(F("C"));

    oled.setCursor(0,2);
    oled.print(F("Humidity:  "));
    oled.print(humidity,1);
    oled.print(F("%"));

    oled.setCursor(12,3);
    oled.print(F("theoryCIRCUIT"));
  }

  _delay_ms(2000);
}
Prototype on Breadboard