Last Updated on February 5, 2026
When I started working with ESP32 microcontroller board one of the first real use sensors I picked was the DHT22 humidity and temperature sensor. We know that it is low cost, easy to interface and perfect sensor for learning about sensor data handling using microcontroller.
Few words about DHT22 sensor, it is a digital temperature and humidity sensor, it is also called as AM2302 in some datasheets. we know that this sensor gives calibrated digital output so that we don’t need to calibrate manually.
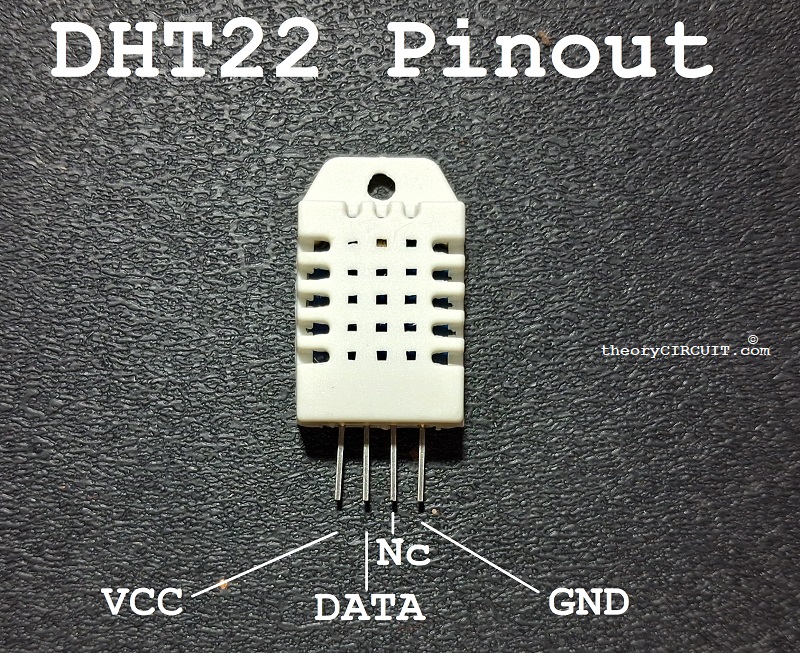
DHT22 sensor contains capacitive and humidity, seeing element and thermistor for Temperature measurement and sends digital data through single wire communication interface. You can choose either DHT11 and DHT22 but this DHT22 sensor provides high accuracy, wider temperature ranges and better humidity measurement resolution.
| DHT22 | Temperature | Humidity |
| Range | -40°C to 80°C | 0% to 100RH! |
| Accuracy | ±0.5°C | ±2% to ±5% RH |
| Resolution | 0.1°C | 0.1% RH |
It operates with 3.3V to 6V DC supply and gives output signal using single terminal, Pullup Resistor between VCC and Data terminals helps sensor use open drain communication.
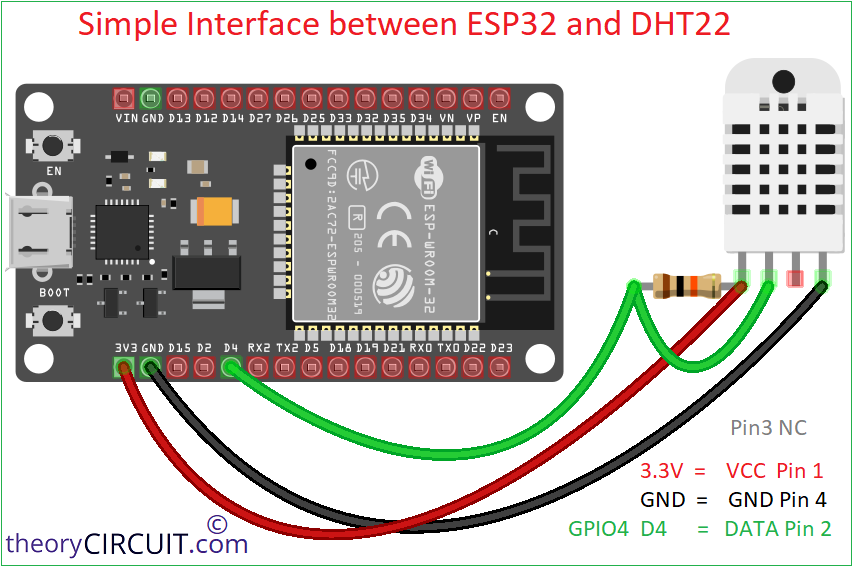
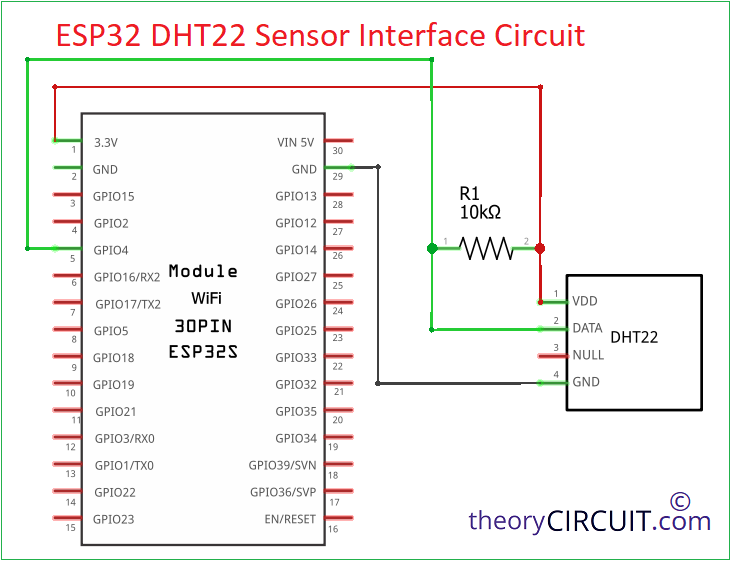
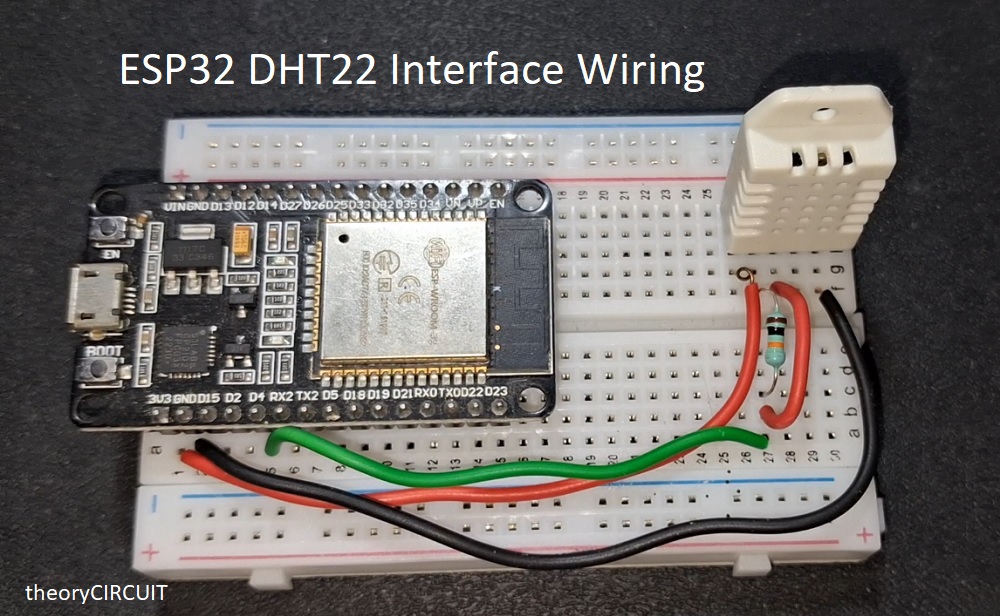
ESP32 DHT22 Wiring Diagram
Circuit Diagram
Components List
- ESP32 Development Board (here we used ESP32 DOIT Devkit V1)
- DHT22 (Digital Humidity and Temperature Sensor)
- Resistor 10KΩ
- Connecting wires
Code with Arduino IDE
If you are new to use ESP32 board in Arduino IDE then read here for Initial setup.
Before start to code ensure available of DHT sensor library in Arduino IDE, Library by Adafruit – while installing it the Unified sensor library will be installed automatically.
ESP32 DHT22 Interface Code
// Code by theoryCIRCUIT * Do Not Remove this line *
#include "DHT.h"
// DHT Configuration
#define DHTPIN 4          // GPIO pin connected to DHT22 DATA
#define DHTTYPE DHT22     // DHT22 (AM2302)

// Create DHT object
DHT dht(DHTPIN, DHTTYPE);

void setup() {
  Serial.begin(115200);
  delay(1000);

  Serial.println("ESP32 + DHT22 Test");
  dht.begin();
}

void loop() {

  // DHT22 minimum sampling period is 2 seconds
  delay(2000);

  float humidity = dht.readHumidity();
  float temperature = dht.readTemperature(); // Celsius
  float temperatureF = dht.readTemperature(true); // Fahrenheit

  // Check if any reading failed
  if (isnan(humidity) || isnan(temperature)) {
    Serial.println("Failed to read from DHT sensor!");
    return;
  }

  Serial.print("Humidity: ");
  Serial.print(humidity);
  Serial.print(" %\t");

  Serial.print("Temperature: ");
  Serial.print(temperature);
  Serial.print(" °C\t");

  Serial.print(temperatureF);
  Serial.println(" °F");
}
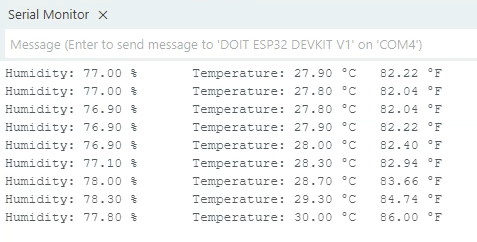
This code prints “Humidity and Temperature values” detected by DHT22 sensor on serial monitor of Arduino IDE.
Web Server to Host DHT22 Sensor using ESP32
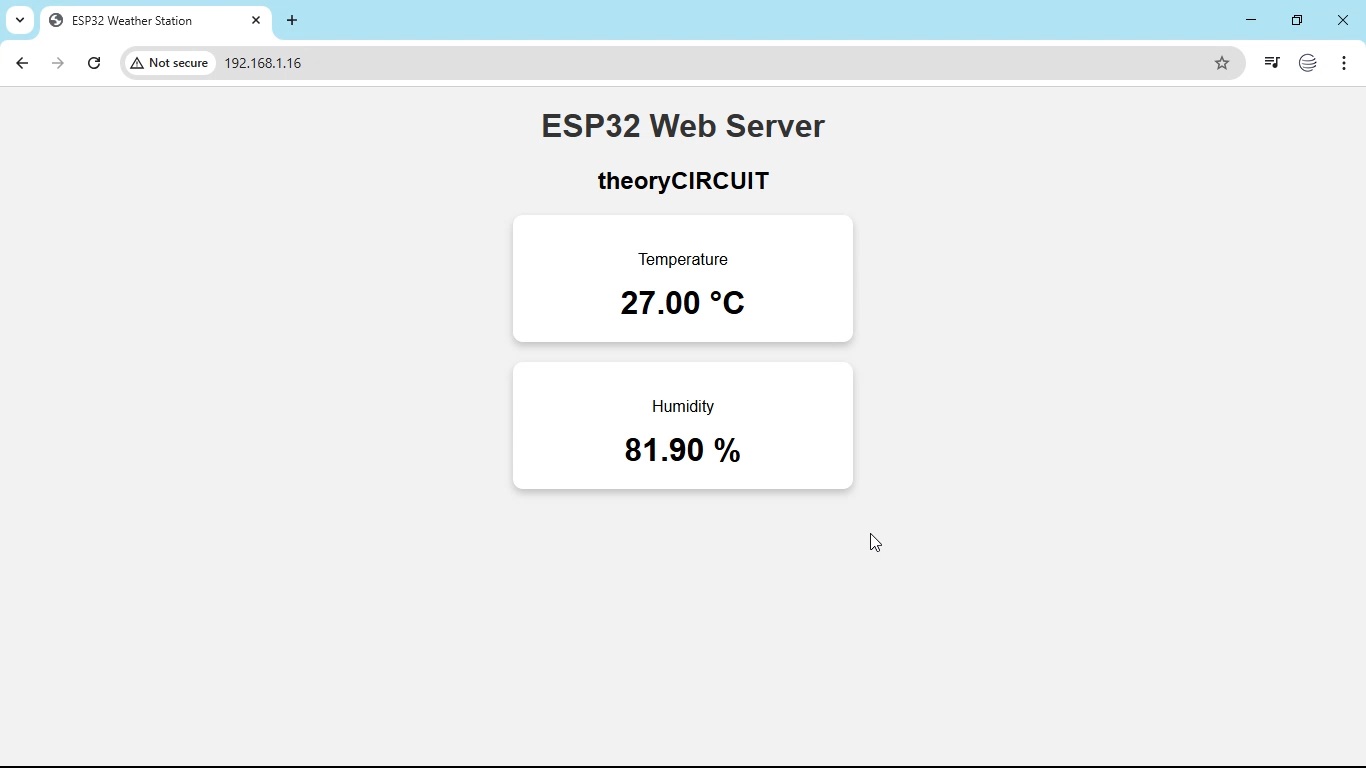
If you want to display the data remotely, then ESP32 board can act as web server, all it requires WiFi credentials in the code. After uploading the code just open serial monitor at 115200 baud rate and then note the IP address, if there is no display then press ‘EN’ button on your board and now serial monitor prints IP address. Use the same WiFi for ESP32 setup and browsing devices.
Open browser and enter the IP address, this page will refresh every 5 seconds and display fresh data.
Code
// Code by theoryCIRCUIT * Do not Remove this line *
#include <WiFi.h>
#include <WebServer.h>
#include "DHT.h"
// WiFi Credentials
const char* ssid = "YOUR_WIFI_NAME";
const char* password = "YOUR_WIFI_PASSWORD";
// DHT Configuration
#define DHTPIN 4
#define DHTTYPE DHT22
DHT dht(DHTPIN, DHTTYPE);
WebServer server(80);
// HTML Web Page
String webPage() {
float humidity = dht.readHumidity();
float temperature = dht.readTemperature();
if (isnan(humidity) || isnan(temperature)) {
humidity = 0;
temperature = 0;
}
String page = "<!DOCTYPE html><html>";
page += "<head>";
page += "<meta name='viewport' content='width=device-width, initial-scale=1'>";
page += "<meta http-equiv='refresh' content='5'>";
page += "<title>ESP32 Weather Station</title>";
page += "<style>";
page += "body{font-family:Arial;text-align:center;background:#f2f2f2;}";
page += ".card{background:#fff;padding:20px;margin:20px auto;width:300px;";
page += "border-radius:10px;box-shadow:0 4px 8px rgba(0,0,0,0.2);}";
page += "h1{color:#333;}";
page += ".value{font-size:32px;font-weight:bold;}";
page += "</style></head><body>";
page += "<h1>ESP32 Web Server</h1>";
page += "<h2>theoryCIRCUIT</h2>";
page += "<div class='card'>";
page += "<p>Temperature</p>";
page += "<div class='value'>" + String(temperature) + " °C</div>";
page += "</div>";
page += "<div class='card'>";
page += "<p>Humidity</p>";
page += "<div class='value'>" + String(humidity) + " %</div>";
page += "</div>";
page += "</body></html>";
return page;
}
// --------------------
// Handle Root Page
// --------------------
void handleRoot() {
server.send(200, "text/html", webPage());
}
void setup() {
Serial.begin(115200);
dht.begin();
// Connect WiFi
WiFi.begin(ssid, password);
Serial.print("Connecting to WiFi");
while (WiFi.status() != WL_CONNECTED) {
delay(500);
Serial.print(".");
}
Serial.println("\nWiFi connected");
Serial.print("IP Address: ");
Serial.println(WiFi.localIP());
// Start Web Server
server.on("/", handleRoot);
server.begin();
Serial.println("Web server started");
}
void loop() {
server.handleClient();
}