Last Updated on March 16, 2024

Simple Circle Running LED using Arduino Designed with easy to understand Code and Wiring. Here eight LEDs taken as test try, you can add much LEDs as you want. If you are choosing more LEDs than Arduino Digital Pins then use Shift Register ICs to extend the Arduino digital Pins.
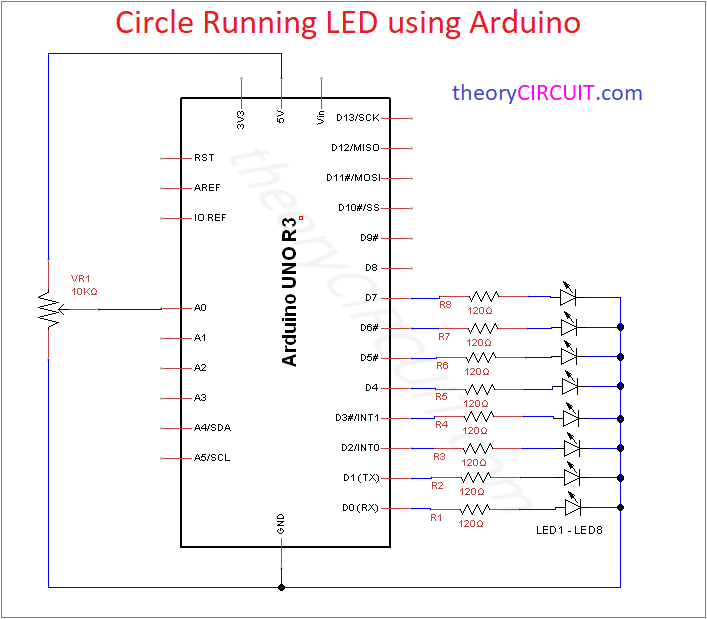
This LED chaser Arduino is so simple and easy to construct because it needs few external components only. For to control Flashing and running speed of LEDs we use 10KΩ Variable Resistor. This Variable Resistors variable end is connected with Arduino Analog pin A0 as a Input.
Connection Diagram
Components Required
- Arduino Uno (Any Arduino board) – 1
- Variable Resistor 10KΩ – 1
- Resistors 120Ω – 8
- LEDs (any color) – 8
- Connecting Wires as required
Construction & Working
Decide How many LEDs in circle? then use 120Ω Resistors and Connect the LEDs Anode pin with Resistor 120Ω terminal then connect other terminal of 120Ω Resistor to Arduino board Digital Pin. Here we connect eight LEDs with Arduino Uno (R3) you can use any Arduino board as you want, Remember to mention it on Arduino IDE before programming it. All LEDs Cathode pins are connected together with GND (Ground) pin of Arduino board.
LED Arduino Code
/* Circle Running LED using Arduino Code
 *  theoryCIRCUIT.com
 */
const byte LEDs = 8; // Number of LEDs connected to Arduino board
byte pins[] = {0, 1, 2, 3, 4, 5, 6, 7}; // Digital Pins D0 to D7 - Connected with LEDs
int var = A0; // Variable Resistor for LEDs Running Speed Control
int minSpeed = 1000; // Slow
int maxSpeed = 100;  // fast

void setup()
{
  for(int t = 0; t < LEDs; t++) {
    pinMode(pins[t], OUTPUT);
  }
  pinMode(var, INPUT);
}

void loop()
{
  for(int t = 0; t < LEDs; t++) {
    digitalWrite(pins[t], HIGH);
    int valVar = analogRead(var);
    int speed = map(valVar, 0, 1023, minSpeed, maxSpeed);
    delay(speed);
    digitalWrite(pins[t], LOW);
  }
}

