
Last Updated on February 3, 2025
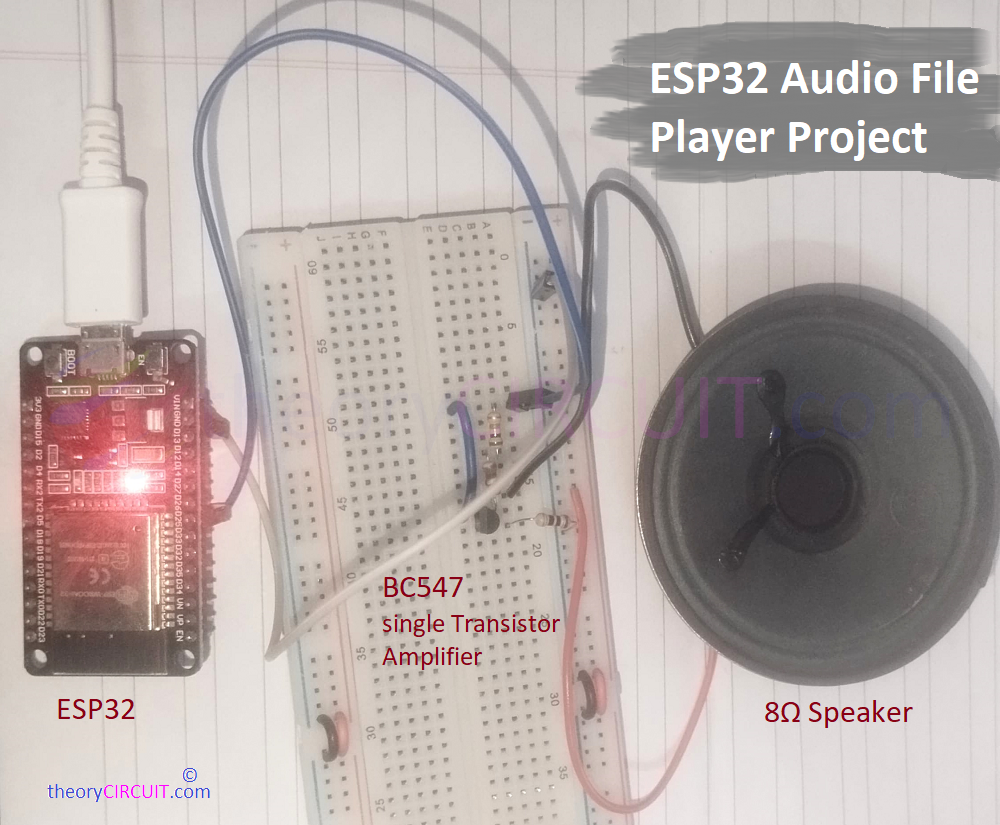
Standalone Audio players are readily available in market and its very simple to build, but if your project only needs to play few second audio or Audio file for notifications or instructions, you don’t need to build bulky and costly audio player along with project design. Instead of reading audio files from external storage use the following simple and effective solution. ESP32 Audio File Player Project utilizes an ESP32 microcontroller to convert internally stored audio data into analog signals, which are then amplified using a single BC547 transistor to drive an 8-ohm speaker.
Why we are doing this project because, most DIY audio player or audio notification projects depends on the external SD cards, external memory and DAC modules with complex coding. But this project uses ESP32 microcontroller and its internal DAC to play audio or audio file. You can try it with other microcontrollers with either internal or external DACs. Here we store Audio file (WAV) as HEX code in the memory of ESP32 through headerfile then make it play and convert as Analog signal using internal DAC and then taking analog audio output (with lower resolution) through GPIO pin (25). To make audio louder we use Single Transistor Audio Amplifier using BC547. Finally you can hear the sound from speaker while ESP32 microcontroller reads the audio file. This project perfect for lightweight applications like alarms, voice notifications, or retro sound effects.
ESP32 Audio File Player
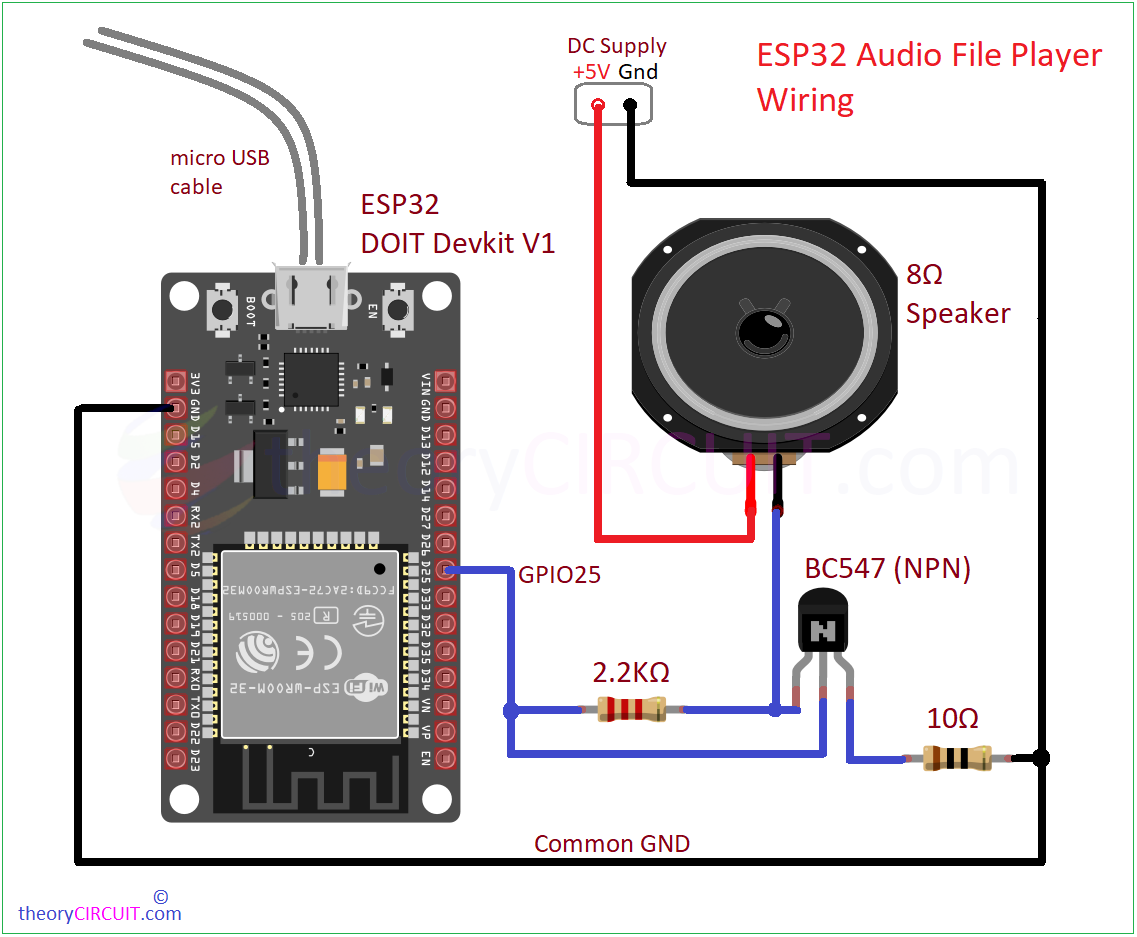
Wiring Diagram
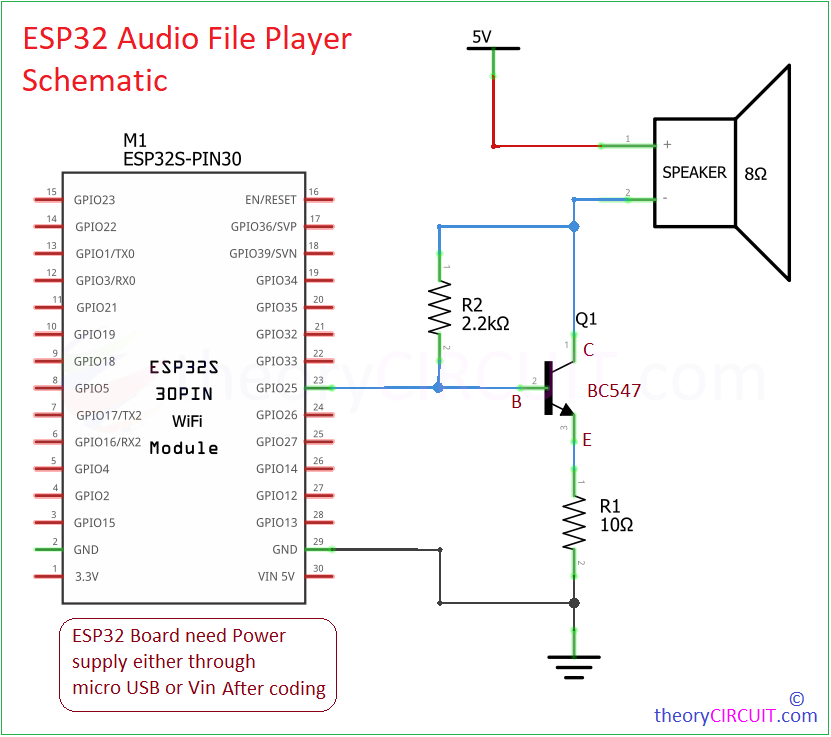
Schematic Diagram
Required Components
- ESP32 Development Board (DOIT Devkit V1)
- 8Ω Loud Speaker
- Transistor BC547 (NPN)
- Resistors 2.2KΩ, 10Ω each one
- Connecting Wires
- 5V DC power supply
- Breadboard
- Computer
Working Video
Construction & Working
The ESP32 microcontroller includes two built-in digital-to-analog converters (DACs), both of which offer 8-bit resolution. These DAC channels are typically available on GPIO25 and GPIO26. This configuration allows you to output analog voltage levels directly from the microcontroller from 0 to the reference voltage (typically 3.3V), which is especially useful for applications such as audio playback, here we used GPIO25 pin (DAC1) as audio output pin. Connected GPIO25 to the base terminal of BC547 transistor. Speaker Positive terminal is connected to the +5V Supply and negative terminal of speaker is connected to Collector terminal of transistor. Between collector and base terminal there is a 2.2KΩ Resistor used to give enough Base Voltage (VB). Emitter terminal is connected to the Ground through 10Ω Resistor.
Let’s start to make Audio File and Firmware to feed to ESP32.
ESP32 deals with only HEX code (machine level language)., so we need to convert the Audio file into HEX before that Audio File should be in .WAV format, if your audio in mp3 or any other format then you have to convert it to .WAV, here is the simple way to do it.
Open Audacity Audio Editor software and import your audio the make sure that it is in mono track, if not make it mono that is in single track, then trim it to 5 Seconds or 6 Seconds length (Because the ESP32 have little memory). Then export it in WAV format.
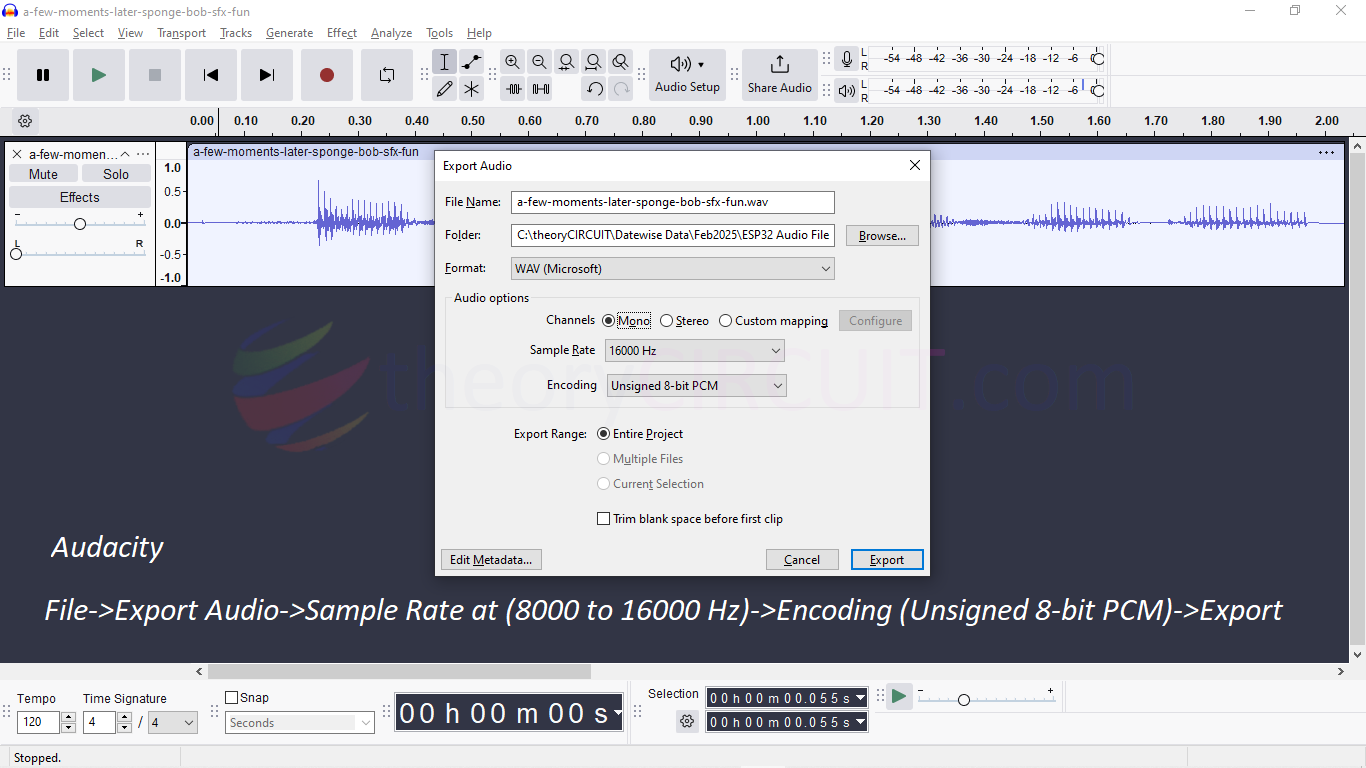
Make sure to select mono channel, Sample Rate between 8000 to 16000 Hz then Encoding as Unsigned 8-bit PCM (Because the ESP32 DAC resolution is 8 bit) and then export, Now we have the AudioFile.wav
Let’s Convert AudioFile.wav to HEX
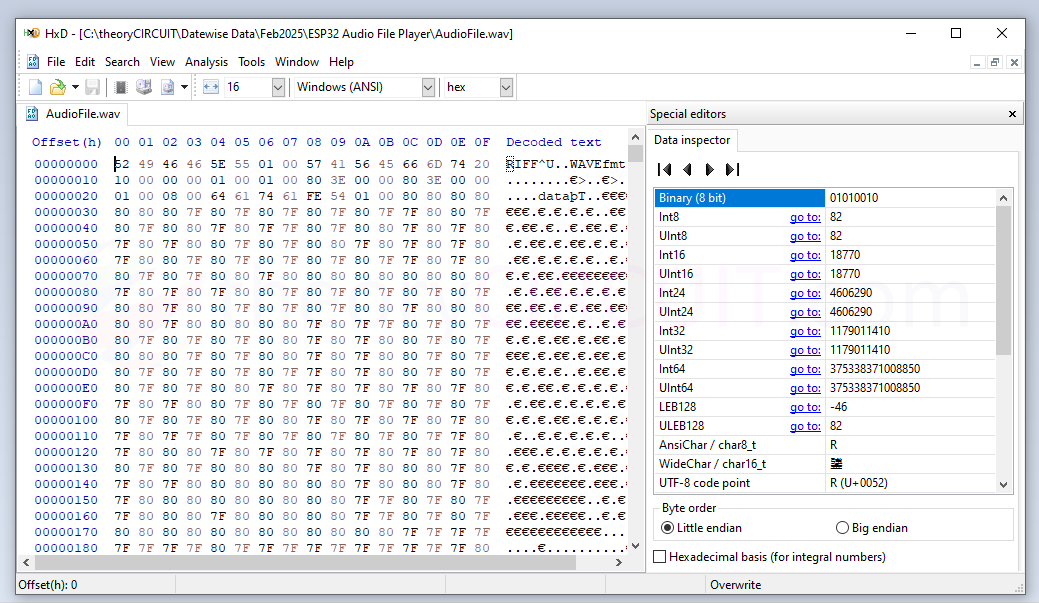
To feed the AudioFile into ESP32 we need it in HEX code format, here is the method to do it. First thing to have is HxD converter app, just download and install HxD Converter, then open the AudioFile.wav, immediately this app will convert it into HEX code.
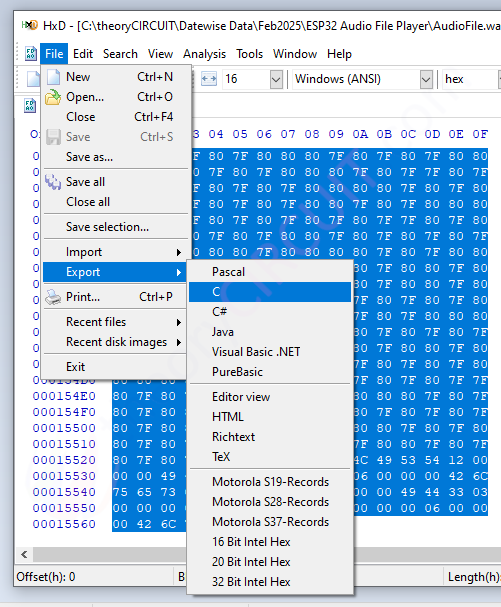
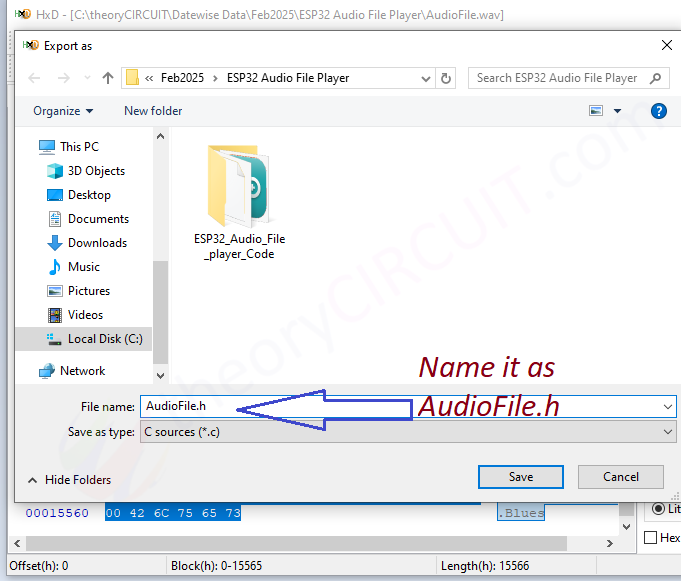
Then Export this HEX code as C and save it as AudioFile.h (this is the header file we are going to use in Aruduino IDE)
Next step is to have XTronical DAC Audio library to Play a digital WAV AudioFile or recording through code. You can get XTronical DAC Audio library here, then install it on your Arduino IDE before start coding.
Arduino Code for ESP32 Audio File Player Project
/*code from theoryCIRCUIT.com */

#include "AudioFile.h"
#include "XT_DAC_Audio.h"

XT_Wav_Class Sound(rawData);

XT_DAC_Audio_Class DacAudio(25,0);

uint32_t DemoCounter=0;

void setup() {
  Serial.begin(115200);
}


void loop() {
  DacAudio.FillBuffer();
  if(Sound.Playing==false)
    DacAudio.Play(&Sound);
  Serial.println(DemoCounter++);
}
get our AudioFile.h header file here or you can make your own.
Steps to Remember:
- Choose Audio File within 5 to 7 Seconds length.
- Make it .WAV file with mono channel, Sample Rate between 8000 to 16000 Hz then Encoding as Unsigned 8-bit PCM
- Convert this into HEX code and make it as header file like (AudioFile.h)
- Install XTronical DAC Audio library in Arduino IDE
- Upload the Code to ESP32
- Use 5V DC supply to power single transistor amplifier.
If you have any doubts you can ask in the comment section our team is happy to help you.
It seems that it doesn’t work with ESP32 from lonely binary. The error message is ‘timerAlarmEnable’ was not declared in this scope; did you mean ‘timerAlarm’?
325 | timerAlarmEnable(timer); // enable
| ^~~~~~~~~~~~~~~~
| timerAlarm
exit status 1
See this issue: https://github.com/WeekendWarrior1/XTronical_XT_DAC_Audio_Mirror/issues/11
I´ve git it work after editing teh XT_DACAudio.cpp with ArduinoIDE in the actual Verison
( ESP32DevKit4 )
Hmmm… i could not get it working to play the Sample ONLY Once – i have tryed a lot
PlayItem.Forever=true; ( or false )
PlayItem.Repeat=3;
Nothing seems to work ?
Code:
#include “AudioFile.h”
#include “XT_DAC_Audio.h”
int led = 13;
unsigned long delayStart = 0; // the time the delay started
bool delayRunning = false; // true if still waiting for delay to finish
XT_Wav_Class Sound(rawData);
XT_DAC_Audio_Class DacAudio(25,0);
void setup() {
delayStart = millis(); // start delay
delayRunning = true; // not finished yet
}
void loop() {
DacAudio.FillBuffer();
Sound.Repeat=0;
if(Sound.Playing==false)
DacAudio.Play(&Sound,false);
if (delayRunning && ((millis() – delayStart) >= 3650)) { //Sampledauer
delayRunning = false;
delay (3600000); //Wartezeit in 1000tel Sekunden (3600000=1Std)
ESP.restart(); //Restart weil sonst Mist passiert ?
}
}