
Last Updated on April 14, 2025
We know that measuring AC voltage safely is a tough job and for repeated measurement we have to be very conscious about the safety and protection. For IoT projects, Home Automation, and Energy monitoring applications we need real time AC voltage measurement. Here the AC voltage sensor ZMPT101B comes to rescue, by Interfacing ZMPT101B with ESP32 microcontroller we can enable real time monitoring of AC voltage levels and also we can serve it to other devices through web server implementation. By interfacing ZMPT101B with ESP32 we can safely monitor real time AC voltage and also web serve.
About ZMPT101B
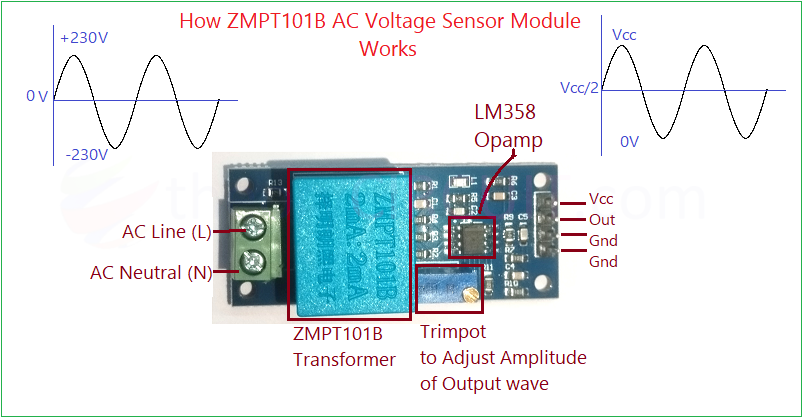
AC Voltage Sensor (ZMPT101B) is designed to measure the AC Voltage levels and convert them into a signal that can be read by microcontrollers. It provides isolated way to measure AC Voltages up to 250V, through miniature voltage transformer with 2mA:2mA current ratio. It provides Analog voltage proportional to input AC voltage. LM358 amplifier at the output stage provides adjustable gain through multiturn Trimpot. Output voltage range between 0 to 3.3V or 5V depends on the applied Vcc to sensor.
Circuit Diagram

This Circuit Involves in Handling of High AC Voltage which lethal, Handle with extreme care.
Video
Construction & Working
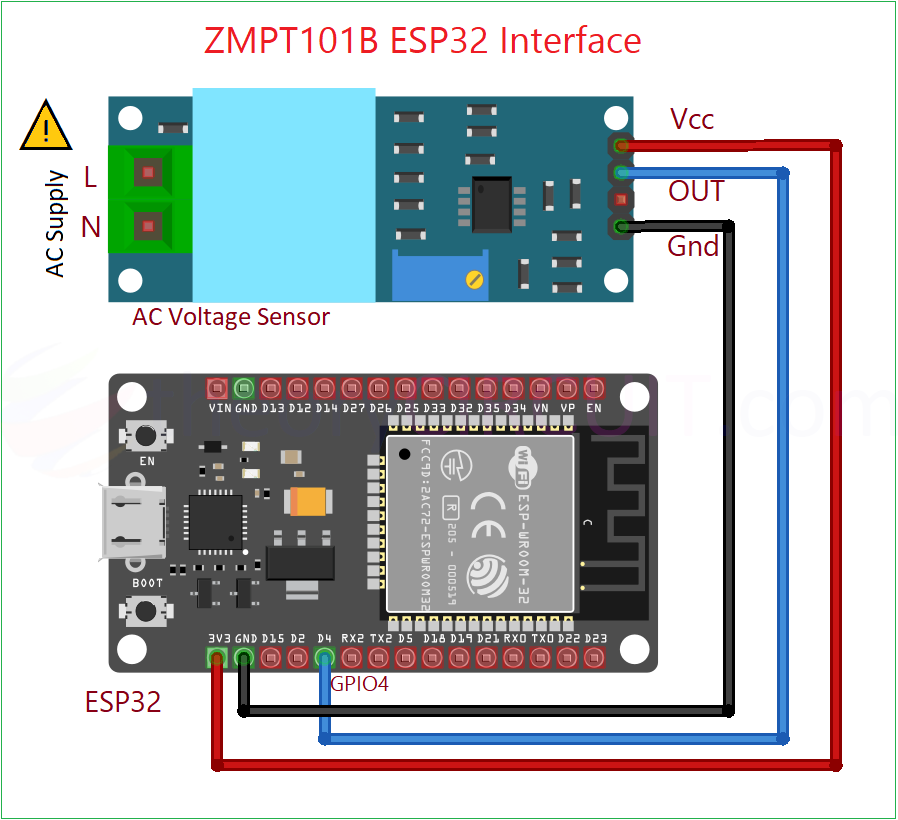
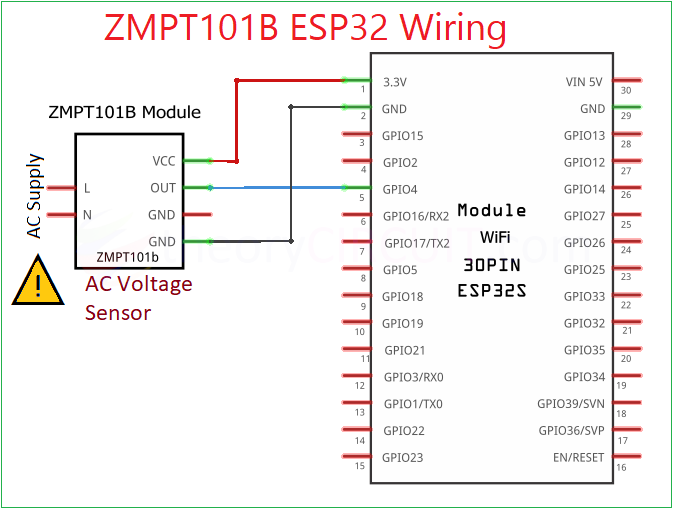
Connect ZMPT101B module with ESP32 board (here we used ESP32 DOIT Devkit V1), based on the silkscreen text of ZMPT101B sensor module. That is Vcc to 3.3V on ESP32 board, OUT pin from the sensor to GPIO4 (ADC2_0) of ESP32 (ESP32 have multiple ADC channel with 12 bit resolution), then Gnd to Gnd. Lets measure the AC voltage.
Signal Conditioning & Calibration
Here the ZMPT101B sensor module output is a varying voltage proportional to the input AC voltage like sinusoidal value. To measure the AC voltage we will use these values to calculate,
- Peak voltage, RMS Voltage and Approximate real-time AC level.
and also signal processing methods,
- Sampling at High rate (1KHz)
- Detecting peak voltage
- Calculating RMS
Code for reading AC Voltage
#define SENSOR_PIN 4
const int samples = 1000;
float calibration_factor = 1; // Set after manual calibration

void setup() {
  Serial.begin(115200);
  analogReadResolution(12); // 12-bit ADC (0-4095)
}

void loop() {
  float maxValue = 0;
  float minValue = 4095;
  for (int i = 0; i < samples; i++) {
    int val = analogRead(SENSOR_PIN);
    if (val > maxValue) maxValue = val;
    if (val < minValue) minValue = val;
  }

  float peakToPeak = maxValue - minValue;
  float voltage = (peakToPeak / 2.0) * (3.3 / 4095.0);
  float acRMS = voltage * 0.707 * calibration_factor;

  Serial.print("AC RMS Voltage: ");
  Serial.print(acRMS);
  Serial.println(" V");

  delay(1000);
}
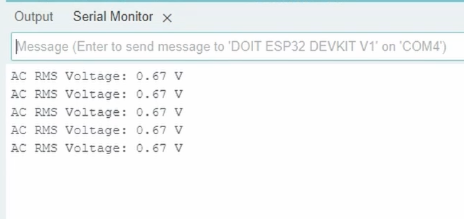
Calibration
- Now measure the AC Voltage using Multimer.
- Tune trimpot on sensor module to get desired output voltage level that suits microcontroller gpio.
- Then compare the serial monitor output with multimeter readings.
- Adjust the calibration_factor to match the actual value.
- Calibration Factor = (Multimeter readings / Serial Monitor readings)
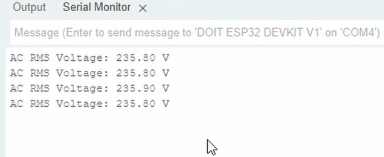
- Here we get 236V in MM and 0.67 in SM so, Calibration Factor = (236/0.67) = 352.23.
- After Adjusting from
float calibration_factor = 1;
to float calibration_factor = 352.23;
and after uploading the code to ESP32 board, now we get
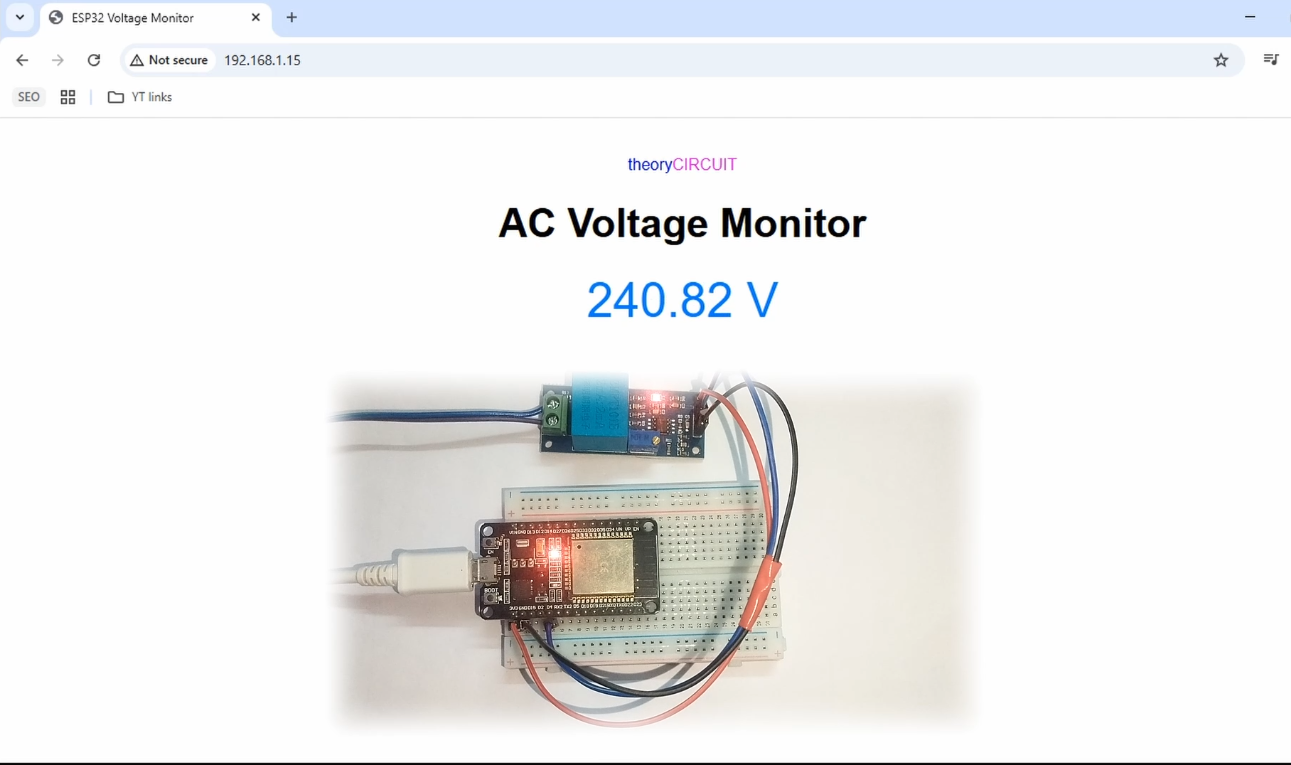
Lets Make, AC Voltage Monitoring Web Server using ESP32
GPIO4 (ADC2_0), here this pin attached internal ADC 2 can not be used when Wi-Fi is active due to internal ESP32 hardware limitations. So that we have to use ADC1 enabled pins that is GPIO 32 to GPIO 39 for Analog read when Wi-Fi is active. Here the code for ESP32 AC Voltage Web Server written with,
- WiFi Setup
- Reading data from ZMPT101B and using Calibration Factor to adjust to real voltage level
- Calculating AC RMS Voltage
- HTML lines to make live reading on a Webpage hosted on the ESP32
Code for ESP32 AC Voltage Sensor ZMPT101B Web Server
#include <WiFi.h>
#include <WebServer.h>

#define SENSOR_PIN 34
const char* ssid = "Your SSID Name"; //Put your wi-fi nam
const char* password = "Your Wi-Fi Password"; //put your wi-fi password

WebServer server(80);

const int samples = 1000;
float calibration_factor = 352.23; // Replace with your actual factor

String getVoltage() {
  float maxValue = 0;
  float minValue = 4095;

  for (int i = 0; i < samples; i++) {
    int val = analogRead(SENSOR_PIN);
    if (val > maxValue) maxValue = val;
    if (val < minValue) minValue = val;
  }

  float peakToPeak = maxValue - minValue;
  float voltagePeak = (peakToPeak / 2.0) * (3.3 / 4095.0);
  float acRMS = voltagePeak * 0.707 * calibration_factor;

  return String(acRMS, 2);
}

void handleRoot() {
  String voltage = getVoltage();

  String html = R"rawliteral(
    <html><head>
    <meta http-equiv="refresh" content="2">
    <title>ESP32 Voltage Monitor</title>
    <style>
      body { font-family: Arial; text-align: center; padding: 30px; }
      h1 { font-size: 2.5em; }
      .value { font-size: 3em; color: #007bff; }
    </style></head><body>
    <p><span style="color: blue;">theory</span><span style="color: magenta;">CIRCUIT</span></p>
    <h1>AC Voltage Monitor</h1>
    <div class="value">)rawliteral";

  html += voltage + " V</div></body></html>";

  server.send(200, "text/html", html);
}

void setup() {
  Serial.begin(115200);
  analogReadResolution(12);
  WiFi.begin(ssid, password);
  Serial.print("Connecting to WiFi");
  while (WiFi.status() != WL_CONNECTED) {
    delay(500);
    Serial.print(".");
  }
  Serial.println("\nConnected! IP address: ");
  Serial.println(WiFi.localIP());

  server.on("/", handleRoot);
  server.begin();
  Serial.println("HTTP server started");
}

void loop() {
  server.handleClient();
}
Note:-
There are different types of ZMPT101B sensors available and some with Components value difference, read here for more details: https://forum.arduino.cc/t/warning-about-zmpt101b-voltage-sensor-modules-with-active-output/693258