Last Updated on May 12, 2025
ESP32 Microcontroller provides easy way to Interface complex sensors, with flexible coding and internal blocks. Here we are going to Interface BMP280 with ESP32 using Arduino IDE. The BMP280 is a barometric pressure sensor which can sense temperature also, by calculating pressure we can detect Altitude. By interfacing this sensor with ESP32 we can build simple weather station, IoT web server, weather display etc..,
BMP280
BMP280 barometric pressure MEMS sensor from Bosch comes in 8 pin LGA with metal cap package, due to its size we need breakout board, while you search for it, be careful about choosing exact sensor and pinout because, similar looking BME280 sensor also available in the market.
BMP280 Sensor Pinout
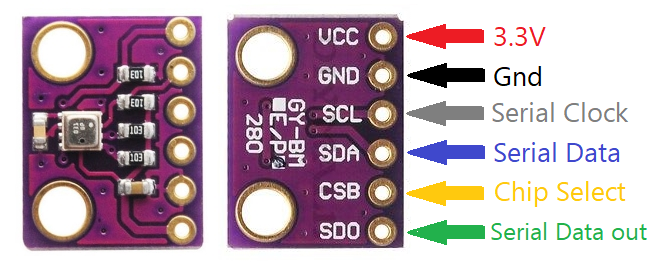
It can sense pressure from 300 to 1100 hPa, then temperature from -40°C to +85°C. It provides I2C and SPI interface for communication, both are suitable for many microcontrollers, here we used I2C method.
“Apply only 3.3V VCC to BMP280 Sensor, Do not apply 5V VCC – It will damage the Sensor”
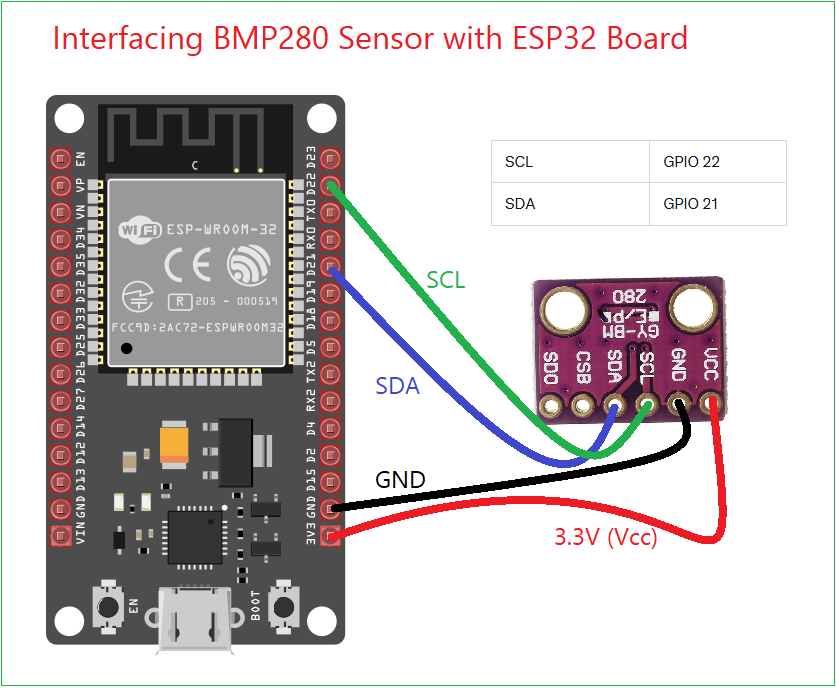
ESP32 BMP280 Sensor Wiring Diagram
Components Required
- ESP32 Development board (here we used ESP32 DOIT Devkit V1)
- BMP280 Sensor Breakout board
- Connecting Wires
- Computer with Arduino IDE
- USB A type to Micro USB cable
- Wi-Fi Network
Working Video
Interfacing BMP280 with ESP32
We know that ESP32 low cost microcontroller have built in Wi-Fi and Bluetooth capability and supports I2C/SPI interfaces and also supports Arduino Code, micro python code.
If you are new to code ESP32 using Arduino IDE Read Here… (you need to make some pre settings)
I2C provides simple Interface by using only two wires that is SDA and SCL. Just connect wires between BMP280 breakout board and ESP32 board as mentioned in the table.
| BMP280 Pin | ESP32 Pin | Description |
|---|---|---|
| VCC | 3.3V | Power supply (1.8–3.6V) |
| GND | GND | Ground |
| SCL | GPIO 22 | Serial Clock (I2C) |
| SDA | GPIO 21 | Serial Data (I2C) |
Make sure that you have connected exact pins, If your BMP280 breakout board only have four pins (I2C) just make all wiring, If your BMP280 sensor breakout board have additional pins like CSB and SDO then leave them unconnected for I2C mode.
After presetting Arduino IDE for ESP32, just connect ESP32 board with computer using USB cable (micro) and note the COM x port number and then select your port and ESP32 board type in Arduino IDE.
Simple BMP280 ESP32 Arduino Code
/*theoryCIRCUIT*/
#include <Wire.h>
#include <Adafruit_BMP280.h>

Adafruit_BMP280 bmp; // I2C interface

void setup() {
  Serial.begin(115200);
  Serial.println(F("BMP280 Test"));

  // Initialize BMP280
  if (!bmp.begin(0x76)) { // Default I2C address is 0x76
    Serial.println(F("Could not find a valid BMP280 sensor, check wiring!"));
    while (1);
  }

  // Configure BMP280 settings
  bmp.setSampling(Adafruit_BMP280::MODE_NORMAL,     // Operating mode
                  Adafruit_BMP280::SAMPLING_X2,     // Temperature oversampling
                  Adafruit_BMP280::SAMPLING_X16,    // Pressure oversampling
                  Adafruit_BMP280::FILTER_X16,      // Filtering
                  Adafruit_BMP280::STANDBY_MS_500); // Standby time
}

void loop() {
  // Read temperature (°C)
  Serial.print(F("Temperature = "));
  Serial.print(bmp.readTemperature());
  Serial.println(" *C");

  // Read pressure (Pa)
  Serial.print(F("Pressure = "));
  Serial.print(bmp.readPressure());
  Serial.println(" Pa");

  // Read altitude (meters, adjust sea-level pressure as needed)
  Serial.print(F("Approx altitude = "));
  Serial.print(bmp.readAltitude(1013.25)); // Standard sea-level pressure
  Serial.println(" m");

  Serial.println();
  delay(2000); // Wait 2 seconds before next reading
}
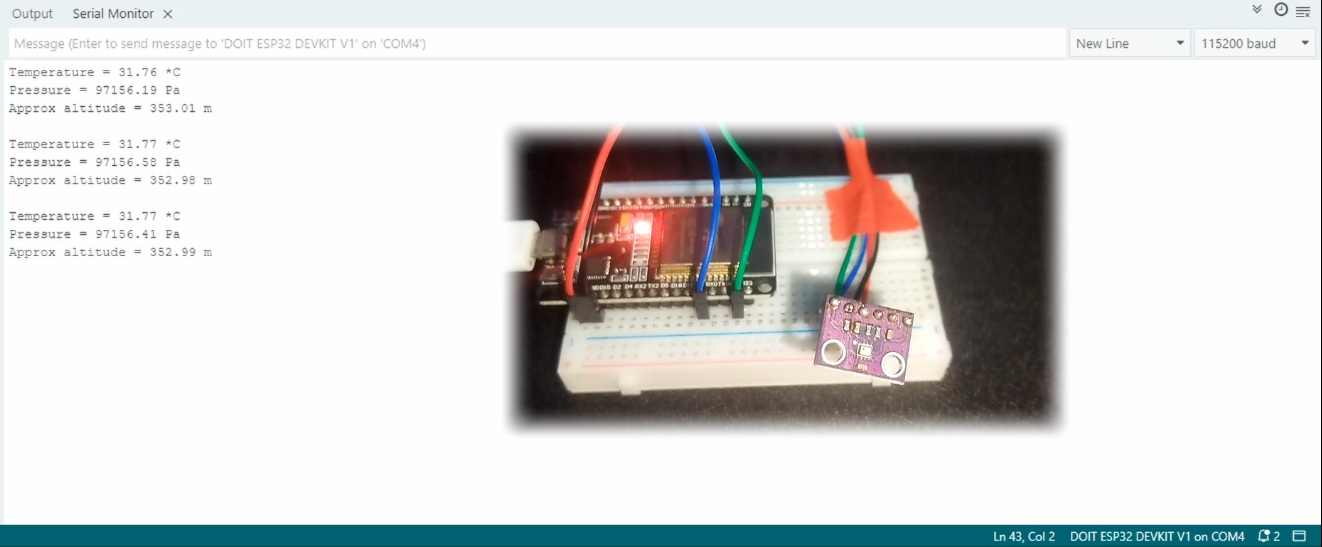
Result in Serial Monitor
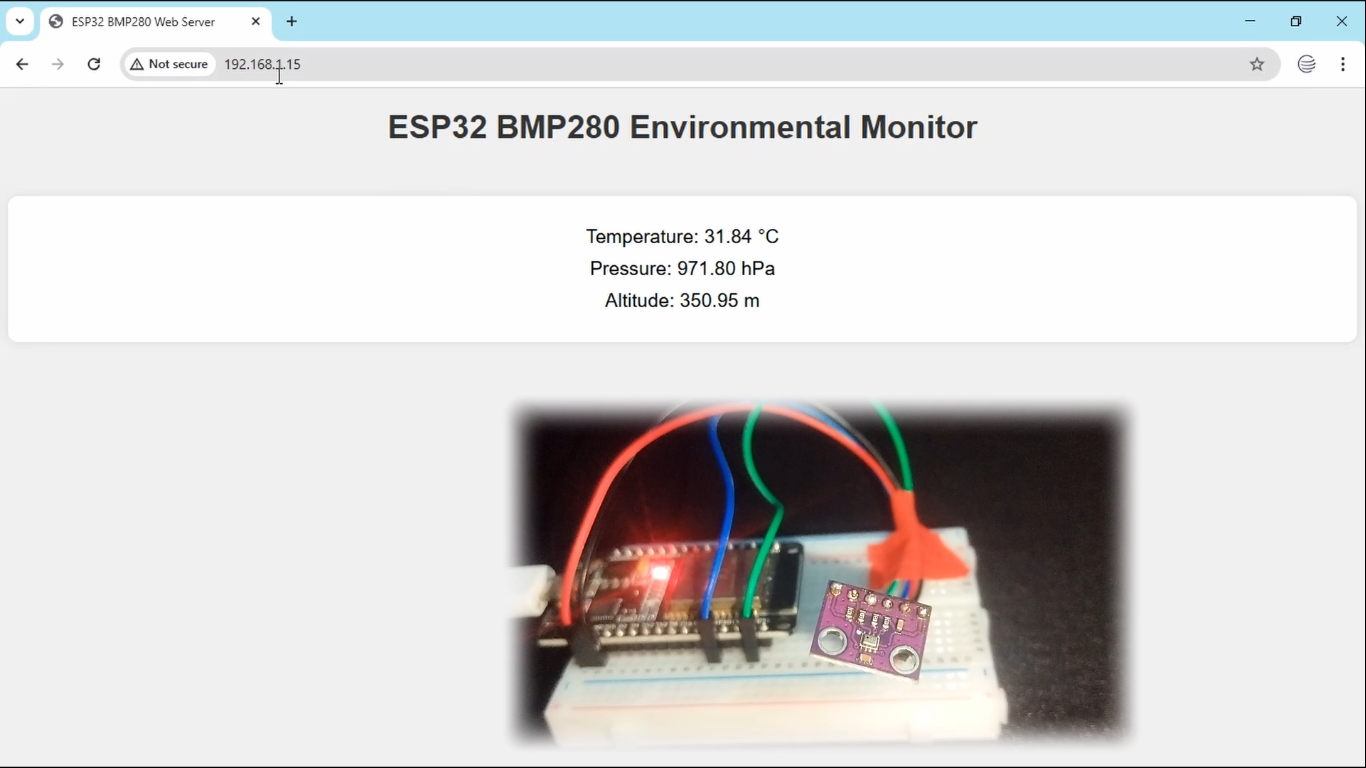
Let’s try ESP32 BMP280 Web Server
No need to change the wiring just upload the following code and then note down the IP address then open the address using any browser. (Remember, it works on same Wi-Fi Network connected devices).
/*theoryCIRCUIT*/
#include <WiFi.h>
#include <WebServer.h>
#include <Wire.h>
#include <Adafruit_BMP280.h>
// Wi-Fi credentials
const char* ssid = "Your Wi-Fi SSID Name"; // Replace with your Wi-Fi SSID
const char* password = "Your Wi-Fi password"; // Replace with your Wi-Fi password
// Initialize BMP280
Adafruit_BMP280 bmp; // I2C interface
// Initialize WebServer on port 80
WebServer server(80);
// HTML content for the web page with JavaScript for auto-refresh
String getHTML() {
String html = "<!DOCTYPE html><html>";
html += "<head><meta name='viewport' content='width=device-width, initial-scale=1'>";
html += "<title>ESP32 BMP280 Web Server</title>";
html += "<style>";
html += "body { font-family: Arial, sans-serif; text-align: center; background-color: #f0f0f0; }";
html += "h1 { color: #333; }";
html += ".container { margin: 50px auto; padding: 20px; background: #fff; border-radius: 10px; box-shadow: 0 0 10px rgba(0,0,0,0.1); }";
html += ".data { font-size: 1.2em; margin: 10px 0; }";
html += "</style></head>";
html += "<body>";
html += "<h1>ESP32 BMP280 Environmental Monitor</h1>";
html += "<div class='container'>";
html += "<p class='data'>Temperature: <span id='temperature'>--</span> °C</p>";
html += "<p class='data'>Pressure: <span id='pressure'>--</span> hPa</p>";
html += "<p class='data'>Altitude: <span id='altitude'>--</span> m</p>";
html += "</div>";
html += "<script>";
html += "function updateReadings() {";
html += " var xhr = new XMLHttpRequest();";
html += " xhr.onreadystatechange = function() {";
html += " if (xhr.readyState == 4 && xhr.status == 200) {";
html += " var data = JSON.parse(xhr.responseText);";
html += " document.getElementById('temperature').innerText = data.temperature.toFixed(2);";
html += " document.getElementById('pressure').innerText = data.pressure.toFixed(2);";
html += " document.getElementById('altitude').innerText = data.altitude.toFixed(2);";
html += " }";
html += " };";
html += " xhr.open('GET', '/data', true);";
html += " xhr.send();";
html += "}";
html += "setInterval(updateReadings, 2000);"; // Update every 2 seconds
html += "window.onload = updateReadings;"; // Load initial data on page load
html += "</script>";
html += "</body></html>";
return html;
}
// Handle root URL ("/")
void handleRoot() {
String html = getHTML();
server.send(200, "text/html", html); // Send HTML response
}
// Handle data endpoint ("/data") for JSON readings
void handleData() {
float temperature = bmp.readTemperature(); // Read temperature (°C)
float pressure = bmp.readPressure() / 100.0; // Read pressure (hPa)
float altitude = bmp.readAltitude(1013.25); // Read altitude (m), adjust sea-level pressure
// Create JSON response
String json = "{";
json += "\"temperature\":" + String(temperature, 2) + ",";
json += "\"pressure\":" + String(pressure, 2) + ",";
json += "\"altitude\":" + String(altitude, 2);
json += "}";
server.send(200, "application/json", json); // Send JSON response
}
void setup() {
// Start Serial for debugging
Serial.begin(115200);
Serial.println("BMP280 Web Server Starting...");
// Initialize BMP280
if (!bmp.begin(0x76)) { // Default I2C address is 0x76
Serial.println("Could not find a valid BMP280 sensor, check wiring!");
while (1);
}
// Configure BMP280 settings
bmp.setSampling(Adafruit_BMP280::MODE_NORMAL, // Operating mode
Adafruit_BMP280::SAMPLING_X2, // Temperature oversampling
Adafruit_BMP280::SAMPLING_X16, // Pressure oversampling
Adafruit_BMP280::FILTER_X16, // Filtering
Adafruit_BMP280::STANDBY_MS_500); // Standby time
// Connect to Wi-Fi
Serial.print("Connecting to ");
Serial.println(ssid);
WiFi.begin(ssid, password);
while (WiFi.status() != WL_CONNECTED) {
delay(1000);
Serial.print(".");
}
// Print ESP32 IP address
Serial.println("");
Serial.println("WiFi connected.");
Serial.print("IP address: ");
Serial.println(WiFi.localIP());
// Define web server routes
server.on("/", handleRoot); // Handle root URL
server.on("/data", handleData); // Handle data endpoint
// Start the server
server.begin();
Serial.println("Web server started.");
}
void loop() {
// Handle incoming client requests
server.handleClient();
}
Result in allocated IP address