
Last Updated on March 24, 2024
Temperature is the physical quantity that influences various aspects of our lives. Measuring temperature of a Equipment or Device and controlling it, is very essential for electronic or electrical system. There are many ways available for temperature sensing. Easy to implement and cost effective method is using Temperature sensor LM35 with Arduino board. This Temperature level bar graph using LM35 with Arduino project designed to indicate the temperature level in different color LED and Buzzer.
LM35
Before Arduino Wiring and Code let us recall, What is LM35 and important points to remember when we use it as a sensor with Microcontrollers.
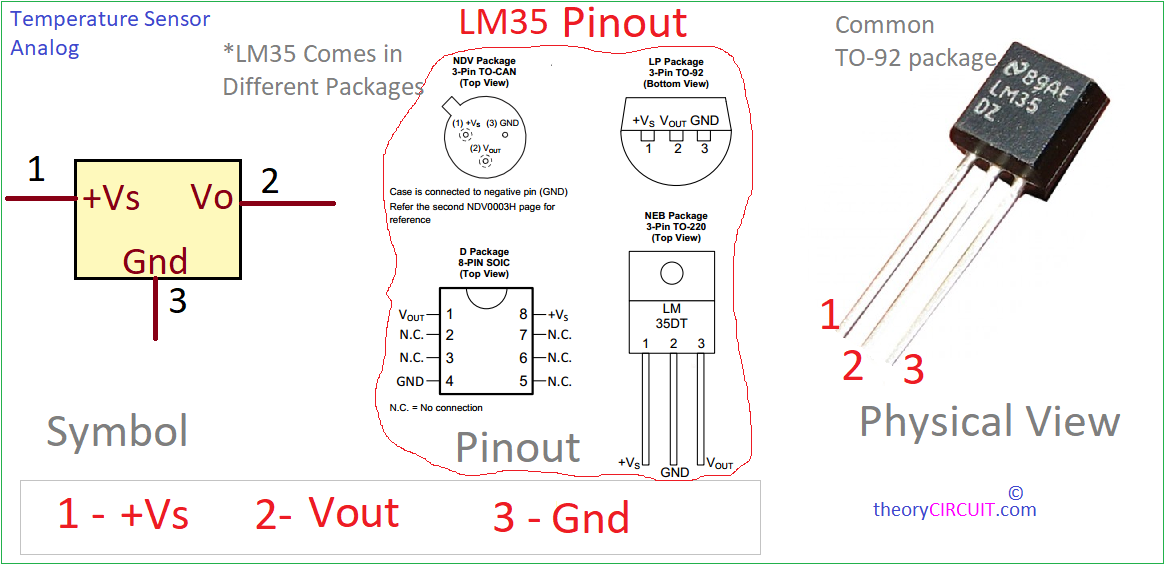
The LM35 is a widely used precision centigrade Temperature sensor from Texas Instruments. As an electronics enthusiast and engineer, you might find the LM35 utilized by many circuits, electronics systems and prototypes due to its simplicity and accuracy. This analog sensor operates on the principle that its output voltage is linearly proportional to Celsius temperature, making it convenient for various temperature monitoring applications. Its ease of use, low cost, and ability to interface directly with Analog to Digital Converters make it a favorite choice among electronic hobbyists and professionals alike. Its applications range from environmental sensing in IoT projects to thermal management in electronic devices. Given your expertise in electronic product design and embedded electronics, integrating the LM35 into your projects could enhance the precision and reliability of your temperature related applications.
This LM35 temperature sensor works without any external components, it just need 4 V to 30 V Regulated DC supply as bias. In this circuit we use +5V DC from Arduino development board. This sensor gives temperature output with accuracies of ±1/4 °C at room temperature and ±3/4°C over a full −55°C to 150°C temperature range. As this LM35 gives analog output (Linear + 10-mV/°C Scale Factor), we can directly connect output pin of LM35 to any Analog input pin of Arduino board. LM35 is can operate with single power supply or dual power supply and consumes only 60 μA for its own operation. It comes in different packages like TO-CAN (3), TO-92 (3). Here we used LM35 TO-92 from Texas Instruments.
Refer Datasheet for more Information.
Arduino Temperature Sensor LM35 Wiring
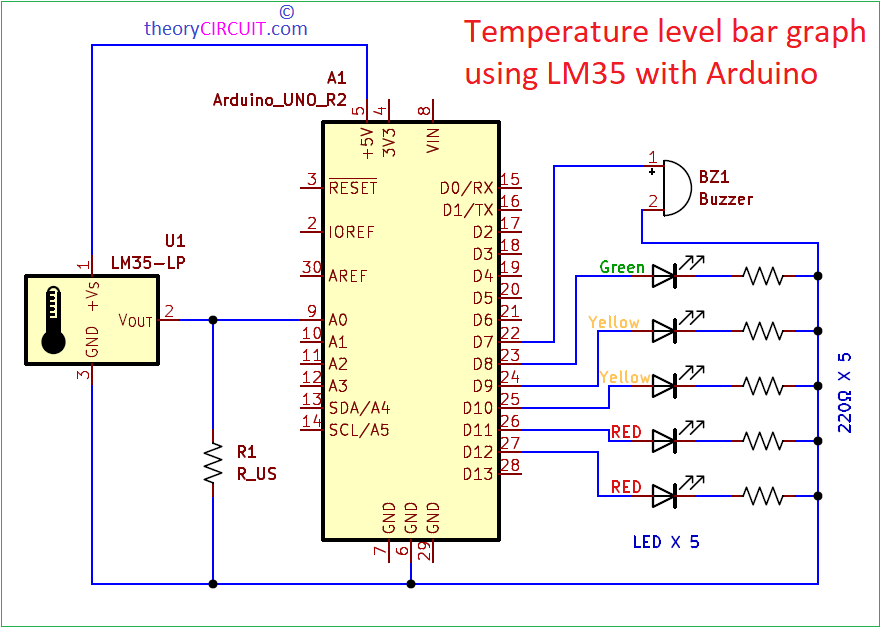
Note: R1 is 1KΩ Resistor.
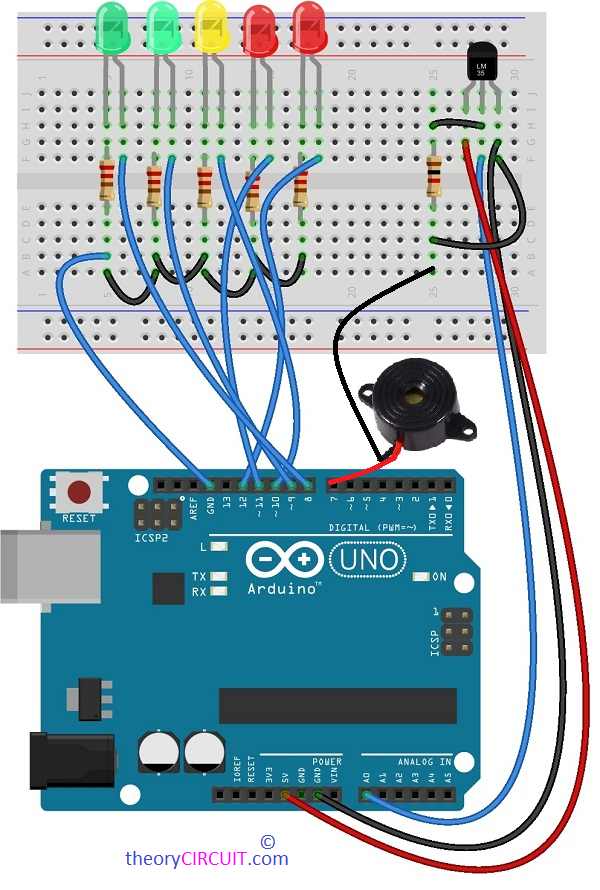
Fritzing… 😉
Components List
| S.No | Name | Quantity |
| 1. | Arduino uno | 1 |
| 2. | LED Red LED Yellow LED Green | 2, 1, 2 (As your Wish) *did you noticed |
| 3. | Resistor-220Ω, Resistor 1KΩ | 5, 1 |
| 4. | Connecting wires | as required |
| 5. | LM 35 temperature sensor | 1 |
Construction & Working
Construction of Temperature level bar graph using LM35 with Arduino is very simple, first thing you need to decide how many outputs you need and which analog pin is going to act as temperature sensor input then only you can write Arduino code according to that. Here we have chosen five LED output and Buzzer output for Highest temperature level. Analog pin A0 is going to act as sensor input pin. Here first or first level LED is going to be Green color and Last level LED is Red one. Here Analog input is taken as 0 to 255 and level of temperature dived from this value. So there is no Temperature °C conversion. If you want to include the °C conversion, refer here https://theorycircuit.com/temperatur-sensor-lm35-with-arduino/.
Lets start to frame the Arduino Code for Temperature Level Bar graph using LEDs.
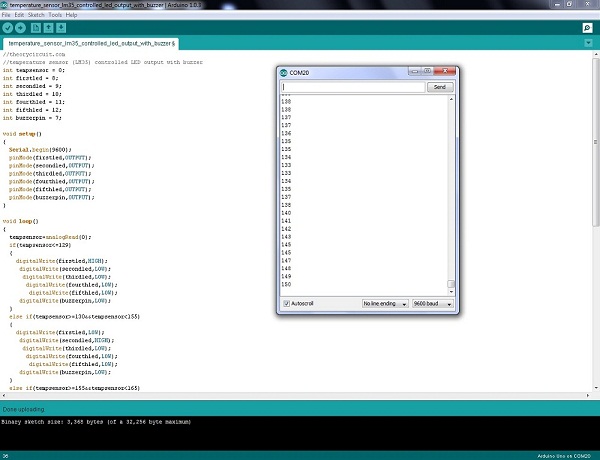
Arduino Code
//theorycircuit.com **Don't Remove this line**
//temperature sensor (LM35) controlled LED output with buzzer
int tempsensor = 0;
int firstled = 8;
int secondled = 9;
int thirdled = 10;
int fourthled = 11;
int fifthled = 12;
int buzzerpin = 7;
void setup()
{
Serial.begin(9600);
pinMode(firstled,OUTPUT);
pinMode(secondled,OUTPUT);
pinMode(thirdled,OUTPUT);
pinMode(fourthled,OUTPUT);
pinMode(fifthled,OUTPUT);
pinMode(buzzerpin,OUTPUT);
}
void loop()
{
tempsensor=analogRead(0);
if(tempsensor<=129)
{
digitalWrite(firstled,HIGH);
digitalWrite(secondled,LOW);
digitalWrite(thirdled,LOW);
digitalWrite(fourthled,LOW);
digitalWrite(fifthled,LOW);
digitalWrite(buzzerpin,LOW);
}
else if(tempsensor>=130&&tempsensor<155)
{
digitalWrite(firstled,LOW);
digitalWrite(secondled,HIGH);
digitalWrite(thirdled,LOW);
digitalWrite(fourthled,LOW);
digitalWrite(fifthled,LOW);
digitalWrite(buzzerpin,LOW);
}
else if(tempsensor>=155&&tempsensor<165)
{
digitalWrite(firstled,LOW);
digitalWrite(secondled,LOW);
digitalWrite(thirdled,HIGH);
digitalWrite(fourthled,LOW);
digitalWrite(fifthled,LOW);
digitalWrite(buzzerpin,LOW);
}
else if(tempsensor>=165&&tempsensor<180)
{
digitalWrite(firstled,LOW);
digitalWrite(secondled,LOW);
digitalWrite(thirdled,LOW);
digitalWrite(fourthled,HIGH);
digitalWrite(fifthled,LOW);
digitalWrite(buzzerpin,LOW);
}
else if(tempsensor>=180&&tempsensor<200)
{
digitalWrite(firstled,LOW);
digitalWrite(secondled,LOW);
digitalWrite(thirdled,LOW);
digitalWrite(fourthled,LOW);
digitalWrite(fifthled,HIGH);
digitalWrite(buzzerpin,LOW);
}
else if(tempsensor>200)
{
digitalWrite(firstled,HIGH);
digitalWrite(secondled,HIGH);
digitalWrite(thirdled,HIGH);
digitalWrite(fourthled,HIGH);
digitalWrite(fifthled,HIGH);
digitalWrite(buzzerpin,HIGH);
}
Serial.println(tempsensor);
delay(150);
}
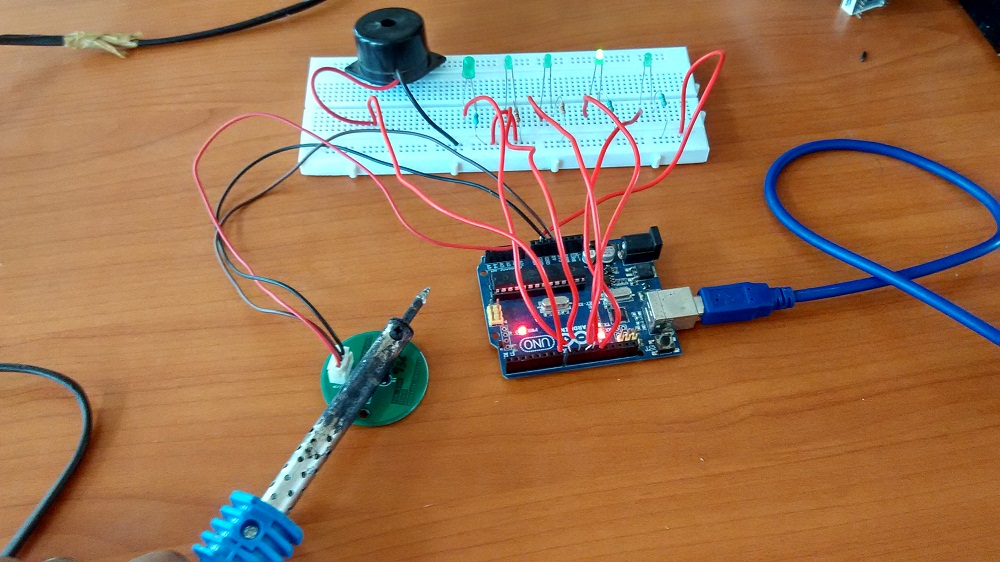
Prototype
thank you code thank you code thank you code