Last Updated on March 24, 2024
Arduino board can communicate through serial monitor of Arduino IDE, but it provides text and numeric options only. When we think about Graphical Interface and control the Visual Basic is the best one come in mind. Visual studio provides different language program support, even the visual studio Arduino IDE also available on internet.
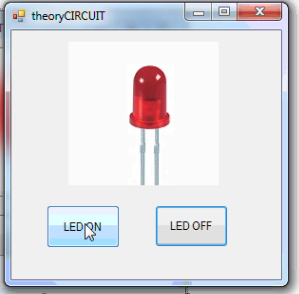
In this project I have used Microsoft Visual studio 2005, here the goal is to turn ON and turn OFF the Arduino onboard LED (D13) through one windows application.
Creating windows application through Visual basic provides best GUI (Graphical User Interface) and also it provides configurable Serial Port to control devices connected with computer.
Hardware setup
Simply connect the Arduino board with computer and there is no other hardware connections required, because this project handles the onboard LED of Arduino.
Visual Basic Program
To start the project you need visual basic software, Just create new project windows application in visual basic IDE and draw the required buttons and picture box for visual interface then name these components as given in properties.
- Button1 (text = LED ON) (Name = ButtonON)
- Button2 (text = LED OFF) (Name = ButtonOFF)
- Picturebox1 (Name = led)
- Picturebox2 (Name = ledon)
- Serial port (com11 //change as per your arduino port number)
Imports System.IO
Imports System.IO.Ports
Imports System.Threading
Public Class Form1
Shared _continue As Boolean
Shared _serialPort As SerialPort
Private Sub Form1_Load(ByVal sender As System.Object, ByVal e As System.EventArgs) Handles MyBase.Load
SerialPort1.Close()
SerialPort1.PortName = “com11” //check and change Arduino port
SerialPort1.BaudRate = 9600
SerialPort1.DataBits = 8
SerialPort1.Parity = Parity.None
SerialPort1.StopBits = StopBits.One
SerialPort1.Handshake = Handshake.None
SerialPort1.Encoding = System.Text.Encoding.Default
End Sub
Private Sub ButtonON_Click(ByVal sender As System.Object, ByVal e As System.EventArgs) Handles ButtonON.Click
led.Visible = False
ledon.Visible = True
SerialPort1.Open()
SerialPort1.Write(“1”)
SerialPort1.Close()
End Sub
Private Sub ButtonOFF_Click(ByVal sender As System.Object, ByVal e As System.EventArgs) Handles ButtonOFF.Click
led.Visible = True
ledon.Visible = False
SerialPort1.Open()
SerialPort1.Write(“0”)
SerialPort1.Close()
End Sub
End Class
Arduino Code
After completing the Visual basic design don’t forget to upload the Arduino code on board.
void setup()
{
 pinMode (13,OUTPUT);
 Serial.begin(9600);
}

void loop()
{
  int value;
  if(Serial.available())
  {
    delay(50);
    while(Serial.available() >0)
    {
      value=Serial.read();
      if(value=='1'){digitalWrite(13,HIGH);}
      else if (value=='0') {digitalWrite (13,LOW);
      }
    }
  }
}
Prototype
Design Files


Hello ,
it is possible to get a Code for wifi / WLAN Connection for arduino / visual Basic
Sending serial from VB to an ESP8266 device is performed exactly the same. I still code in VB6 but you’ll get the idea. Notice the baud rate I’ve used is 115200 so the sketch must match (Eg: Serial.begin(115200);) When the program connects to the ESP8266 (.PortOpen = True) it will reset the device. I usually have the Arduino send an acknowledgement to VB upon reset and catch it here.
‘Private Sub WemosInput()’. This double checks that you have connection and communication ability….needed for RF wireless.
On Error GoTo ESP8266Error
With ESP8266Port
.CommPort = ESP8266COM
.Handshaking = comNone
.InputMode = 0
.InputLen = 0
.RThreshold = 1
.RTSEnable = False
.Settings = “115200,n,8,1”
.SThreshold = 1
.PortOpen = True
End With
to send to the 8266
ESP8266Port.Output = “hello world”
You can even have VB read new network data from a text file and upload new SSID, Password or anything else you like to the ESP8266 on the fly. A standard Arduino sketch with blank data can then be used. It boots then waits for a serial command from VB Eg:
// network data
char* ssid = “”;
char* password = “”;
char* mqtt_server = “”;
char* topic = “”;
if (Serial.available()){ // is there a VB6 signal?
to receive input from the 8266
Private Sub ESP8266Port_OnComm()
Select Case ESP8266Port.CommEvent
Case comEvReceive ‘Received
WemosInput
‘Case comEvSend ‘if Sent packets are to be manipulated, do it here
End Select
End Sub
Private Sub WemosInput()
DataIn = ESP8266Port.Input
‘deal with input
End Sub
I hope this helps
danke, endlich ein beispiel das funktioniert hat – war sehr hilfreich
Hallo,
Thank you very much.
I can communicate with an Arduino in Processing, Python, and BASIC ( old style).
But VB I could not get to work with the serial port.
Now I can.
Thanks again. Very good program I can build upon.
Hi Henk
I’m interested in this project but will like to know how to use Visual Studio 2019 and Python to do it with Arduino UNO. Will be appreciated if you can advise.
Thank you very much.
Regards.
Hi,
I do exactly like your code by simply copy paste it.
I’m using VB in Microsoft Visual Studio 2017
error says that SerialPort1 is not declared. It may be inaccessible due to its protection level.
Error Code = BC30451.
I’d be appreciate your helping as i’m new in VB.
Thanks.
Hi,
Sorry, i just found out that i miss one step, which is not insert serial port in window form.
Thanks.
il faut inserer le petit telephone a ecran pour le port serie mscom