
Last Updated on March 16, 2024
It is Very simple to Measure the water or liquid flow by using water flow sensor YF-S201 with Arduino, this Article describes about the water flow sensor and How the water flow sensor works then how to interface water flow sensor with Arduino.
To take control on volume we need to measure, water is essential to every thing, here this article helps you to built water flow meter to measure the volume of water flow through pipelines.
How water flow Sensor Works

This illustration gives detailed working method of hall effect sensor based water flow sensor, a turbine wheel embed with magnet is placed on a closed plastic envelop and a Hall effect sensor placed, When the water flows through the pipeline, it makes the turbine wheel to rotate and hence the magnet flux interferes the hall sensor, the rate of interference is depends on the speed of water flow, so the hall effect sensor produce pulse signal output, this pulse output can be calculated as water volume.
YF-S201 water flow sensor

This water flow sensor has only three wires and it can be easily interfaced between any microcontroller and Arduino board. It requires only +5V Vcc and gives pulse output, the sensor needs to be tightly fitted between water pipeline.
Arduino Hookup
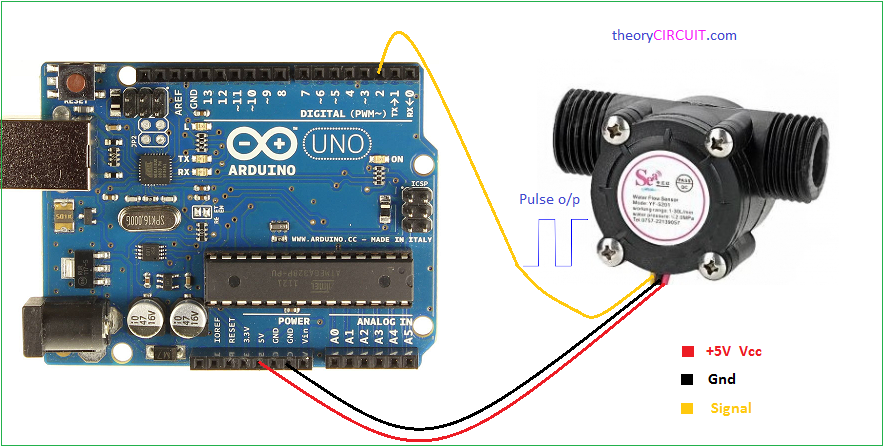
Connect the +5V wire to Arduino power pin 5V and Ground pin to Gnd then connect Signal pin to Digital pin D2, this sensor has control circuit hence there is no need for pull up resistor, some sensor requires pull up resistors refer datasheet of water flow sensor before concluding hookup.
Arduino Code for water flow meter
/*
Arduino Water flow meter
YF- S201 Hall Effect Water Flow Sensor
Water Flow Sensor output processed to read in litres/hour
*/
volatile int flow_frequency; // Measures flow sensor pulses
unsigned int l_hour; // Calculated litres/hour
unsigned char flowsensor = 2; // Sensor Input
unsigned long currentTime;
unsigned long cloopTime;
void flow () // Interrupt function
{
   flow_frequency++;
}
void setup()
{
   pinMode(flowsensor, INPUT);
   digitalWrite(flowsensor, HIGH); // Optional Internal Pull-Up
   Serial.begin(9600);
   attachInterrupt(0, flow, RISING); // Setup Interrupt
   sei(); // Enable interrupts
   currentTime = millis();
   cloopTime = currentTime;
}
void loop ()
{
   currentTime = millis();
   // Every second, calculate and print litres/hour
   if(currentTime >= (cloopTime + 1000))
   {
      cloopTime = currentTime; // Updates cloopTime
      // Pulse frequency (Hz) = 7.5Q, Q is flow rate in L/min.
      l_hour = (flow_frequency * 60 / 7.5); // (Pulse frequency x 60 min) / 7.5Q = flowrate in L/hour
      flow_frequency = 0; // Reset Counter
      Serial.print(l_hour, DEC); // Print litres/hour
      Serial.println(" L/hour");
   }
}
can i use this sensor to measure flow rate and give me results every time flow rate fluctuates?
I suggest the following :
1. Declare two variables: flowRateNew and flowRateOld
2. Measure the flow rate and put the value in flowRateNew
3. If flowRateNew is different from flowRateOld, report result
4. copy flowRateNew value onto flowRateOld variable.
Hope it helps.
Is it correct that this sensor has a internal (10kOhm) pull-up resistor?
Hey Sir , Please send me water flow sensor yf-s201 arduino library urgently required Thanx !!!
this code enough.
please help me required library for proteus simulation of yf-s201
Can this sensor be used to measure flow velocity?
Just calculate average velocity by dividing the flow by the transectional area based on the internal diameter of the tube
Thank you so much, I really appreciate your code,
Thank you very much. I would like to know when I connect 2 water flow sensors as digital pin 2 and 3, how is code changes? Thank you in advance.
How can we use it with esp32 as the controller.?
Hi.
I get an interesting effect when I have two flow sensors configured in software i.e. two interrupts setup on different pins (I’m using Wemo ESP8266 mini).
e.g. I have pin D1 and D5 on my Wemos setup as interrupts. So I have setup my software to read two separate physical flow meters. However when I have only 1 physically connected flow meter (say to pin D1) is actually setup the software still processes interrupts i.e. pulses from the other pin i.e. D5 (even though D5 has no physically connected flow sensor…only D1 has). When I do connected one to D5 (so now I have one flow meter on D1 and another on D5) all is normal and it process interrupt pulses correctly.
Can you explain why this may be the case ?
noise ! noise ! noise !
Can i use it to know is there water in pipeline. for example i want my water pump to run only when there is water in pipeline. I will set time after it pump runs if there is water, pump continue to run otherwise pump stops.
can i use this sensor for measuring the flow of water through pipe
from 1 tank (bottle) to another .its for my project
hi
i want code for flow rate sensor to calculate the total quantity and flow rate in same time
best regards
good evening
I have connected the flow meter yf-s201 with the Arduino and I’ve uploaded the code on the Arduino yet it the serial monitor keeps displaying 0 L/hour.. what can I do to rectify this problem?
Would someone advise how to prevent electromagnetic interference to affect the water sensor (with hall effect).
I have some DC pump and UV lightsource at some inches away. And the pulse signals when pumping water is not showing repeatability.
Please advise.
Helo sir can i get a code that helps the flow sensor to read the flow of pressure passing through the valve ( i mean like if the valve is completely open the sensor will detect full pressure and give out a reading of 100% likewise if its half open the sensor will detect from the pressure and give out a reading for 50% also respectively for 75% and 25%.
Hi I am using LoLin NodeMCU V3.
Your code compiles OK, but when I run it I just get the following scrolling on the print monitor. Can you advise what I am doing wrong please.
ctx: cont
sp: 3ffffef0 end: 3fffffc0 offset: 0000
3ffffef0: feefeffe feefeffe feefeffe 00000100
ack>>>
I think I have sorted it out. The interrupt definition needed ICACHE_RAM_ATTR adding in front.
I am looking at using three sensors all at the same time, just wondering what changes to the code I will have to do?
I am fairly new to Arduino and learning as I go.
Appreciate the feedback !
How to set the output to dashboard so that we can view the output in mobile. I’m using ESP8266 NODE MCU board.