Last Updated on November 1, 2024
For standalone measurement of sound or Audio level in LED, we often use LM3915 dot/bar display driver IC. Visual Audio Level Indicator by using this IC can posses the following disadvantages.
- Limited Resolution Range
- Fixed Logarithmic Scale
- It is Obsolete (limited availability)
Instead of this IC we can use any tiny Microcontrollers which have internal ADC and for more outputs we can use GPIO extender. So here we tried to build a Visual Audio Level Indicator by using ESP32 (Next try with ATtiny 85). It will be very useful for those interested in Audio Electronics.
This Audio level Indicator (VU meter) uses few LEDs (up to 6), you can extend this by your requirement. Here these LEDs will glow based on the Audio Signal Intensity (Volume). Here we use ESP32 DOIT Dev kit V1 with 30 Pins board, and Arduino IDE to program it.
Circuit Diagram
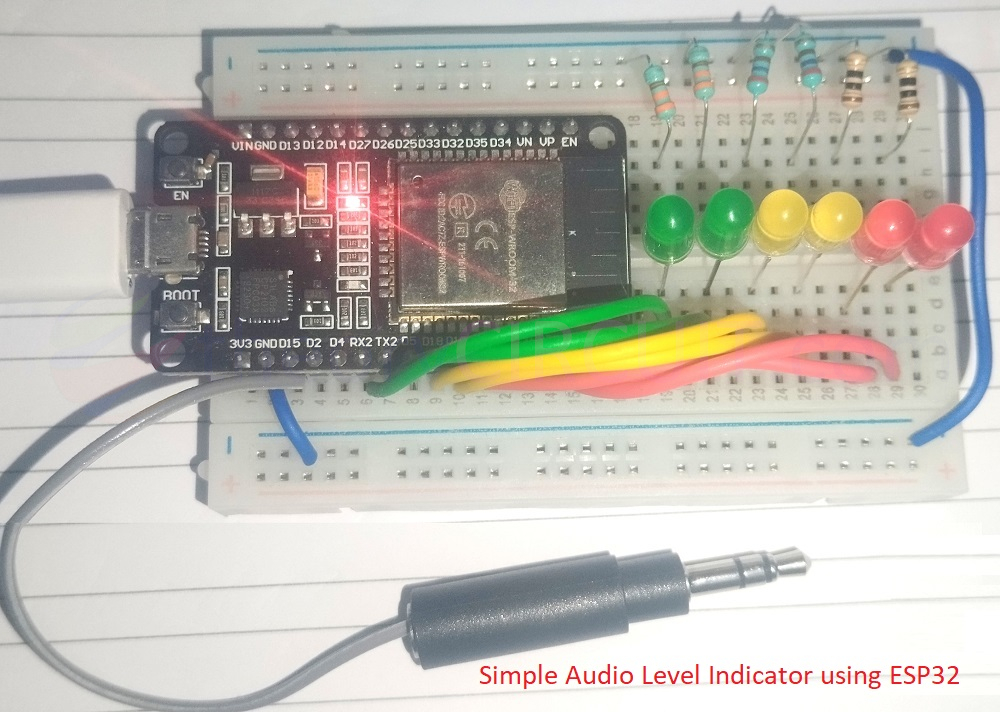
On Breadboard
Components Required
- ESP32 Development Board
- LEDs = 6
- Resistors 220Ω = 6
- Connecting wires
- Breadboard
- Audio Source
- PC with Arduino IDE
Working Video
Construction & Working
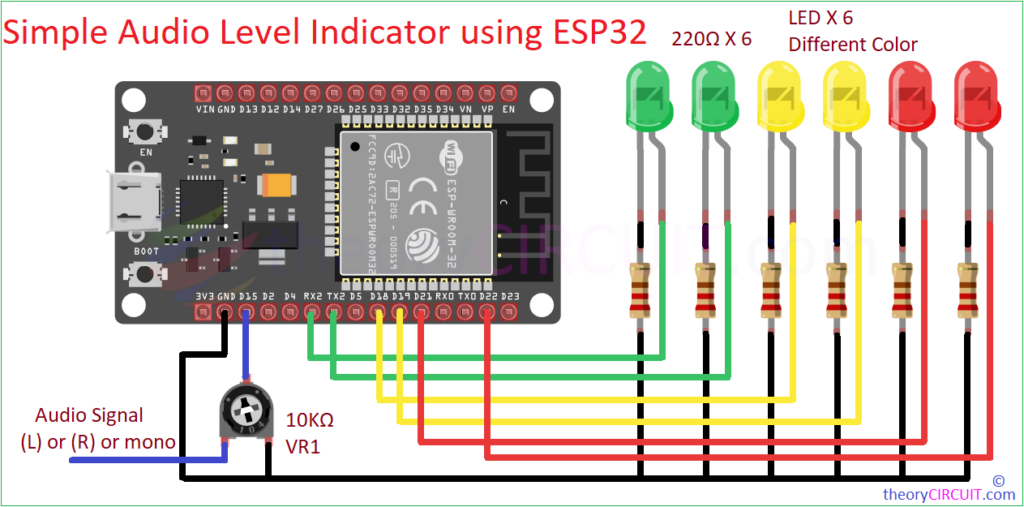
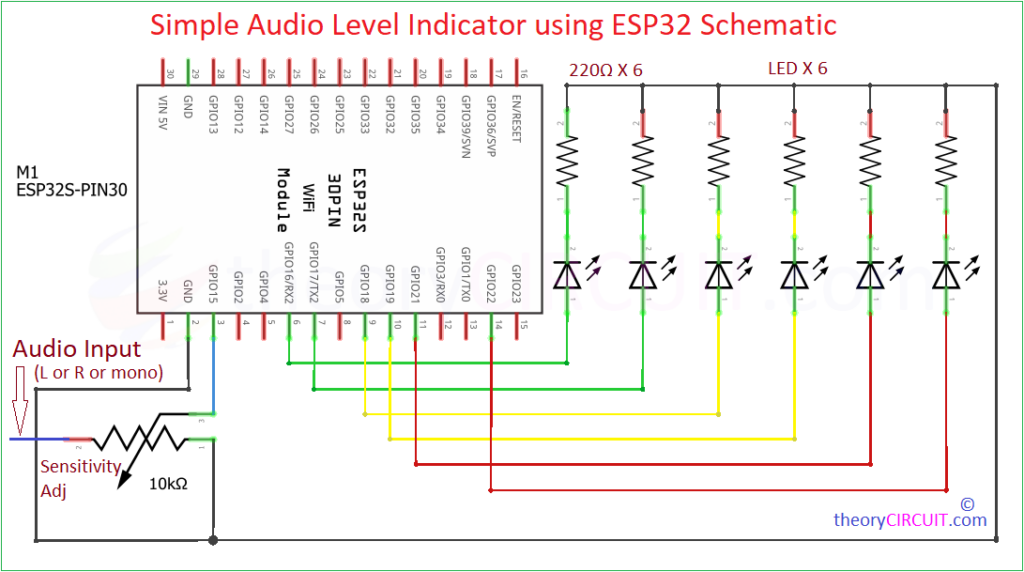
You can use any ADC pin for giving Input, here we choose GPIO15 and fed Audio Signal through Variable Resistor. You should give either Left or Right Audio as mono signal. If you want to give both, then you have to choose another Analog input GPIO pin and separate output pins for LEDs. By using 10KΩ Variable Resistor between Audio Input and GND, we can control the input sensitivity level.
Connect different color LEDs Anode terminals to ESP32 GPIO pins 16, 17, 18, 19, 21 and 22. Connect the cathode of each LED to GND through 220Ω Resistor (Here we used different range to adapt brightness) to limit current. Now its time to upload the code.
Code for VU meter using ESP32
//Simple Audio Level Indicator using ESP32 - code by theoryCIRCUIT
#include <Arduino.h>

// Define the GPIO pins for each LED
const int ledPins[] = {16, 17, 18, 19, 21, 22};
const int numLEDs = sizeof(ledPins) / sizeof(ledPins[0]);

// Define the audio input pin
const int audioPin = 15;

// Variables for adjusting the sensitivity and threshold of the VU meter
int minAudioLevel = 0;     // Minimum audio level (calibration)
int maxAudioLevel = 4095;  // Maximum ADC value (for 12-bit resolution)

void setup() {
  Serial.begin(115200);  // Begin serial for debugging

  // Initialize all LED pins as output
  for (int i = 0; i < numLEDs; i++) {
    pinMode(ledPins[i], OUTPUT);
  }

  pinMode(audioPin, INPUT);  // Set audio input pin to input mode
}

void loop() {
  // Read the audio level from the microphone
  int audioLevel = analogRead(audioPin);

  // Constrain the audio level within the defined min and max levels
  audioLevel = constrain(audioLevel, minAudioLevel, maxAudioLevel);

  // Map the audio level to the range of LEDs (0 to numLEDs)
  int ledLevel = map(audioLevel, minAudioLevel, maxAudioLevel, 0, numLEDs);

  // Turn on LEDs based on the mapped audio level
  for (int i = 0; i < numLEDs; i++) {
    if (i < ledLevel) {
      digitalWrite(ledPins[i], HIGH);  // Turn on the LED
    } else {
      digitalWrite(ledPins[i], LOW);   // Turn off the LED
    }
  }

  delay(20);  // Short delay for smoother LED transitions
}
Here GPIO15 can take audio signal from mic also. The ESP32 Reads this Audio Input. Detects the Amplitude of Audio from 0 to 4095 (maximum ADC value for 12-bit resolution). Depending on the volume level, different number of LEDs are turned ON. It provides visual indication of Audio Intensity. The higher the sound level all the LEDs glows.


