
Last Updated on July 2, 2026
Lets make Internet Clock using ESP32 and OLED Display with simple I2C wiring. Have you ever wondered if you could build a clock that automatically shows the correct time without adjusting it every time and changing time zones effortlessly. ESP32 Chip have internal RTC it can handle timing to manage task but unlike Standalone RTC with battery back this internal RTC will lose the time when the power supply interrupt occurs to ESP32. But we can connect ESP32 with WiFi network (2.5G) and get the current time from an open internet timer server called NTP (Network Time Protocol) and then display it on the OLED screen. Even after the Power interrupt, It resyncs the time and date when WiFi comes back.
This project needs only two main components as i previously said, and four jumper wires. Yes, just four wires! Let’s build it.
Wiring Diagram
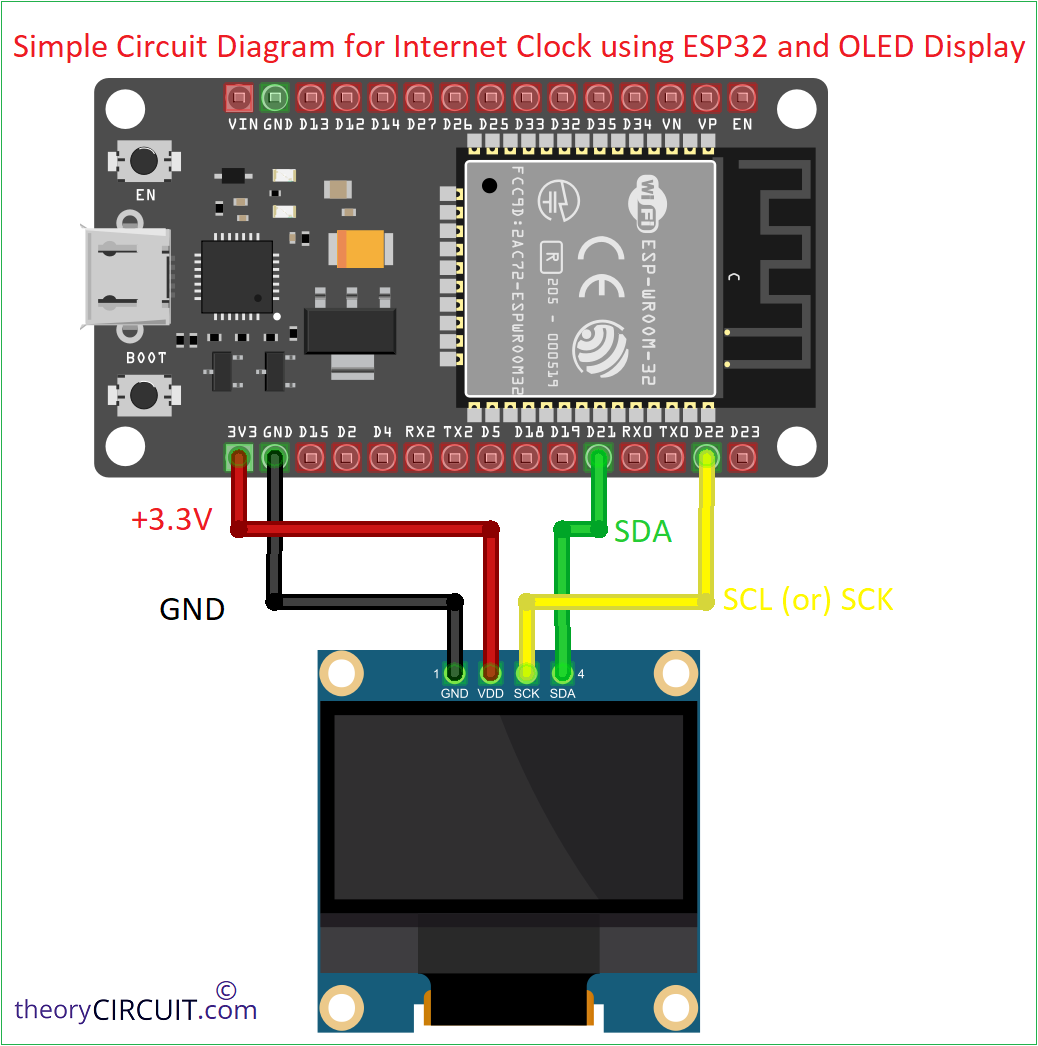

| OLED SSD1306 Pin | ESP32 Pin |
| VCC | 3.3V |
| GND | GND |
| SDA | GPIO 21 |
| SCL (or) SCK | GPIO 22 |
Working Video
Component Required
- ESP32 Development board (I used ESP32 DOIT devkit v1)
- 0.96 Inch OLED display (I2C type)
- Connecting wires
Construction & Working
ESP32 board GPIO 21 and GPIO 22 pins are the default I2C pins. Make sure you are having I2C 0.96 inch oled display which have only four pins. The 0.96″ SPI OLED modules usually come in 6 to 7 pin configurations and need more wiring. For I2C type OLED display, standard Wire library works without any extra configuration.
Do not connect OLED display VCC pin to VIN (5V) pin of ESP32 board unless your module explicitly supports 5V. Most SSD1306 modules have onboard regulator even though 3.3V is the safe choice for the bare OLED panel.
How This Internet Clock Works?
You may wonder how this clock work! The working principle is simple. Three steps happen inside the ESP32 by our code,
1. ESP32 microcontroller chip connects to your home WiFi router using the SSID and password written in the code (you have to give your own wifi ssid and password).
2. ESP32 chip sends a request to pool.ntp.org NTP server which we use to get the time from internet. The server replies with UTC epoch time. The built-in configTime() function adds your timezone offset.
3. ESP32 make received time information to HH:MM:SS and then date information into DD-MM-YYYY and then pushes details to the OLED Display every second through I2C SCL,SDA lines.
ESP32 OLED Internet Clock Arduino Code
Before uploading the code just install two libraries from Arduino IDE Library Manager those are,
- Adafruit SSD1306
- Adafruit GFX Library
Also install ESP32 board support. Go to File > Preferences and add this URL in Additional Board Manager URLs.
https://raw.githubusercontent.com/espressif/arduino-esp32/gh-pages/package_esp32_index.json
Then in Boards Manager, search “ESP32” and install. Select board as DOIT ESP32 DEVKIT V1 and then right port. If you are completely new to ESP32 board to use with Arduino IDE then read here to get started.
#include <WiFi.h>
#include <time.h>
#include <Wire.h>
#include <Adafruit_GFX.h>
#include <Adafruit_SSD1306.h>

#define SCREEN_WIDTH 128
#define SCREEN_HEIGHT 64
#define OLED_ADDR 0x3C

Adafruit_SSD1306 display(SCREEN_WIDTH, SCREEN_HEIGHT, &Wire, -1);

// Replace with your WiFi credentials
const char* ssid     = "YOUR_WIFI_SSID";
const char* password = "YOUR_WIFI_PASSWORD";

// NTP settings
const char* ntpServer = "pool.ntp.org";
const long  gmtOffset_sec = 28800;   // SGT = UTC +8:00 = 28800 seconds
const int   daylightOffset_sec = 0;  // Singapore has no DST

void setup() {
  Serial.begin(115200);

  // Initialize OLED
  if (!display.begin(SSD1306_SWITCHCAPVCC, OLED_ADDR)) {
    Serial.println("SSD1306 not found!");
    while (true);
  }
  display.clearDisplay();
  display.setTextColor(SSD1306_WHITE);
  display.setTextSize(1);
  display.setCursor(0, 25);
  display.print("Connecting WiFi...");
  display.display();

  // Connect WiFi
  WiFi.begin(ssid, password);
  while (WiFi.status() != WL_CONNECTED) {
    delay(500);
    Serial.print(".");
  }
  Serial.println("\nWiFi Connected!");

  // Sync time from NTP
  configTime(gmtOffset_sec, daylightOffset_sec, ntpServer);
}

void loop() {
  struct tm timeinfo;
  if (!getLocalTime(&timeinfo)) {
    Serial.println("Failed to get time");
    delay(1000);
    return;
  }

  char timeStr[10];
  char dateStr[12];
  char dayStr[10];
  strftime(timeStr, sizeof(timeStr), "%H:%M:%S", &timeinfo);
  strftime(dateStr, sizeof(dateStr), "%d-%m-%Y", &timeinfo);
  strftime(dayStr, sizeof(dayStr), "%A", &timeinfo);

  display.clearDisplay();

  // Time - big font
  display.setTextSize(2);
  display.setCursor(16, 8);
  display.print(timeStr);

  // Date - small font
  display.setTextSize(1);
  display.setCursor(34, 35);
  display.print(dateStr);

  // Day name
  display.setCursor(40, 50);
  display.print(dayStr);

  display.display();
  delay(1000);
}
Prototype
