
Last Updated on April 27, 2025
The BMP280 is an absolute barometric pressure sensor made by Bosch. It can measure highly accurate barometric pressure and temperature. It is widely used in GPS modules, smart watches, Altimeters and weather stations. Lets Interface BMP280 with Arduino and display temperature, pressure and approximate altitude readings in real time.
BMP280 Sensor
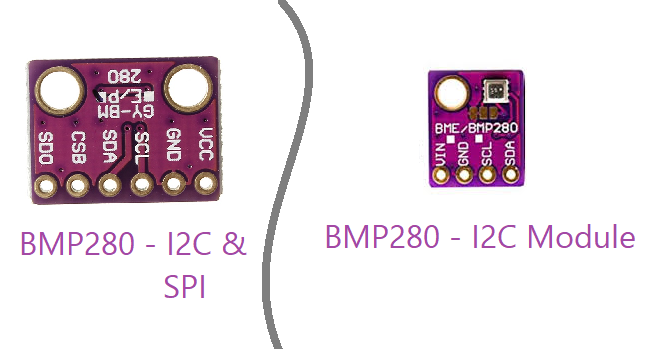
BMP280 digital barometric pressure and temperature sensor comes in 8 pin LGA metal lid package with 2.0 X 2.5 mm2 footprint, so that we need BMP280 sensor module or breakout board to interface with any microcontroller. This module comes in different pinouts because this sensor supports I2C and SPI, choose the board depends on your need.
BMP280 operates with 1.8V to 3.6V power supply, just apply 3.3V power to VCC pin ( Applying 5V to the Vcc will damage the sensor). It can measure 300 to 1100 hpa pressure, and -40°C to +85°C temperature with accuracy of ±1 hpa for pressure and ±1°C for temperature. In terms of resolution 0.16pa for pressure and 0.01°C for temperature.
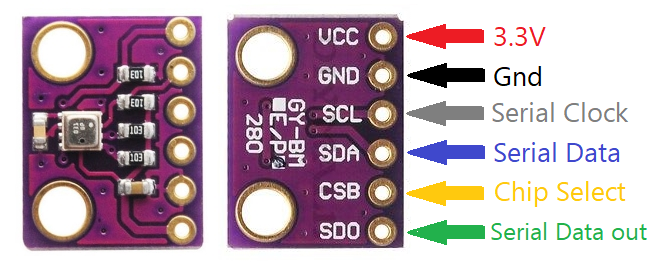
Some BMP280 sensor module will not support micropython code, test it with Arduino IDE and then proceed. BMP280 and BME280 are visually similar sensors with some difference, that is bme280 sensor can measure Humidity but BMP280 cannot. These sensors can work in I2C or SPI so choose the module with proper pinout.
BMP280 Module Schematic diagram
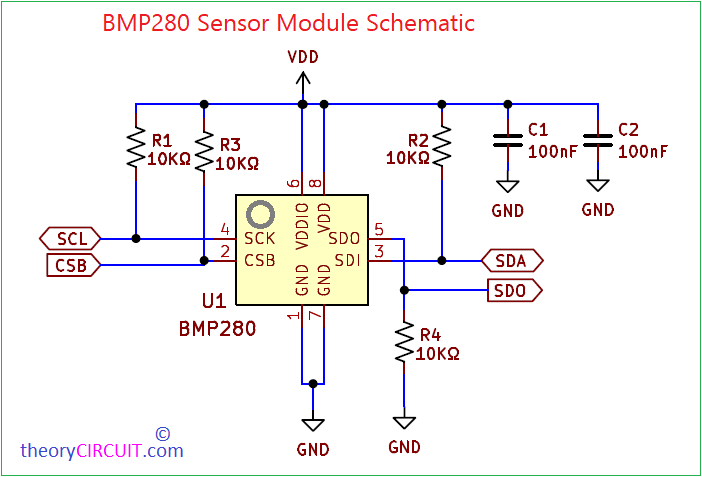
To test or make experiment with BMP280 sensor we need breakout board or module because of sensor size and footprint (8 pin metal lid LGA package). This MEMS sensor requires just pull up, pull down Resistors for the communication lines (SPI and I2C) R1 to R3 – 10KΩ pull up, then R4 – 10KΩ pull down. Two decoupling capacitors (100nF) as per datasheet recommendation, for power stabilization to VDD and VDDIO. Interface selection between I2C and SPI made automatically based on CSB (Chip Select) pin. If CSB is applied with VDD then I2C is active, If CSB pull down (GND) then SPI is active. Here we have used I2C hence we left CSB pin open.
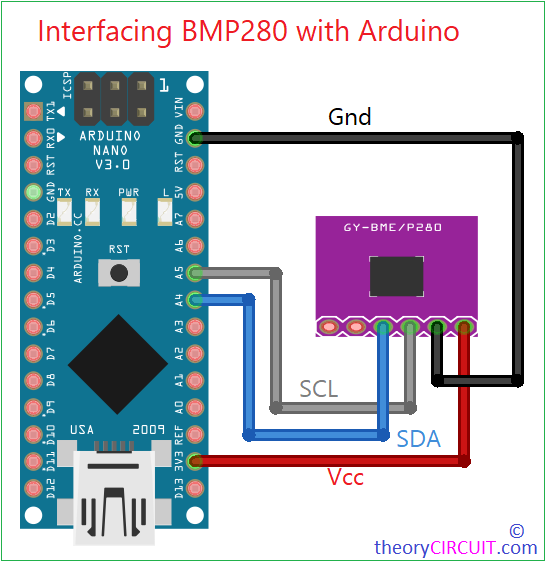
Wiring Diagram
Working Video
Here we have Interfaced BMP280 with Arduino nano board, through I2C lines, SDA from sensor is connected to A4, SCL from sensor to A5, then bias Vcc to 3.3V and GND to GND. Lets connect Arduino board with computer and code it to show Temperature, Pressure and Approximate Altitude depends on the pressure calculation.
Arduino Code for BMP280
Before start to code for BMP280 sensor, we need library (Adafruit BMP280) for effective communication and Bosch’s calibration Algorithm for BMP280, Open Arduino IDE then click library manager icon or Sketch > Include Library > Manage Libraries then search Adafruit BMP280 and install, by the way install Adafruit Unified Sensor Library also. Then upload the following code to see the result in Serial Monitor.
#include <Wire.h>
#include <Adafruit_Sensor.h>
#include <Adafruit_BMP280.h>

// Create BMP280 object
Adafruit_BMP280 bmp; // I2C interface

void setup() {
  Serial.begin(9600);
  while (!Serial); // wait for serial port to connect

  if (!bmp.begin(0x76)) {  // 0x76 or 0x77 depending on your module
    Serial.println("Could not find BMP280 sensor, check wiring!");
    while (1);
  }

  Serial.println("BMP280 Sensor Initialized");

  // Optional: You can configure the sensor
  bmp.setSampling(Adafruit_BMP280::MODE_NORMAL,     /* Operating Mode. */
                  Adafruit_BMP280::SAMPLING_X2,     /* Temp. oversampling */
                  Adafruit_BMP280::SAMPLING_X16,    /* Pressure oversampling */
                  Adafruit_BMP280::FILTER_X16,      /* Filtering. */
                  Adafruit_BMP280::STANDBY_MS_500); /* Standby time. */
}

void loop() {
  Serial.print("Temperature = ");
  Serial.print(bmp.readTemperature());
  Serial.println(" °C");

  Serial.print("Pressure = ");
  Serial.print(bmp.readPressure() / 100.0F); // hPa
  Serial.println(" hPa");

  Serial.print("Approx Altitude = ");
  Serial.print(bmp.readAltitude(1013.25)); // Adjust for local sea level pressure
  Serial.println(" m");

  Serial.println();
  delay(2000); // Read every 2 seconds
}
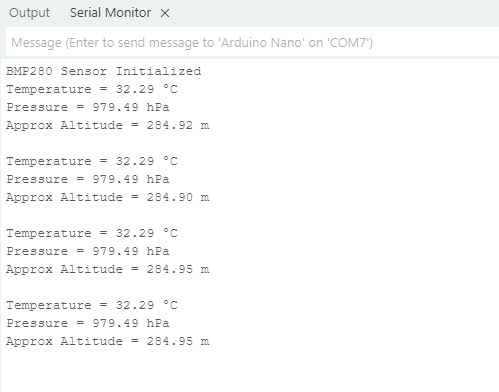
Serial Monitor output
Troubleshooting
- If the serial monitor says No Sensor detected or No device found in I2C then check the wiring connections SDA – A4 (for nano, check your Arduino board I2C pinout), SCL – A5 (for nano).
- Verify the I2C Address If 0x76 not working then change it to 0x77 or run I2C scanner code to confirm I2C address.
- If there is no output check the baud rate that matches 9600.