Last Updated on March 28, 2024
Monitoring and Controlling Air surrounding is necessary now a days due to increasing pollution level. To detect the dust pollution level there are only few sensors available in the market, recently i found a best one that is Optical Dust Sensor GP2Y1010AU0F from Sharp.
This dust sensor is compact in size and detects dust in the air and also smoke particles. It consumes low current to detect dust and uses photometry method to detect dust level in the Air.
Dust Sensor

Got a Optical Dust Sensor from Sparkfun, It has tiny six pin connector best way is go with mating connector housing. This sensor provides analog output signal through one wire (Pin5) Vo, and it doesn’t requires any external components, it requires only 3.3V power supply hence it can be easily interfaced with Arduino development boards.
How Dust Sensor Works?
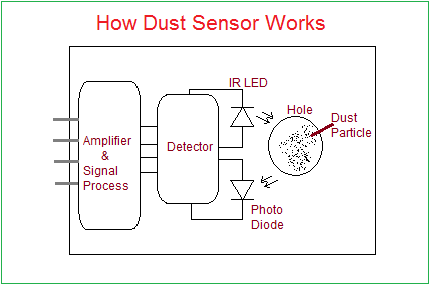
The basic way of sensing dust is through photometry and this method uses IR LED emitter and photovoltaic diode (Photo diode) receiver, the sensor will have Air flow path and the IR LED and Photo diodes are placed near to the Air flow path and pulse signal will make IR LED to glow, due to the dust particles in Air it may scattered and received by photo diode, finally the signal is amplified and processed to get difference level and it can be measured as dust density level.
Arduino Dust sensor Interfacing
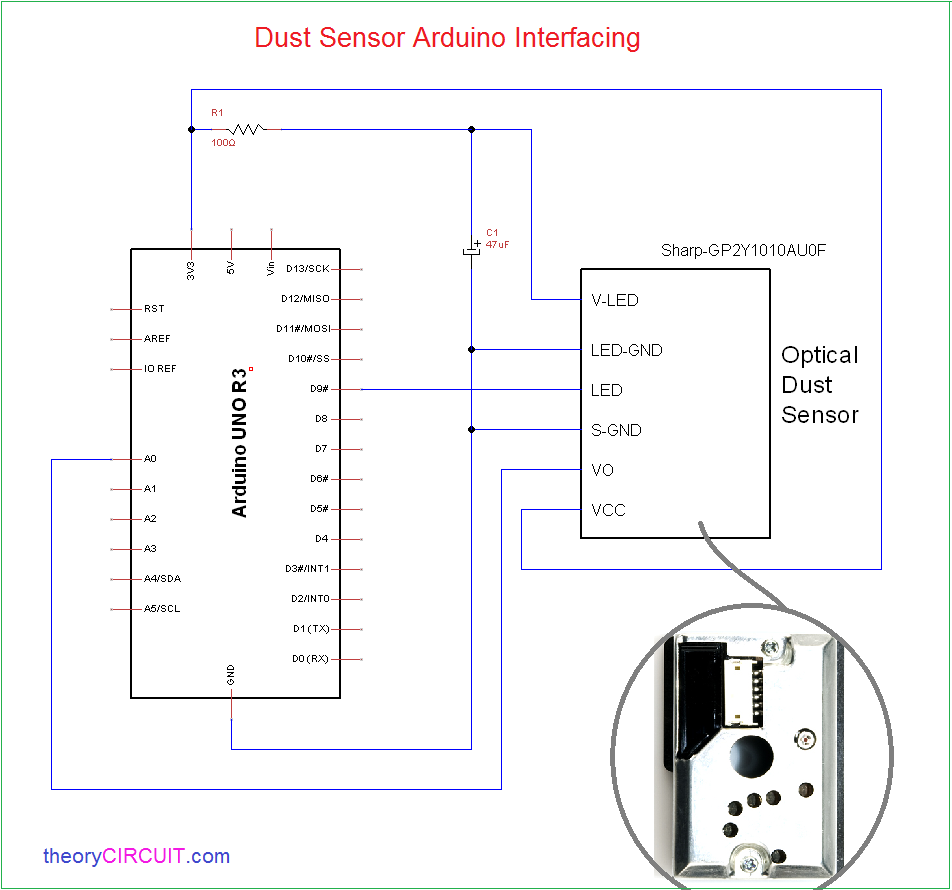
Connect the dust sensor with Arduino board as illustrated, here the 3.3V from Arduino board is given to Sensor Vcc pin and V-LED through 100Ω Resistor, LED-GND and S-GND pins are commonly connected to Arduino Ground pin. Digital pin D9 is connected with LED pin and it is declared as output pin, Vo pin gives Analog output hence it is connected to the Arduino Analog input pin A0.
Arduino Dust sensor Code
int sensePin = A0;
int ledPin = 9;

int Tsampling = 280;
int Tdelta = 40;
int Tsleep = 9680;

float outVo = 0;
float sigVolt = 0;
float dustLevel = 0;

void setup(){
  Serial.begin(9600);
  pinMode(ledPin,OUTPUT);
}

void loop(){
  digitalWrite(ledPin,LOW);
  delayMicroseconds(Tsampling);

  outVo = analogRead(sensePin);

  delayMicroseconds(Tdelta);
  digitalWrite(ledPin,HIGH);
  delayMicroseconds(Tsleep);

  sigVolt = outVo * (3.3 / 1024);

  dustLevel = 0.17 * sigVolt - 0.1;

  Serial.print("Measured Signal Value (0-1023): ");
  Serial.print(outVo);

  Serial.print("   Voltage: ");
  Serial.print(sigVolt);

  Serial.print("   Dust Density Level: ");
  Serial.println(dustLevel);

  delay(1000);
}
This Arduino code will give Dust density level, output Voltage from sensor and output signal value in serial monitor.
Hmm… Does require external components, a 150ohm resistor and a 220uF capacitor, not the 100ohm and 47uF on your diagram. It doesn’t work properly at 3.3v and the code doesn’t produce the right timing pulses. Apart from that, it’s fine….
It is for to Run Example program from library, You can connect External components as per your Requirements.