
Last Updated on September 8, 2024
The ESP32 board is a simple, powerful, and handy tool for making IoT-related projects. It comprises built in Wi-Fi and Bluetooth facilities for providing full connectivity through the internet and Bluetooth so that we can use it in smart device projects and real-time application projects without any complex interface components. This ESP32 microcontroller based board is known for its low power consumption, lots of GPIOs, and extensive sensor and module support through library, so this board is very best option for making projects which includes wifi connectivity. The ESP32 is a very good choice for both beginners and professional engineers because it’s easy to use and code through python, Arduino IDE and supports many MicroPython IDEs. Here we are going to make Simple ESP32 Web Server with Slider to Control LED Brightness.
In this project we are going to use any one ESP32’s GPIO pin which can generate PWM signal, then we are going to connect only one LED in that pin, here we used GPIO 18 pin. Depends on the PWM signal Brightness of LED is going to change. Duty cycle of PWM signal in GPIO 18 pin is changes with respect to the slider in html webpage that is served by ESP32 board. You can use any output device and actuator that is to be controlled by slider in html web page.
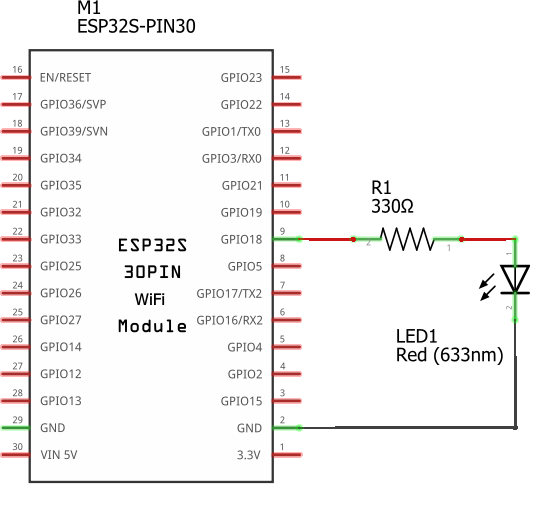
Circuit Diagram
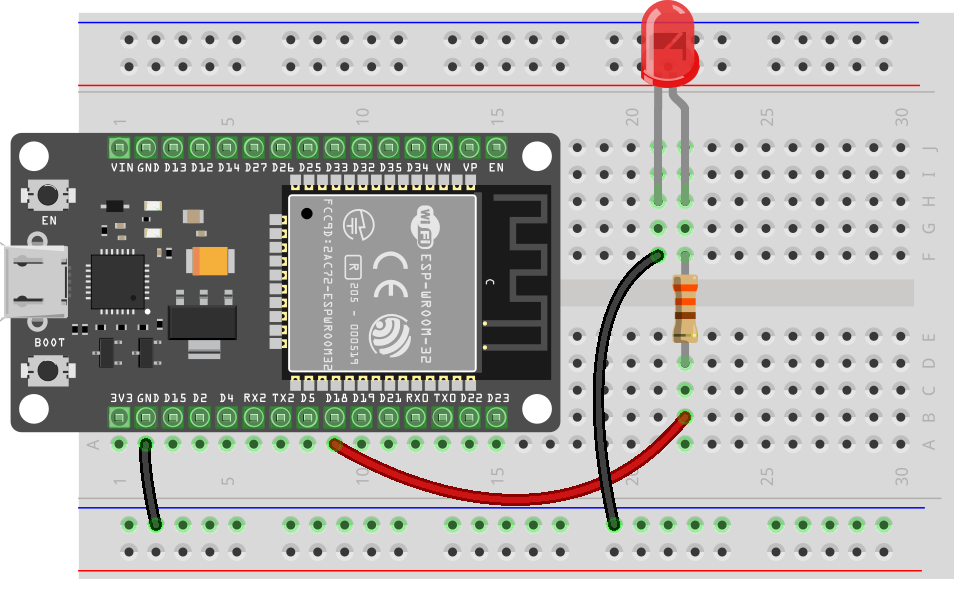
Wiring
Components Required
- ESP32 Board
- LED 5mm Red
- 330Ω Resistor = 1
- Breadboard
- Connecting Wires
Working Video
Construction & Working
Hardware connection for this project is very simple, Connect LED Anode terminal to GPIO 18 of ESP32 through 330Ω Resistor and connect Cathode to GND.
Before start coding, check about the following requirements.
- You should have Wi-Fi, and you have to connect your ESP32 board and Mobile or computer in the same Wi-Fi.
- Here the ESP32 board is programmed through Arduino IDE, so you have to install ESP32 board in your Arduino IDE, Read here to learn about Getting started with ESP32 board and Arduino IDE, if you previously done then forget about it.
- Install AsyncWeb Server Libraries, these are required for building the web server to allow the ESP32 to handle multiple requests without delays or lag.
- Download and open your Arduino IDE then go to Sketch > Include Library > Add .zip Library and select the libraries.
After all set, it is time to upload code and test the web page.
Arduino Code
#include <WiFi.h>
#include <AsyncTCP.h>
#include <ESPAsyncWebServer.h>

// Replace with your network credentials
const char* ssid = "Your WiFi SSID Name";
const char* password = "Your WiFi Password";

// Define GPIO pin for LED
const int ledPin = 18;

String pwmValue = "0";  // To store the PWM value from the slider

// PWM settings
const int freq = 5000;
const int ledChannel = 0;
const int resolution = 8;

// Create an AsyncWebServer object on port 80
AsyncWebServer server(80);

const char index_html[] PROGMEM = R"rawliteral(
<!DOCTYPE HTML><html>
<head>
  <meta name="viewport" content="width=device-width, initial-scale=1">
  <title>LED Brightness Control</title>
  <style>
    html {
      font-family: Arial;
      display: inline-block;
      text-align: center;
    }
    h2 {
      font-size: 2.3rem;
    }
    p {
      font-size: 1.9rem;
    }
    body {
      max-width: 400px;
      margin: 0px auto;
      padding-bottom: 25px;
    }
    .slider {
      width: 100%;
      max-width: 300px;
    }
  </style>
</head>
<body>
  <h2>LED Brightness Control</h2>
  <h3>theoryCIRCUIT</h3>
  <p>Brightness: <span id="pwmValue">0</span></p>
  <input type="range" min="0" max="255" value="0" class="slider" id="brightnessSlider">

  <script>
    const slider = document.getElementById('brightnessSlider');
    const valueDisplay = document.getElementById('pwmValue');

    slider.addEventListener('input', function() {
      const value = slider.value;
      valueDisplay.textContent = value;
      // Send the value to the ESP32
      var xhr = new XMLHttpRequest();
      xhr.open("GET", "/setBrightness?value=" + value, true);
      xhr.send();
    });
  </script>
</body>
</html>
)rawliteral";

// Function to handle placeholder replacement
String processor(const String& var) {
  if (var == "PWMVALUE") {
    return pwmValue;
  }
  return String();
}

void setup() {
  // Initialize serial communication
  Serial.begin(115200);

  // Configure PWM functionalities
  ledcSetup(ledChannel, freq, resolution);
  ledcAttachPin(ledPin, ledChannel);

  // Connect to Wi-Fi
  WiFi.begin(ssid, password);
  while (WiFi.status() != WL_CONNECTED) {
    delay(1000);
    Serial.println("Connecting to WiFi...");
  }
  Serial.println("Connected to WiFi");
  Serial.print("IP Address: ");
  Serial.println(WiFi.localIP());

  // Handle requests for root ("/")
  server.on("/", HTTP_GET, [](AsyncWebServerRequest *request) {
    request->send_P(200, "text/html", index_html, processor);
  });

  // Handle requests for setting brightness
  server.on("/setBrightness", HTTP_GET, [](AsyncWebServerRequest *request) {
    if (request->hasParam("value")) {
      pwmValue = request->getParam("value")->value();
      int pwm = pwmValue.toInt();
      ledcWrite(ledChannel, pwm);
    }
    request->send(200, "text/plain", "Brightness set");
  });

  // Start server
  server.begin();
}

void loop() {
  // No code needed here as server is handled asynchronously
}
After uploading code successfully, check the serial monitor of Arduino IDE and you should receive the IP address., if there is no text then press EN button in your ESP32 board and watch the serial monitor of Arduino IDE. Here we receive IP as 192.168.1.7 and we got the html web page like this.
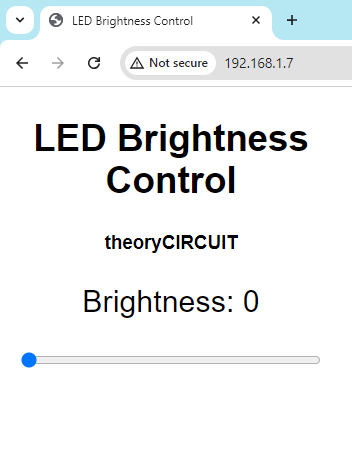
By making every slide, we are giving html request to ESP32 web server and make changes in PWM signal of GPIO 18 pin, by the way we control brightness of LED.