
Last Updated on March 16, 2024
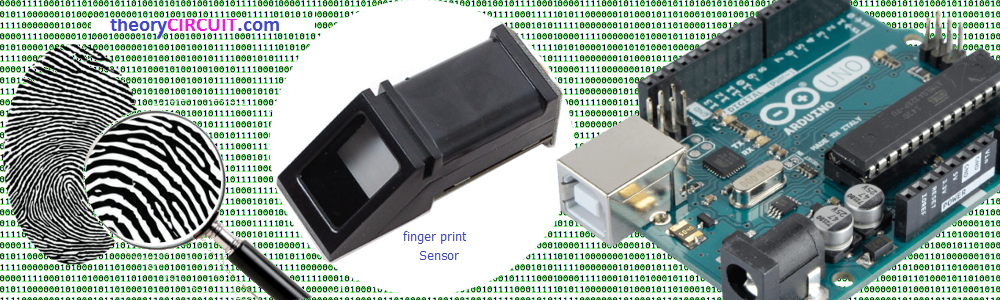
The Fingerprint is one of the safest way to detect and identify the Authorized person, We know that fingerprint is unique even identical twins do not have identical fingerprints. By using this we can make pretty sure about security needs. To add fingerprint verification in microcontroller projects we can use this all in one optical fingerprint sensor-scanner (R305), It makes fingerprint detection and verification super simple.
By using this sensor we can make Bio-metric authentication and access control based Electronic projects easily.
R305 Optical Fingerprint Sensor-Scanner
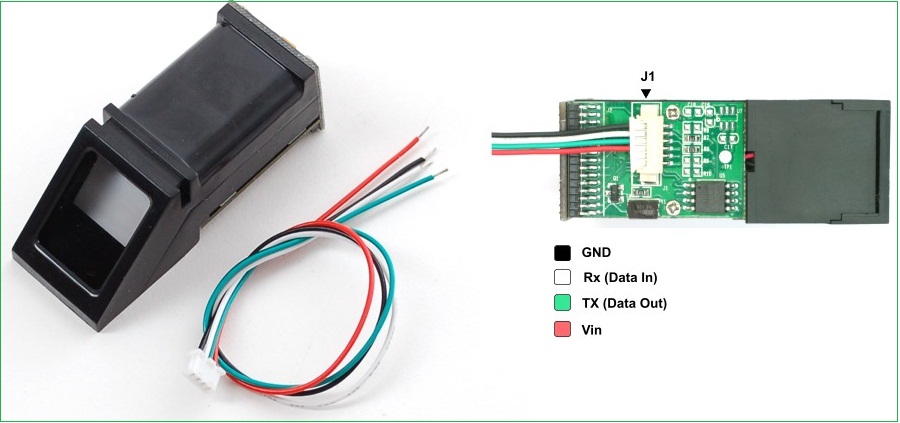
This optical fingerprint reader devices uses high powered DSP chip AS601 form Synochip, that does the image rendering, calculation, feature finding and searching. It provides TTL serial out hence we can connect to any microcontroller or system. The DSP processor has on board FLASH memory which can store 120 finger prints. Thanks to the Adafruit here we have Fingerprint library so that connect this sensor to Arduino as well.
Fingerprint sensor Arduino Hookup
The fingerprint identification process has two steps that is
1. Enrolling Fingerprint,
2. Matching Fingerprint.
These two steps makes microcontroller / System to authenticate right fingerprint.
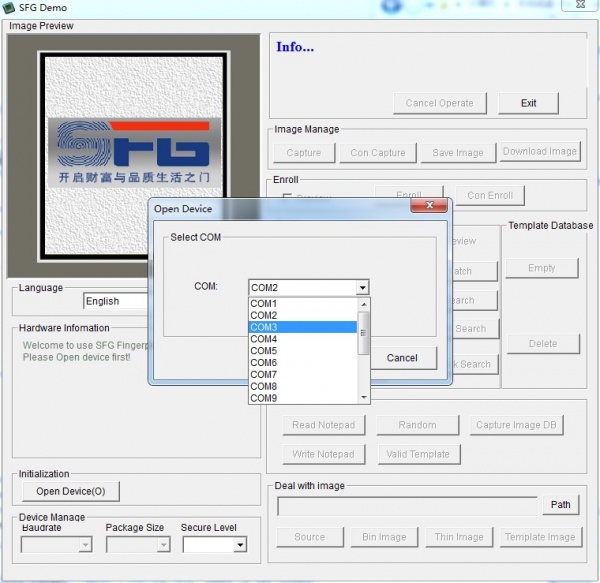
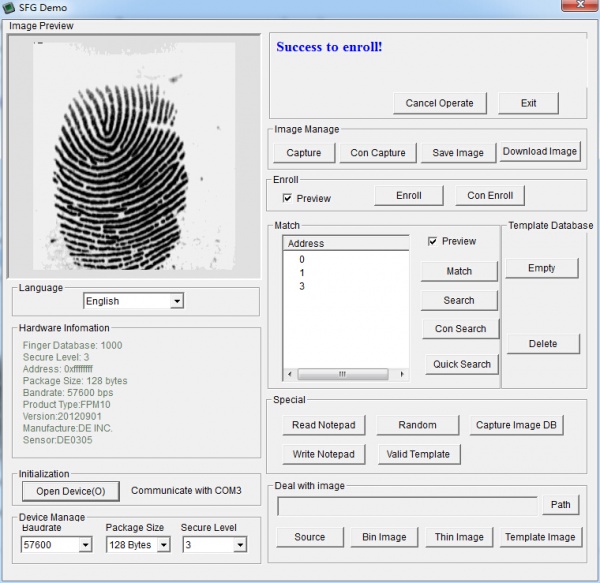
To use this sensor with Computer
(Only windows operating system)
 Image credit: adafruit.com
Connect the white wire from the sensor to Arduino D0 pin and green wire to Arduino D1 pin. Put red & black in (+5V & GND) respectively. After the wiring over upload the following sketch to Arduino board.
Arduino Code
// this sketch will allow you to bypass the Atmega chip
// and connect the fingerprint sensor directly to the USB/Serial
// chip converter.
// Red connects to +5V
// Black connects to Ground
// White goes to Digital 0
// Green goes to Digital 1
void setup() {}
void loop() {}
The “blank” sketch won’t work for ATmega32u4-based Arduinos hence use the following sketch
Arduino Code for (ATmega32u4)
//Leo_passthru
// Allows Leonardo to pass serial data between
// fingerprint reader and Windows.
//
// Red connects to +5V
// Black connects to Ground
// Green goes to Digital 0
// White goes to Digital 1
void setup() {
Serial1.begin(57600);
Serial.begin(57600);
}
void loop()
{
while (Serial.available())
Serial1.write(Serial.read());
while (Serial1.available())
Serial.write(Serial1.read());
}
To read fingerprint through windows system we need special GUI software called “SFGdemo” just google it to get one.
After Loading the above code open the “SFGdemo” software.
Screenshot
Credit : http://www.elecrow.com/wiki/index.php?title=Fingerprint_Sensor
To use this sensor with Arduino Board
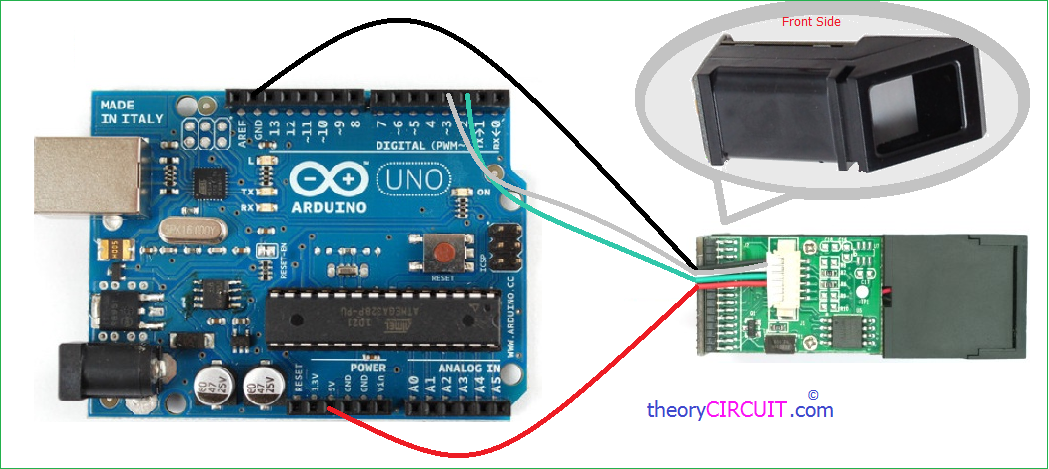
Connect wires as per the hookup diagram shows.
Get the fingerprint library here and put it in Arduino ide library section.
Open the code directly by the path in Arduino IDE: File -> Example ->Adafruit_Fingerprint→enroll
Code to Enrolling with Arduino
#include <Adafruit_Fingerprint.h>
#include <SoftwareSerial.h>

uint8_t getFingerprintEnroll(int id);


// pin #2 is IN from sensor (GREEN wire)
// pin #3 is OUT from arduino  (WHITE wire)
SoftwareSerial mySerial(2, 3);

Adafruit_Fingerprint finger = Adafruit_Fingerprint(&mySerial);

void setup()
{
  Serial.begin(9600);
  Serial.println("fingertest");

  // set the data rate for the sensor serial port
  finger.begin(57600);

  if (finger.verifyPassword()) {
    Serial.println("Found fingerprint sensor!");
  } else {
    Serial.println("Did not find fingerprint sensor :(");
    while (1);
  }
}

void loop()                     // run over and over again
{
  Serial.println("Type in the ID # you want to save this finger as...");
  int id = 0;
  while (true) {
    while (! Serial.available());
    char c = Serial.read();
    if (! isdigit(c)) break;
    id *= 10;
    id += c - '0';
  }
  Serial.print("Enrolling ID #");
  Serial.println(id);

  while (!  getFingerprintEnroll(id) );
}

uint8_t getFingerprintEnroll(int id) {
  int p = -1;
  Serial.println("Waiting for valid finger to enroll");
  while (p != FINGERPRINT_OK) {
    p = finger.getImage();
    switch (p) {
    case FINGERPRINT_OK:
      Serial.println("Image taken");
      break;
    case FINGERPRINT_NOFINGER:
      Serial.println(".");
      break;
    case FINGERPRINT_PACKETRECIEVEERR:
      Serial.println("Communication error");
      break;
    case FINGERPRINT_IMAGEFAIL:
      Serial.println("Imaging error");
      break;
    default:
      Serial.println("Unknown error");
      break;
    }
  }

  // OK success!

  p = finger.image2Tz(1);
  switch (p) {
    case FINGERPRINT_OK:
      Serial.println("Image converted");
      break;
    case FINGERPRINT_IMAGEMESS:
      Serial.println("Image too messy");
      return p;
    case FINGERPRINT_PACKETRECIEVEERR:
      Serial.println("Communication error");
      return p;
    case FINGERPRINT_FEATUREFAIL:
      Serial.println("Could not find fingerprint features");
      return p;
    case FINGERPRINT_INVALIDIMAGE:
      Serial.println("Could not find fingerprint features");
      return p;
    default:
      Serial.println("Unknown error");
      return p;
  }

  Serial.println("Remove finger");
  delay(2000);
  p = 0;
  while (p != FINGERPRINT_NOFINGER) {
    p = finger.getImage();
  }

  p = -1;
  Serial.println("Place same finger again");
  while (p != FINGERPRINT_OK) {
    p = finger.getImage();
    switch (p) {
    case FINGERPRINT_OK:
      Serial.println("Image taken");
      break;
    case FINGERPRINT_NOFINGER:
      Serial.print(".");
      break;
    case FINGERPRINT_PACKETRECIEVEERR:
      Serial.println("Communication error");
      break;
    case FINGERPRINT_IMAGEFAIL:
      Serial.println("Imaging error");
      break;
    default:
      Serial.println("Unknown error");
      break;
    }
  }

  // OK success!

  p = finger.image2Tz(2);
  switch (p) {
    case FINGERPRINT_OK:
      Serial.println("Image converted");
      break;
    case FINGERPRINT_IMAGEMESS:
      Serial.println("Image too messy");
      return p;
    case FINGERPRINT_PACKETRECIEVEERR:
      Serial.println("Communication error");
      return p;
    case FINGERPRINT_FEATUREFAIL:
      Serial.println("Could not find fingerprint features");
      return p;
    case FINGERPRINT_INVALIDIMAGE:
      Serial.println("Could not find fingerprint features");
      return p;
    default:
      Serial.println("Unknown error");
      return p;
  }


  // OK converted!
  p = finger.createModel();
  if (p == FINGERPRINT_OK) {
    Serial.println("Prints matched!");
  } else if (p == FINGERPRINT_PACKETRECIEVEERR) {
    Serial.println("Communication error");
    return p;
  } else if (p == FINGERPRINT_ENROLLMISMATCH) {
    Serial.println("Fingerprints did not match");
    return p;
  } else {
    Serial.println("Unknown error");
    return p;
  }

  Serial.print("ID "); Serial.println(id);
  p = finger.storeModel(id);
  if (p == FINGERPRINT_OK) {
    Serial.println("Stored!");
  } else if (p == FINGERPRINT_PACKETRECIEVEERR) {
    Serial.println("Communication error");
    return p;
  } else if (p == FINGERPRINT_BADLOCATION) {
    Serial.println("Could not store in that location");
    return p;
  } else if (p == FINGERPRINT_FLASHERR) {
    Serial.println("Error writing to flash");
    return p;
  } else {
    Serial.println("Unknown error");
    return p;
  }
}
After uploading this code to Arduino board open the serial monitor, it will ask for you to type in the ID to enroll – use the box up top to type in a number and click Send. choose carriage return with 9600 baud rate. After placing finger two to three times the serial monitor indicated image stored in specific id.
Code to Matching with Arduino
Open the code directly by the path in Arduino IDE : File -> Example ->Adafruit_Fingerprint→fingerprint
#include <Adafruit_Fingerprint.h>
#include <SoftwareSerial.h>

int getFingerprintIDez();

// pin #2 is IN from sensor (GREEN wire)
// pin #3 is OUT from arduino  (WHITE wire)
SoftwareSerial mySerial(2, 3);


Adafruit_Fingerprint finger = Adafruit_Fingerprint(&mySerial);

void setup()
{
  Serial.begin(9600);
  Serial.println("fingertest");

  // set the data rate for the sensor serial port
  finger.begin(57600);

  if (finger.verifyPassword()) {
    Serial.println("Found fingerprint sensor!");
  } else {
    Serial.println("Did not find fingerprint sensor :(");
    while (1);
  }
  Serial.println("Waiting for valid finger...");
}

void loop()                     // run over and over again
{
  getFingerprintIDez();
  delay(50);            //don't ned to run this at full speed.
}

uint8_t getFingerprintID() {
  uint8_t p = finger.getImage();
  switch (p) {
    case FINGERPRINT_OK:
      Serial.println("Image taken");
      break;
    case FINGERPRINT_NOFINGER:
      Serial.println("No finger detected");
      return p;
    case FINGERPRINT_PACKETRECIEVEERR:
      Serial.println("Communication error");
      return p;
    case FINGERPRINT_IMAGEFAIL:
      Serial.println("Imaging error");
      return p;
    default:
      Serial.println("Unknown error");
      return p;
  }

  // OK success!

  p = finger.image2Tz();
  switch (p) {
    case FINGERPRINT_OK:
      Serial.println("Image converted");
      break;
    case FINGERPRINT_IMAGEMESS:
      Serial.println("Image too messy");
      return p;
    case FINGERPRINT_PACKETRECIEVEERR:
      Serial.println("Communication error");
      return p;
    case FINGERPRINT_FEATUREFAIL:
      Serial.println("Could not find fingerprint features");
      return p;
    case FINGERPRINT_INVALIDIMAGE:
      Serial.println("Could not find fingerprint features");
      return p;
    default:
      Serial.println("Unknown error");
      return p;
  }

  // OK converted!
  p = finger.fingerFastSearch();
  if (p == FINGERPRINT_OK) {
    Serial.println("Found a print match!");
  } else if (p == FINGERPRINT_PACKETRECIEVEERR) {
    Serial.println("Communication error");
    return p;
  } else if (p == FINGERPRINT_NOTFOUND) {
    Serial.println("Did not find a match");
    return p;
  } else {
    Serial.println("Unknown error");
    return p;
  }

  // found a match!
  Serial.print("Found ID #"); Serial.print(finger.fingerID);
  Serial.print(" with confidence of "); Serial.println(finger.confidence);
}

// returns -1 if failed, otherwise returns ID #
int getFingerprintIDez() {
  uint8_t p = finger.getImage();
  if (p != FINGERPRINT_OK)  return -1;

  p = finger.image2Tz();
  if (p != FINGERPRINT_OK)  return -1;

  p = finger.fingerFastSearch();
  if (p != FINGERPRINT_OK)  return -1;

  // found a match!
  Serial.print("Found ID #"); Serial.print(finger.fingerID);
  Serial.print(" with confidence of "); Serial.println(finger.confidence);
  return finger.fingerID;
}
After Upload the Code,Open up the serial monitor at 9600 baud rate and when prompted place your finger against the sensor that was already enrolled. It shows found Id with number If it is the stored fingerprint.
Tutorial inspiration
http://www.elecrow.com/wiki/index.php?title=Fingerprint_Sensor
sir im using same library and program but when i enroll finger it shows unknown error i dont understand that problem problem occur after these steps
image taken
image converted
remove finger
place same finger again
image taken
image converted
unknown error
and again
waiting for valid finger
Hi waqas ali
I don’t know what operating system you are using the Sensor module supported by Only windows operating system as described in article. for further you can refer following links.
https://youtu.be/1diFaa5OsFg
https://theorycircuit.com/wp-content/uploads/2017/02/finger-print-module.pdf
hi.. i had the same problem before.. what i did is i edit the library specifically the .cpp file.. it seems that the library from adafruit have problems with the latest version of arduino IDE.. you can try lower version of IDE its working.. or i can give you my library..
can u send me your library please ….
What should be changed in the file Adafruit_Fingerprint.cpp? The verify Password procedure returns an error, the result is that the fingerprint scanner was not found.
if use hardwareserial second parameter must be specified: Serial.begin(115200, 8N2).
HI SIR
i connect fingerprint module and store enroll program but in serial monitor display “fingerprint module can’t found”
please answer me fast .. waiting for your response
thank you .
i connect fingerprint module and store enroll program but in serial monitor display “fingerprint module can’t found”
Wondering if there is a small micro scanner that can be wired into a supersport bike to allow ignition after thumbprint scan or scan will then start bike. Any help is greatly appreciated
iam also doing the same project, but striked with this “unknown error”.
sir what could be the limit of finger’s i can register
Hello
Do you know how to keep the light sensor off in stand-by mode?
how can i connect the relay to arduino for switching purpose
Can arduino Mini only be used for this project?
Can AtTiny85 digispark only be used for this too?
sir, I want to make this project with Arduino mega. do the port still can be same.
Hello! sir, please i wish to know if it is possible to read and print the string of characters on the serial monitor that is generated by the arduino when a finger is placed on the sensor