
Last Updated on August 12, 2026
We know that displays are one of the most important and useful device you can give any Arduino project. Instead of relying only on the serial monitor to see what your microcontroller is doing, a display lets your project show sensor readings, menus, status messages and alerts directly on the hardware itself. Also the display is required to transfer the schematic to prototype or product.
The problem most of us hate is messy wires. A standard 16×2 LCD in parallel mode needs at least 6 to 10 GPIO pins just for the display, which is a lot when you are also using pins for sensors and other output devices. This is exactly where I2C interface becomes valuable. I2C reduces the display connection down to just 2 signal wires that is SDA and SCL, regardless of whether you employing a character LCD or a graphical OLED.
Lets try three of the most commonly used displays in Arduino nano through I2C.
- 16×2 LCD with I2C backpack (PCF8574 based)
- 128×32 OLED display (SSD1306 driver)
- 128×64 OLED display (SSD1306 driver)
Here you can see the wiring, required library and code for interfacing these displays with Arduino nano.
How these Displays Works Internally?
Before jump into wiring and coding first understand the basic operation of LCD and OLED displays, so that we can easily manipulate it and get what we required. So that we can avoid blank screen or garbage characters etc.,
Inside the 16×2 LCD
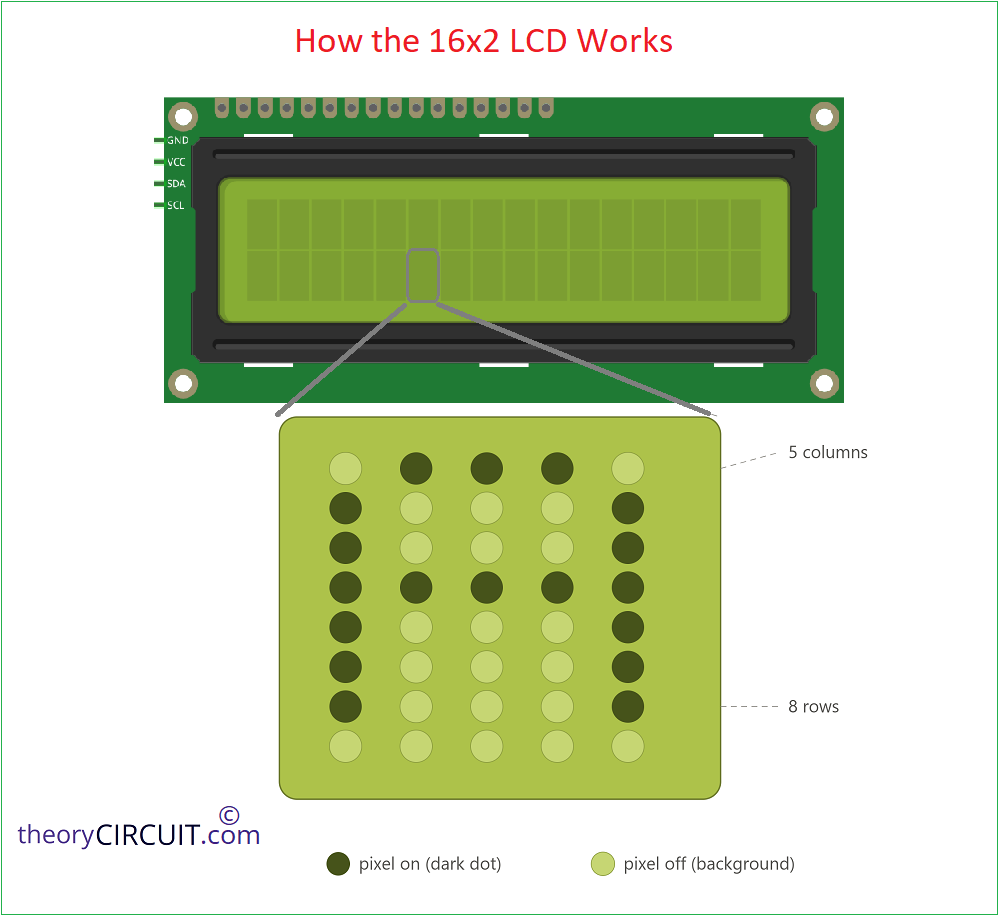
Remember that the 16×2 LCD is not a graphical screen which displays graphic lines, images etc., it is a character display and displays only characters. Here each of the 32 character positioned as a small 5×8 grid of individual liquid crystal pixels. When you look closely with full contrast you can see that, of course it is in 16 columns and 2 rows. Here the display doesn’t store images. It stores character codes. HD44780 controller chip at the backside of LCD lights up the correct pixels (dark) inside the character cell depends on the character you send to it. That is why you can only display characters and not graphic lines on a 16×2 LCD.
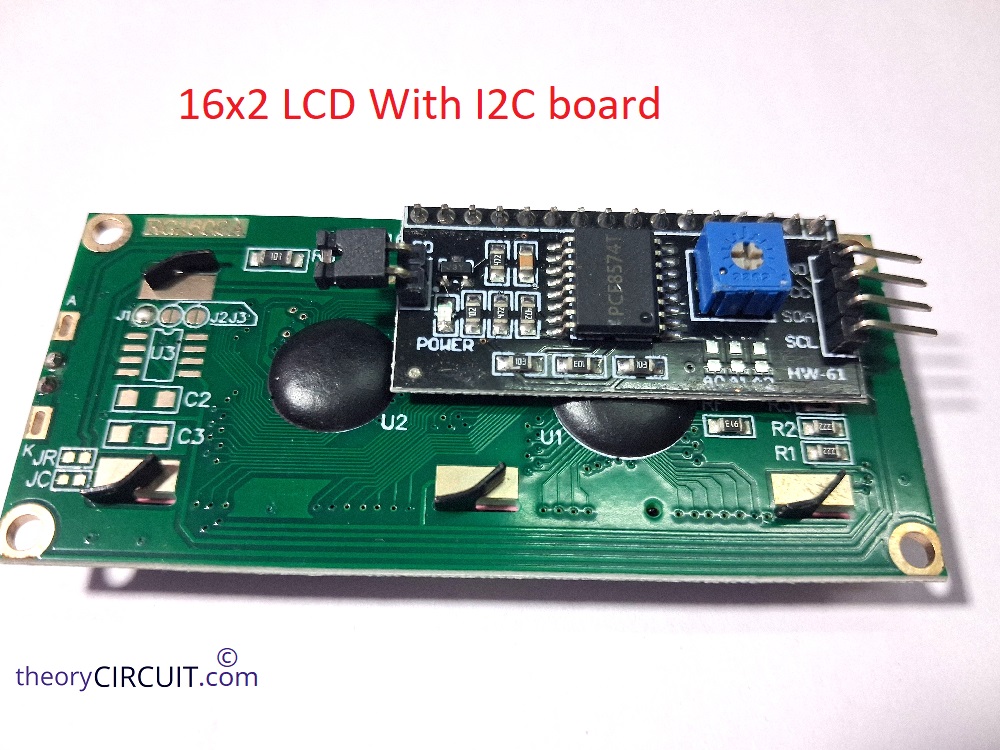
Here the HD44780 needs parallel connection that is separate wires for RS, Enable, R/W and 4 or 8 data lines. But the I2C backpack soldered onto the back of the LCD contains a small chip called PCF8574 which is a 8 bit I/O extender makes it to two wires that is SDA & SCL. Here the PCF8574 is doing all the RS, EN, data line toggling for you but it requires “LiquidCrystal_I2C” library in the Arduino IDE.
Inside the 128×64 / 128×32 OLED
The OLED module completely different from character LCD. Because there is no liquid crystal or back light. It contains individually addressable pixels. That is 128×64 or 128×32 pixel lights that can turn on or off based on you instruction. So that we can draw anything we want. The SSD1306 driver chip on the back of the module holds a full frame operation and constantly refreshes the pixels from buffer. It is native I2C supporting device, so that we don’t need additional hardware.
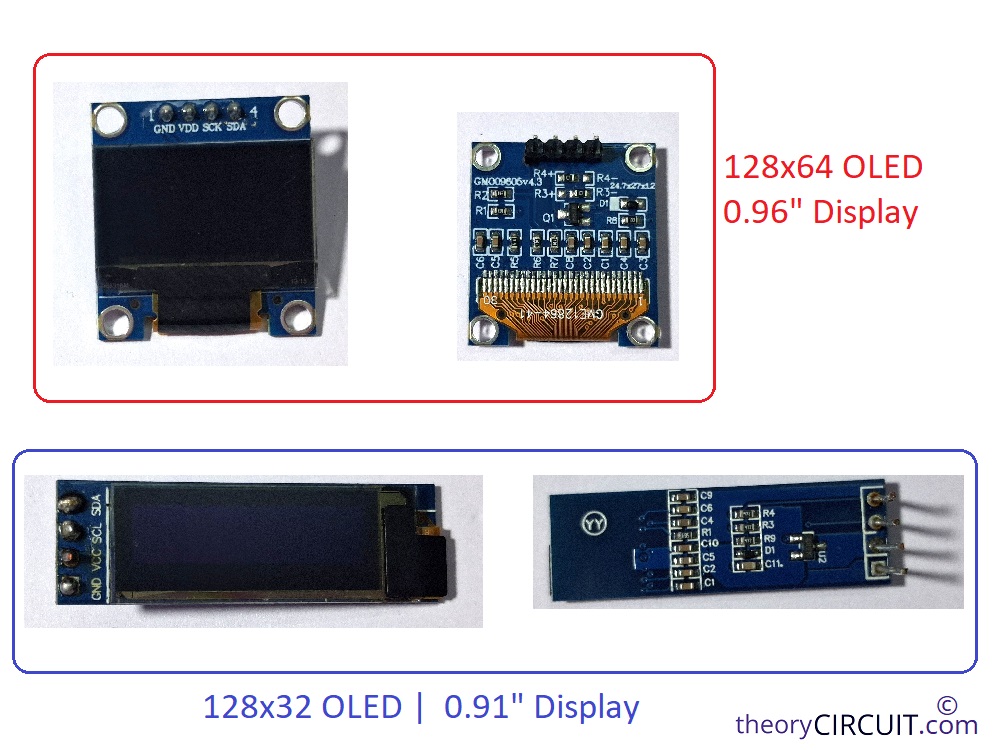
It requires Adafruit_GFX | Adafruit_SSD1306 libraries on the Arduino IDE.
Common I2C Display and Arduino nano Interface Circuit
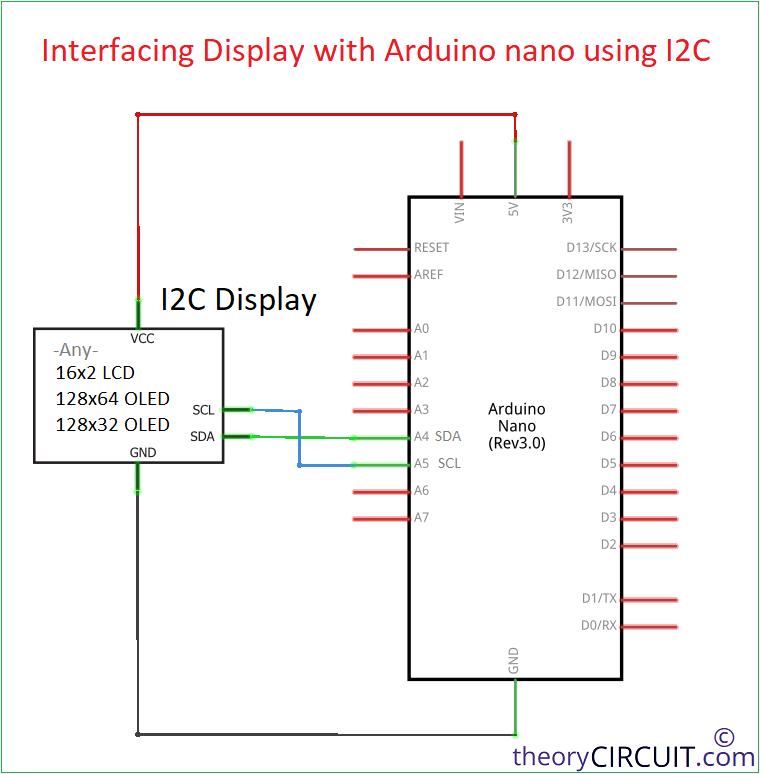
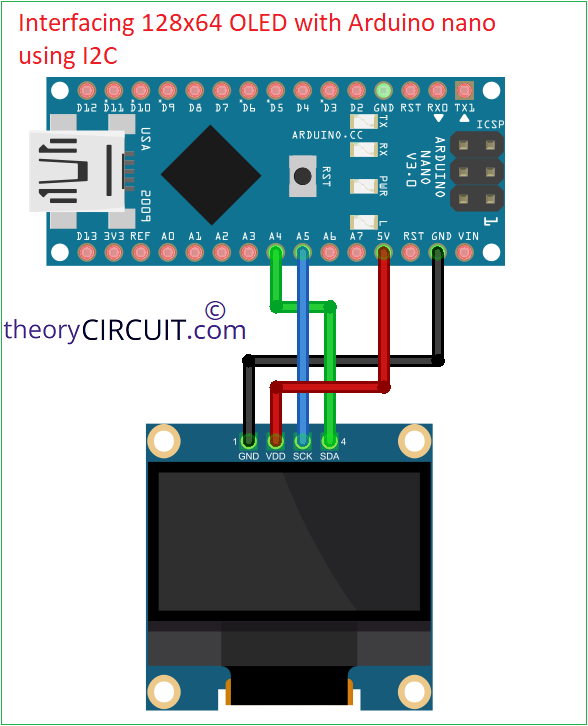
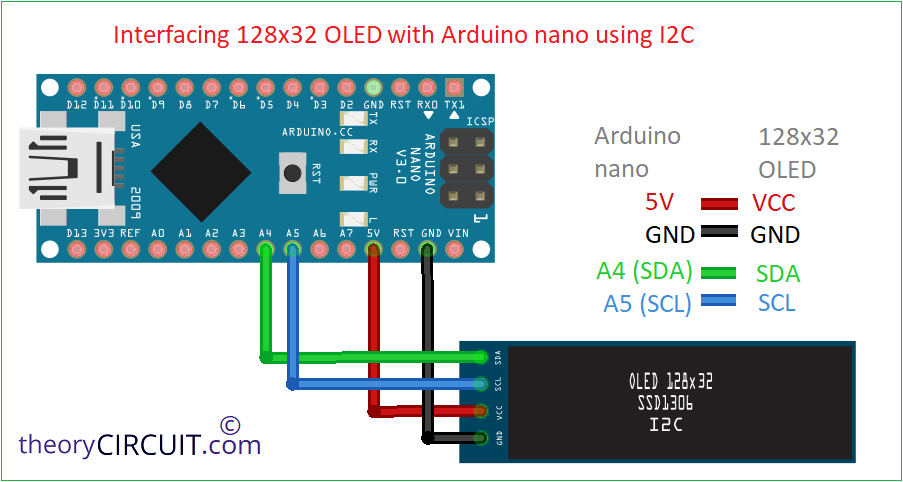
Arduino Nano I2C Pins
| Arduino Nano Pin | Function |
|---|---|
| A4 | SDA (Serial Data) |
| A5 | SCL (Serial Clock) |
| 5V | Power |
| GND | Ground |
Interfacing 16×2 LCD Display with Arduino nano using I2C
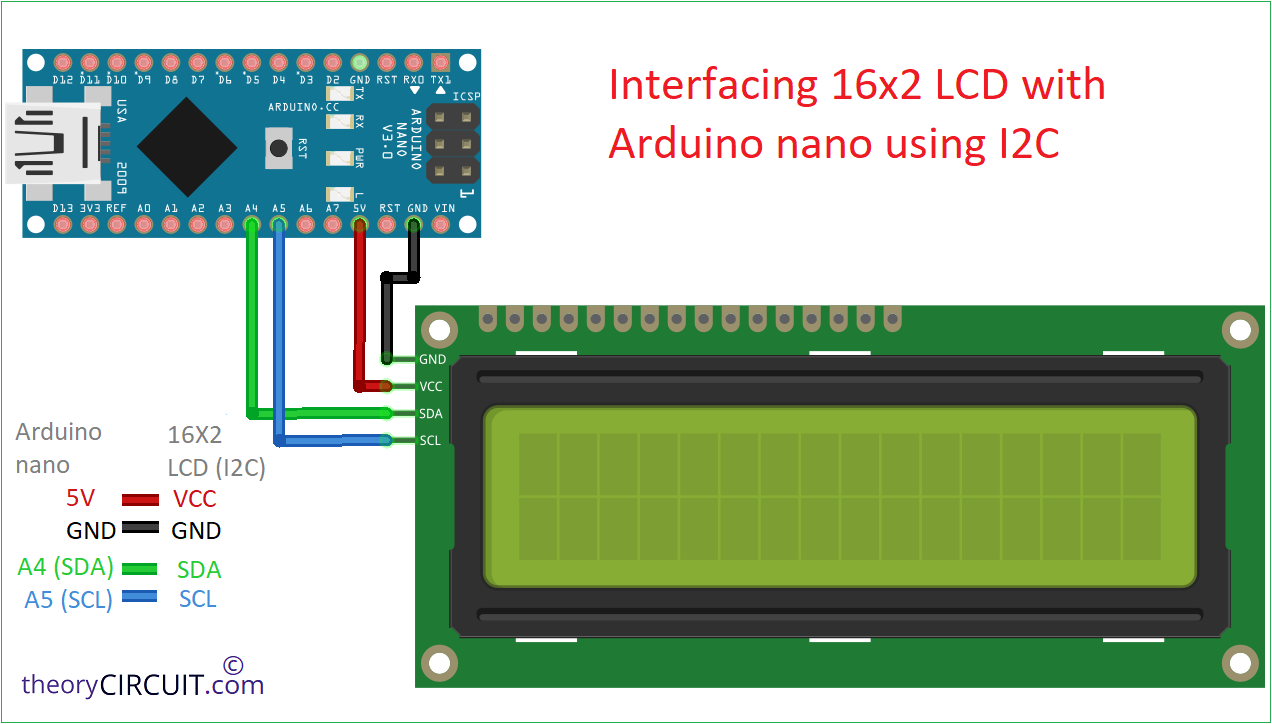
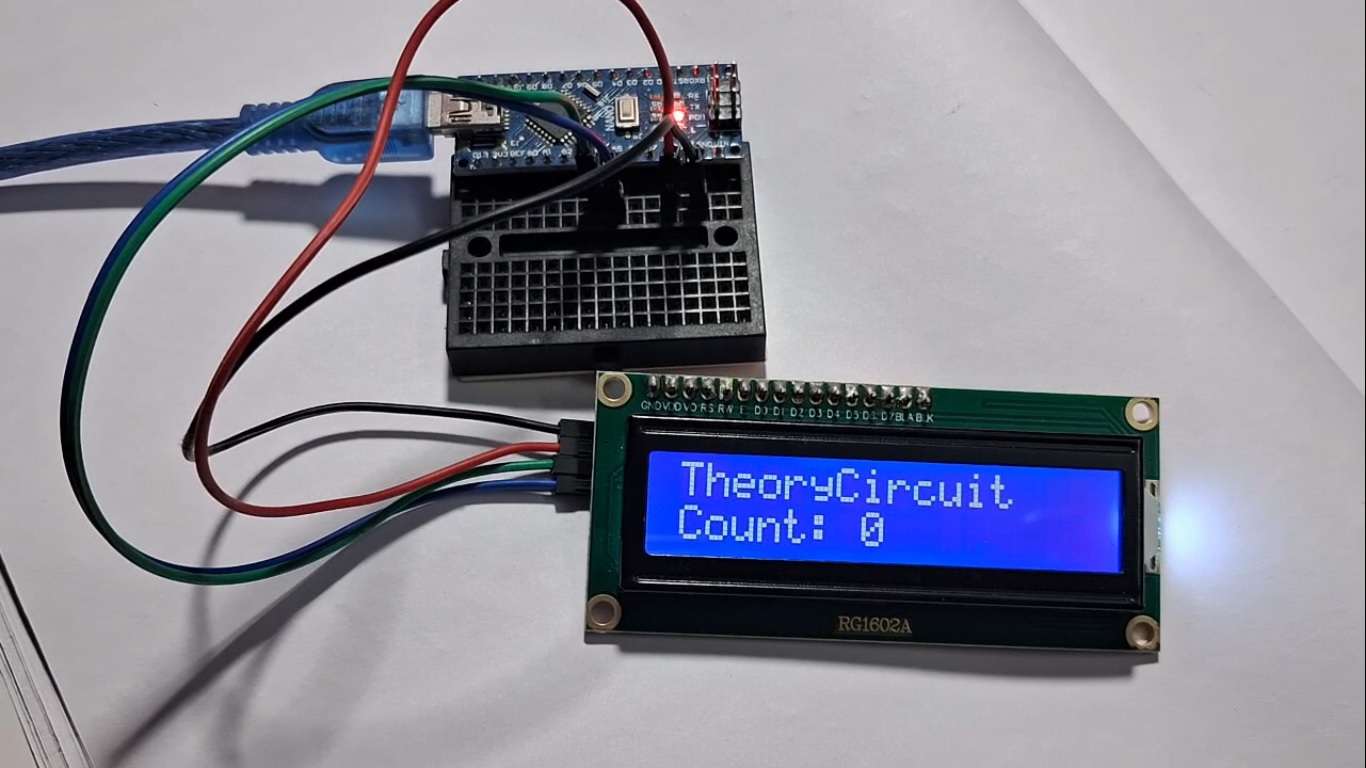
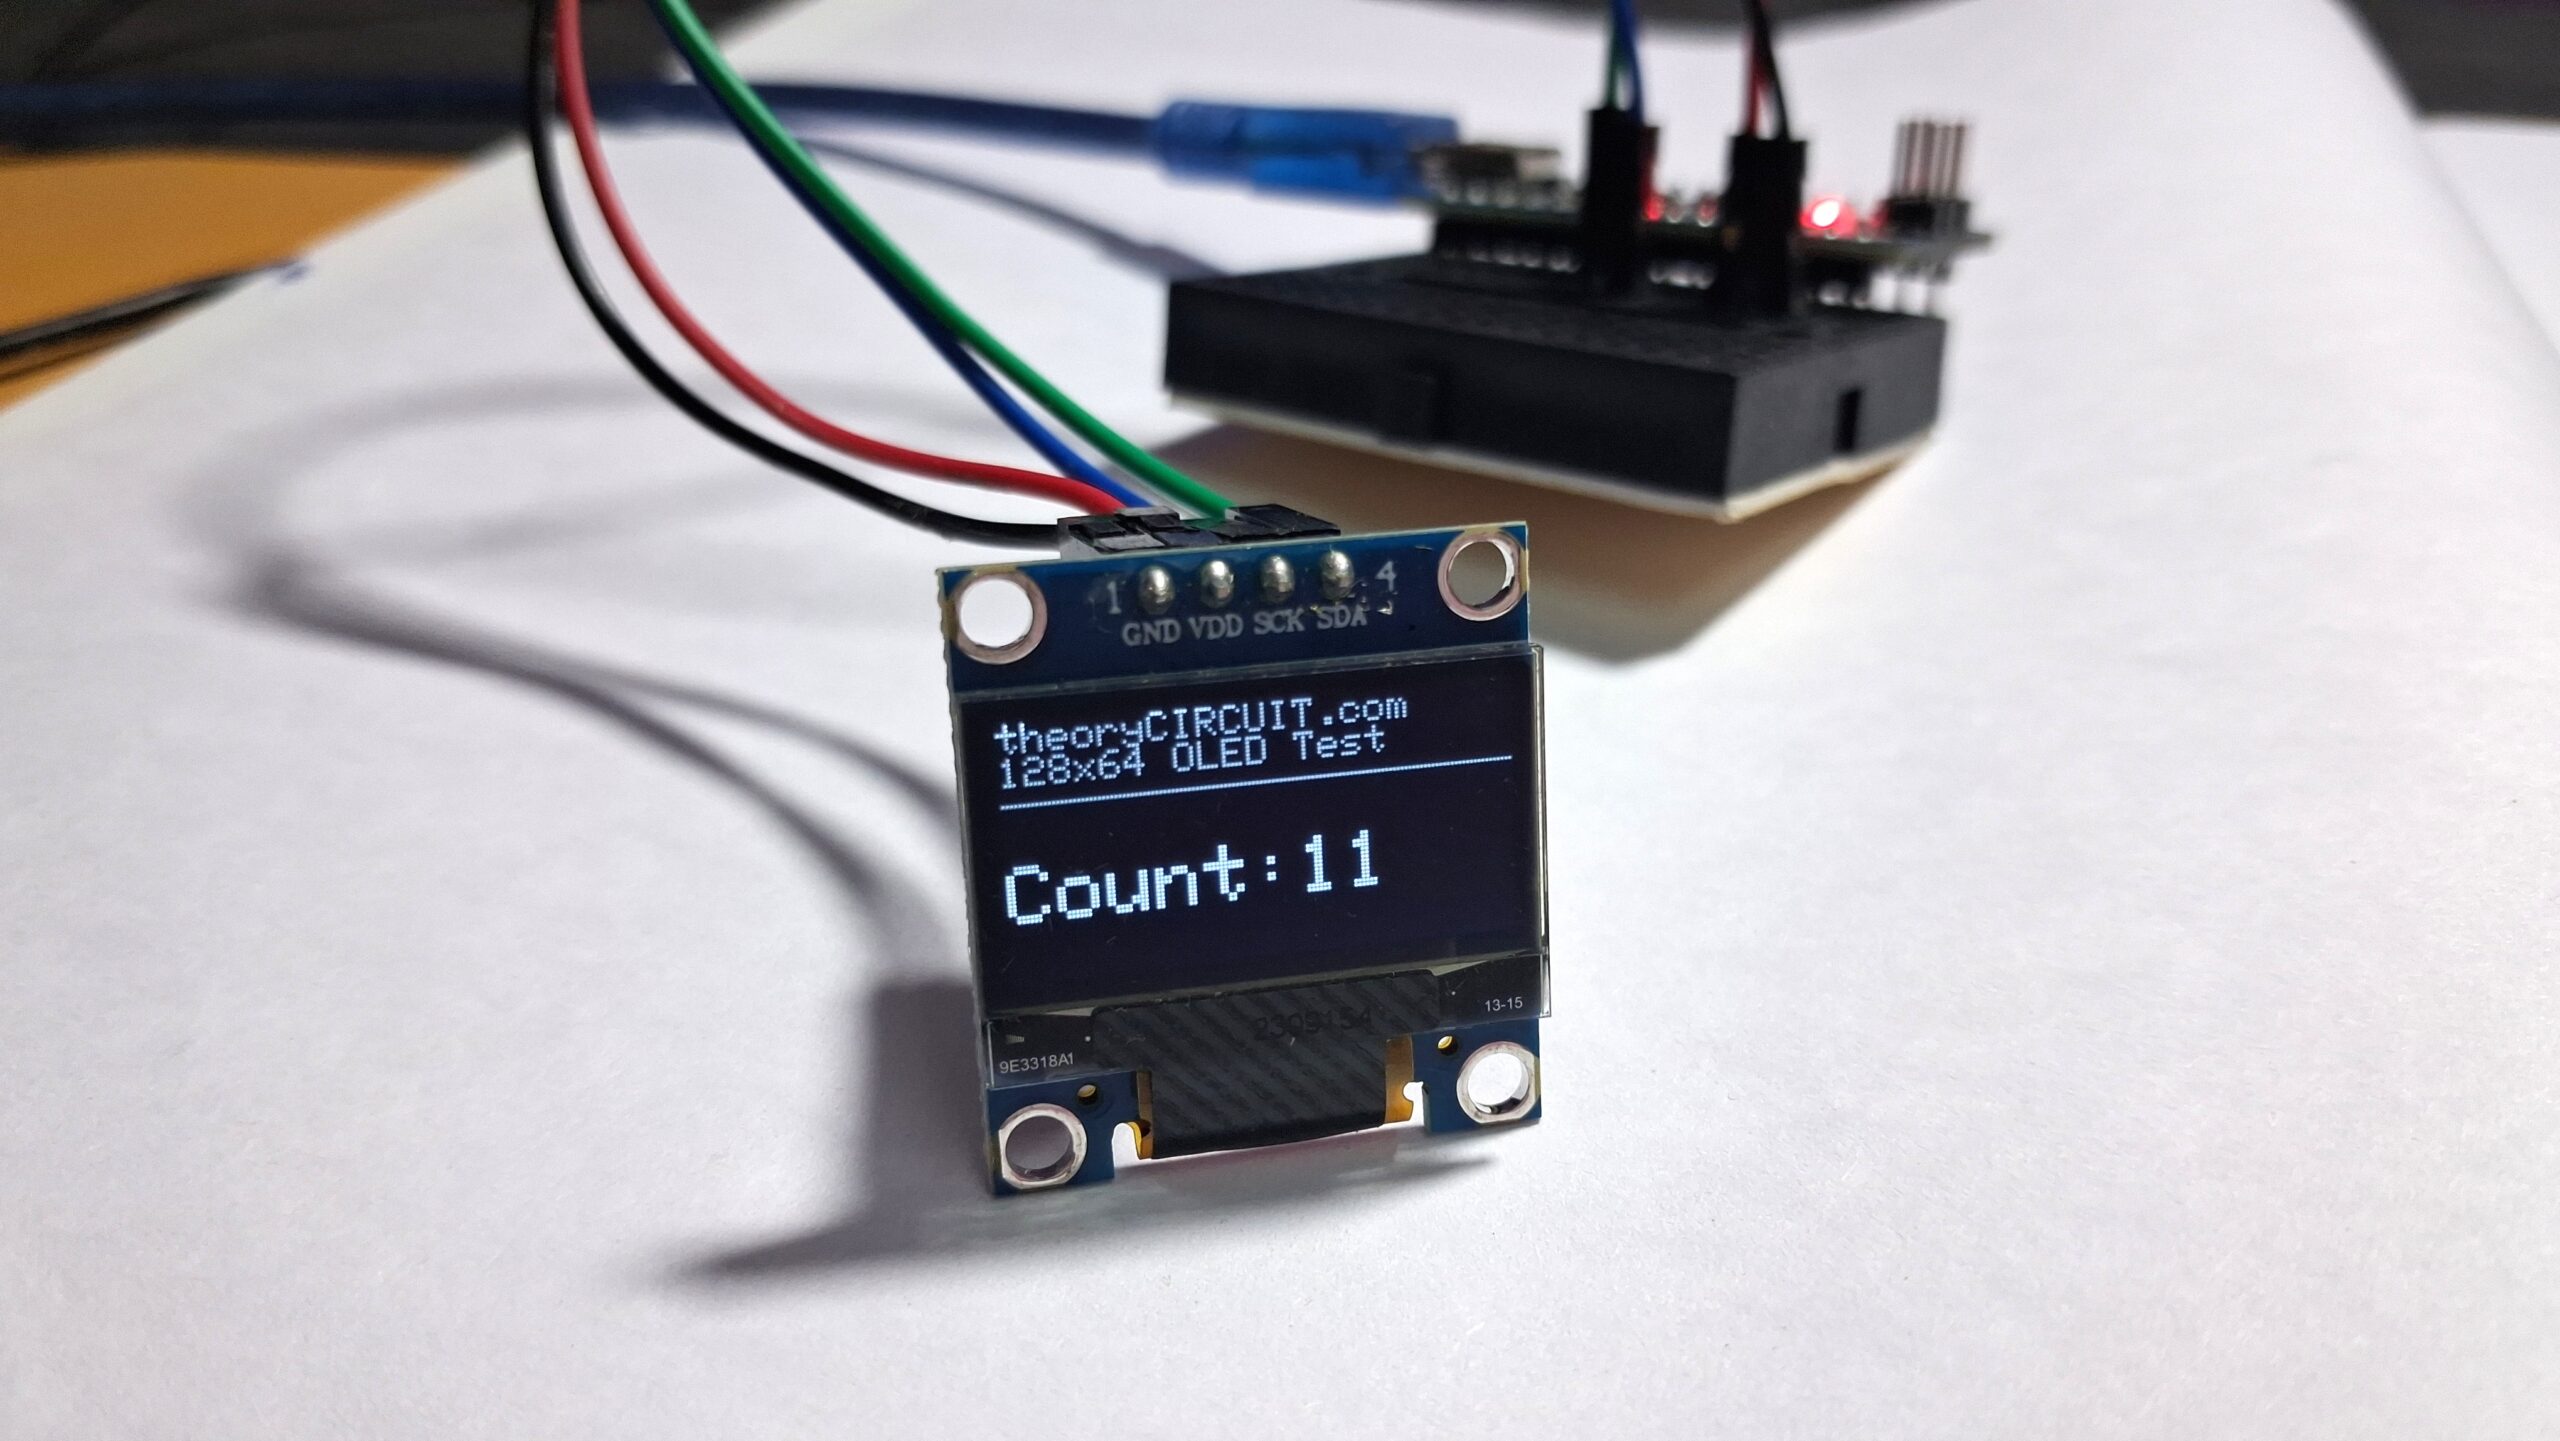
Interfacing 128×64 OLED with Arduino nano using I2C
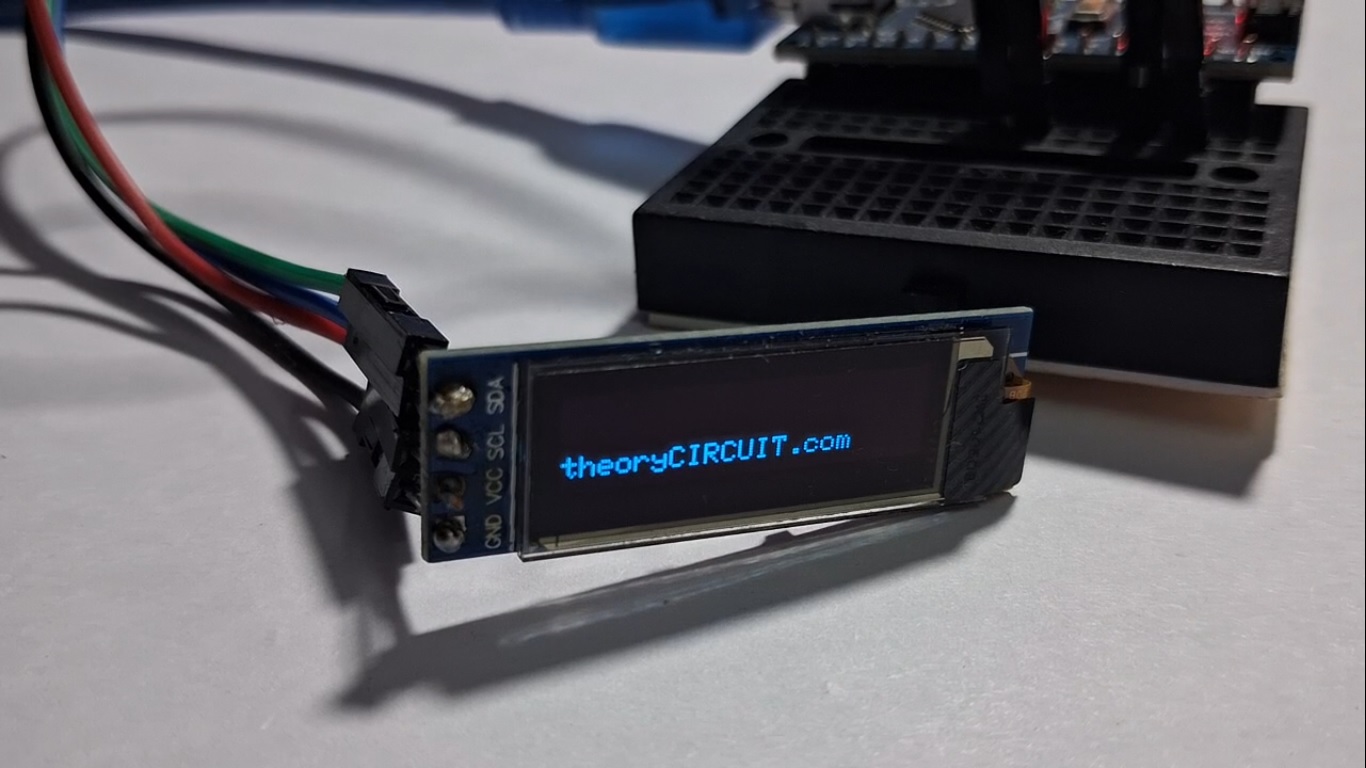
Interfacing 128×32 OLED with Arduino nano using I2C
Working Video
16×2 LCD Arduino nano I2C Interface Code
#include <Wire.h>
#include <LiquidCrystal_I2C.h>

// Set the LCD address, columns, and rows
LiquidCrystal_I2C lcd(0x27, 16, 2);  // Change 0x27 if your scanner found a different address

void setup() {
  lcd.init();
  lcd.backlight();

  lcd.setCursor(0, 0);
  lcd.print("TheoryCircuit");
  lcd.setCursor(0, 1);
  lcd.print("I2C LCD Test");
}

void loop() {
  // Example: display a counter
  static int count = 0;
  lcd.setCursor(0, 1);
  lcd.print("Count: ");
  lcd.print(count);
  lcd.print("   "); // clear leftover digits
  count++;
  delay(1000);
}
128×64 OLED Arduino nano I2C Interface Code
#include <Wire.h>
#include <Adafruit_GFX.h>
#include <Adafruit_SSD1306.h>

#define SCREEN_WIDTH 128
#define SCREEN_HEIGHT 64
#define OLED_RESET -1
#define SCREEN_ADDRESS 0x3C  // Change to 0x3D if scanner shows a different address

Adafruit_SSD1306 display(SCREEN_WIDTH, SCREEN_HEIGHT, &Wire, OLED_RESET);

void setup() {
  if (!display.begin(SSD1306_SWITCHCAPVCC, SCREEN_ADDRESS)) {
    while (true); // Halt if display not found
  }

  display.clearDisplay();
  display.setTextSize(1);
  display.setTextColor(SSD1306_WHITE);
  display.setCursor(0, 1);
  display.println("theoryCIRCUIT.com");
  display.println("128x64 OLED Test");
  display.drawLine(0, 20, 128, 20, SSD1306_WHITE); // divider line
  display.display();
}

void loop() {
  static int count = 0;
  display.fillRect(0, 30, 128, 34, SSD1306_BLACK); // clear lower area
  display.setCursor(0, 35);
  display.setTextSize(2);
  display.print("Count:");
  display.print(count);
  display.display();
  count++;
  delay(1000);
}
128×32 OLED Arduino nano I2C Interface Code
#include <Wire.h>
#include <Adafruit_GFX.h>
#include <Adafruit_SSD1306.h>

#define SCREEN_WIDTH 128
#define SCREEN_HEIGHT 32
#define OLED_RESET -1
#define SCREEN_ADDRESS 0x3C

Adafruit_SSD1306 display(SCREEN_WIDTH, SCREEN_HEIGHT, &Wire, OLED_RESET);

void setup() {
  // Initialize OLED
  if (!display.begin(SSD1306_SWITCHCAPVCC, SCREEN_ADDRESS)) {
    while (true); // Halt if display not found
  }

  // Display startup text
  display.clearDisplay();
  display.setTextSize(1);
  display.setTextColor(SSD1306_WHITE);
  display.setCursor(0, 20);
  display.println("theoryCIRCUIT.com");
  display.display();

  // Keep it visible for 1.5 seconds
  delay(1500);

  // Clear display before counter
  display.clearDisplay();
  display.display();
}

void loop() {
  static int count = 0;

  // Clear bottom area
  display.fillRect(0, 16, 128, 16, SSD1306_BLACK);

  // Display counter
  display.setCursor(0, 20);
  display.print("Count: ");
  display.print(count);

  display.display();

  count++;
  delay(1000);
}