Last Updated on August 15, 2026
We know that, Gas leakage is a series safety problem in homes, work place, and industries. Methane (CH4) and natural gas leaks can lead to fire accidents if they are not detected early. To solve this problem, here we built a simple and low cost gas detector using the MQ4 gas sensor and the Arduino board.
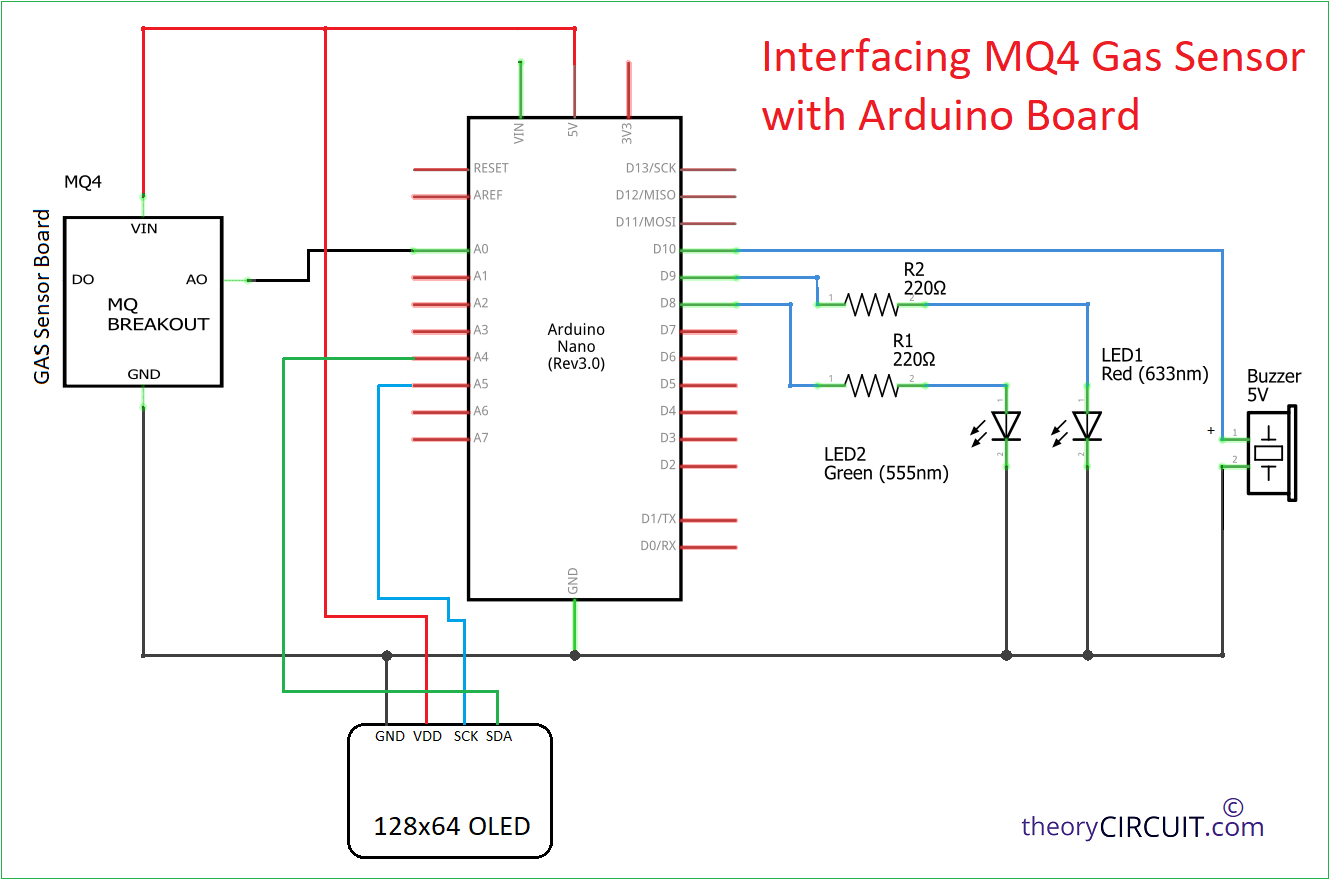
Here in this project, we will interface MQ4 sensor with Arduino nano board, it is same wiring for an Arduino uno also. If you have uno you can use that too. Since both boards use the same pin names for analog and I2C pins. The sensor reading will be shown on 128×64 OLED display and we will use two LEDs and a Buzzer for visual and sound alerts during the gas leakage detection.
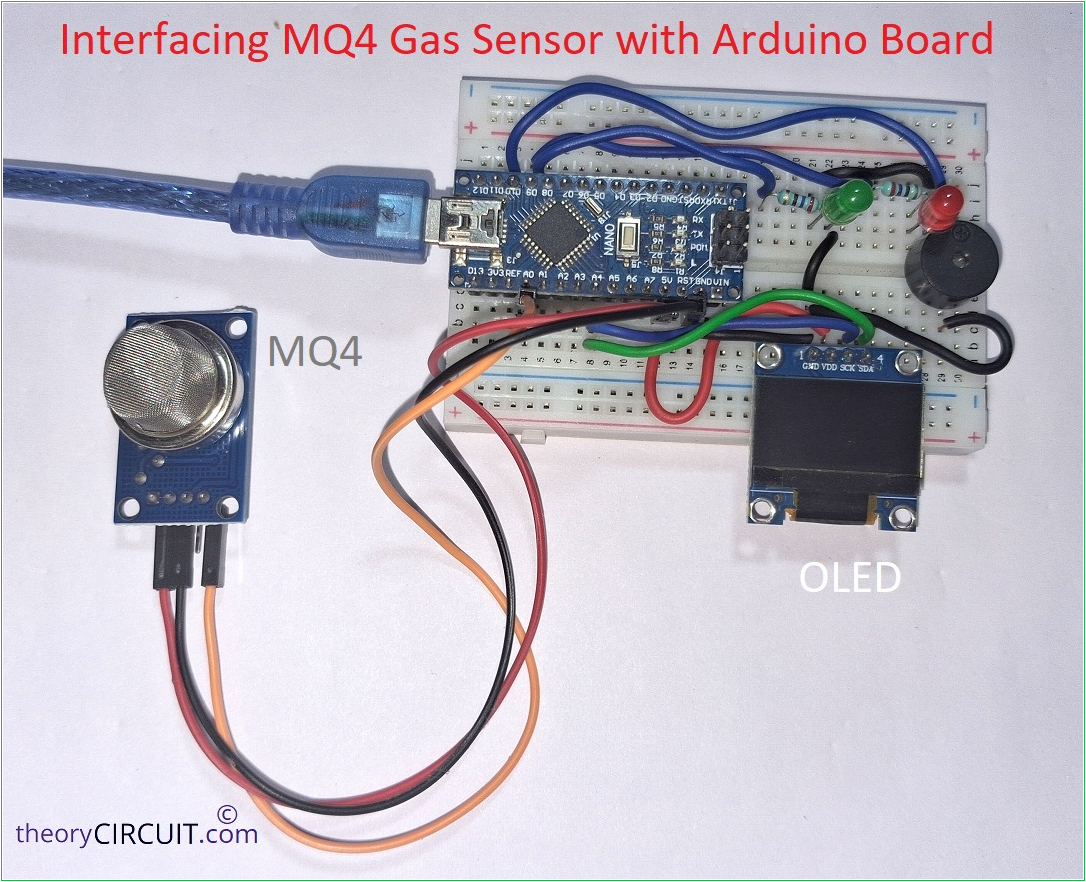
Wiring Diagram
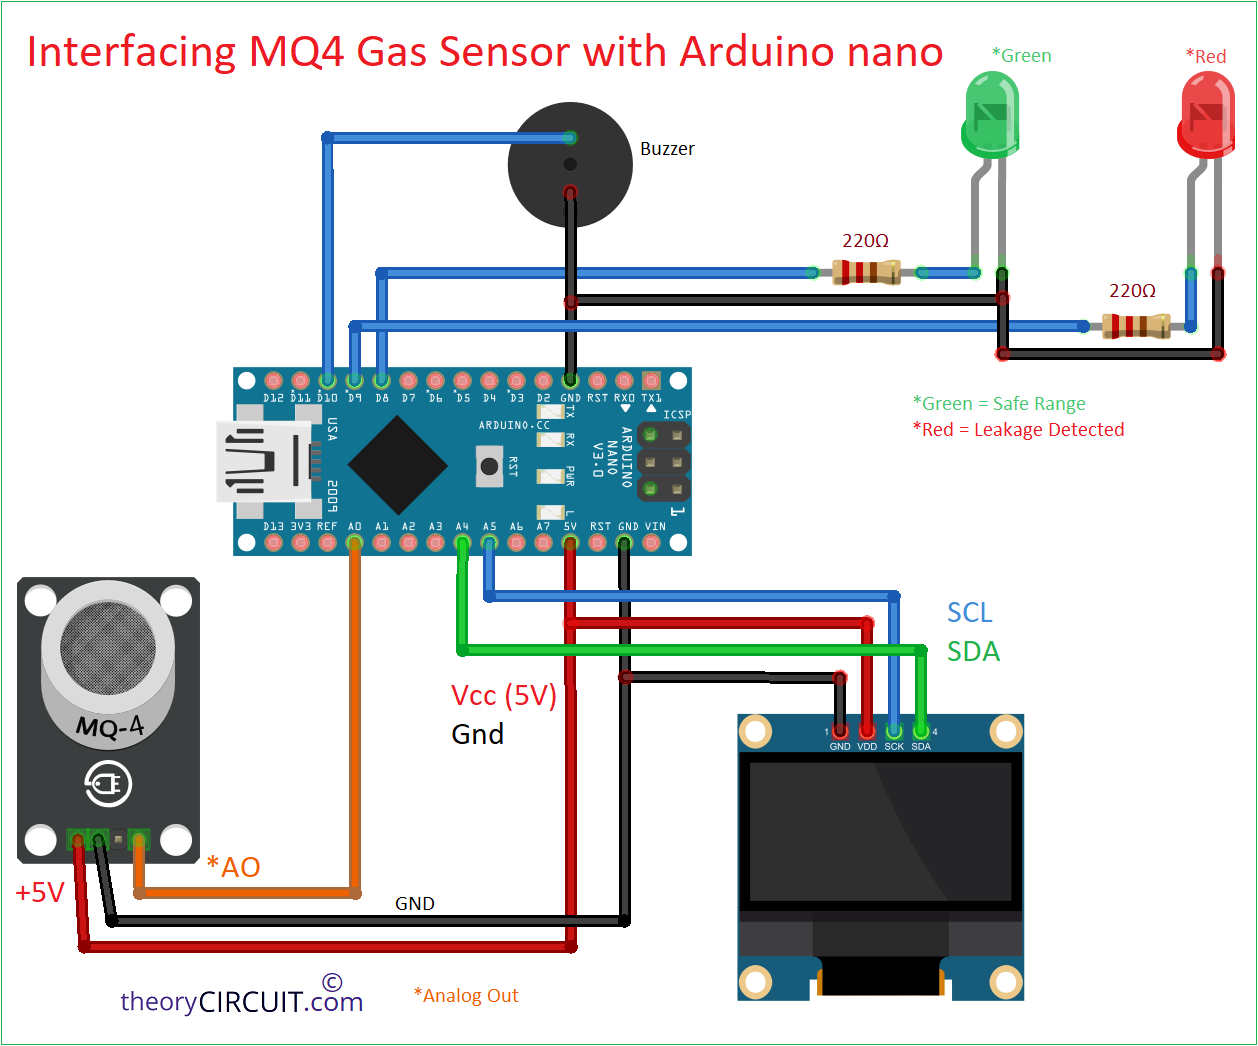
Circuit Diagram
Components Required to build this Project
- Arduino board (nano or uno)
- MQ4 Gas sensor Breakout board
- 128×64 OLED
- 5V Buzzer
- Red, Green LED = each one
- Resistor 220Ω = 2
- Connecting Wires
- Computer with Arduino IDE
- USB Cable for Arduino board
Working Video
Construction & Working
This project is beginner friendly and does not need any complex programming. Follow this article to build your own gas leakage detector for your home or lab. Before start to wiring MQ4 with Arduino check the pinout of MQ4 sensor because MQ4 gas detector will have different pinout pattern depends on the backside PCB board.
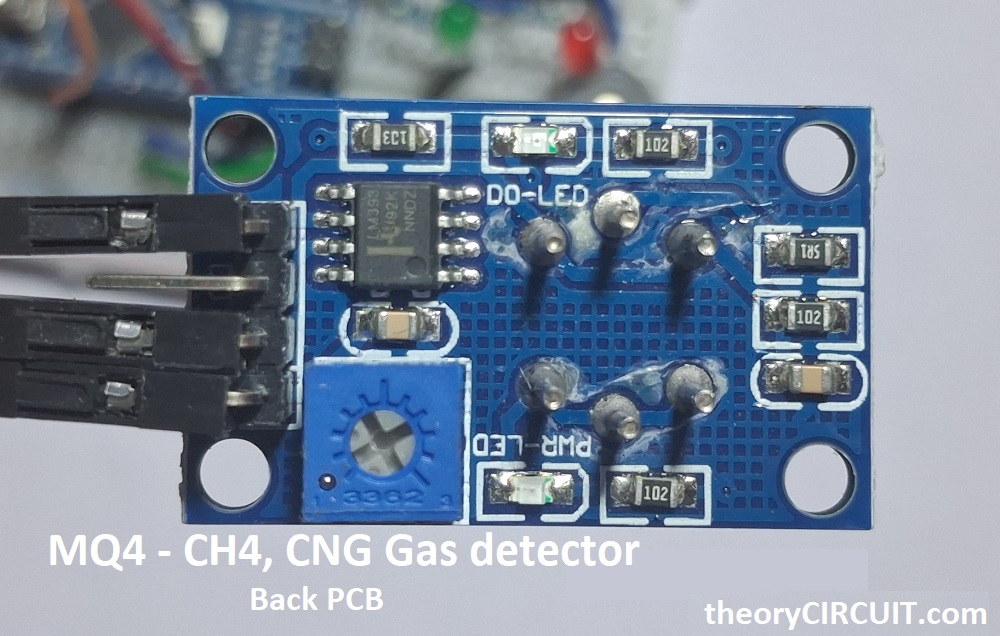
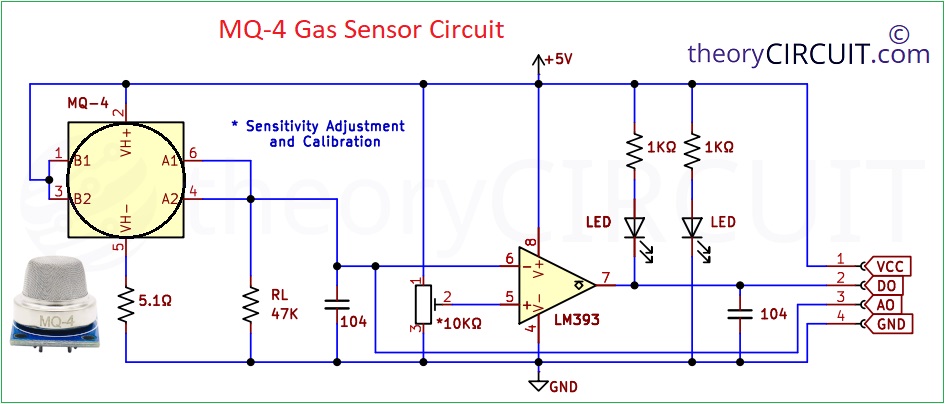
If you have breakout board for MQ4, then it is very easy to connect it with Arduino, most MQ4 breakout board will have VCC, GND, Dout (digital output), Aout (analog output). We will use the Aout pin for reading. If you have MQ4 sensor without PCB then you have to make the sensitivity adjustment and calibration circuit around MQ4 sensor. MQ4 without breakout board is little complex for beginner, better go with breakout board. Here the MQ4 sensor circuit for professionals.
We get smooth Analog reading that we can show on the OLED and also compare with a threshold value for alert triggering.
Just connect all component together as shown in the circuit, here is the wiring table for Arduino nano and Arduino uno with all required components to build simple CNG gas detector.
| Component Pin | Arduino Nano Pin | Arduino Uno Pin |
|---|---|---|
| MQ4 VCC | 5V | 5V |
| MQ4 GND | GND | GND |
| MQ4 AOUT | A0 | A0 |
| OLED VCC | 5V | 5V |
| OLED GND | GND | GND |
| OLED SDA | A4 | A4 |
| OLED SCL | A5 | A5 |
| Green LED Anode | D8 (through 220Ω Resistor) | D8 |
| Green LED Cathode | GND | GND |
| Red LED Anode | D9 (through 220Ω Resistor) | D9 |
| Red LED Cathode | GND | GND |
| Buzzer Positive | D10 | D10 |
| Buzzer Negative | GND | GND |
Before connecting the Arduino board with computer after wiring check the LEDs and Buzzer polarity.
Here the MQ4 sensor poses a sensing element made of tin dioxide (snO2). So that when methane or natural gas molecules react with the sensing surface and change its electrical Resistance. This change in Resistance will changes voltage at the Aout pin. Also LM393 compares this changes in voltage and reference voltage and gives digital out that is HIGH or LOW (5V or 0V).
Here the Arduino continuously reads this Analog voltage using analogRead(A0). Which gives a value between 0 and 1023, a clear room with no methane or CNG gas gives a low reading and when the gas is present near the sensor then the reading will increase.
Here in our code, we compare this reading with a threshold value as we already discussed, and depends on the sensitivity and calibration of your gas sensor you can adjust this threshold based on your testing.
Here the following code will do,
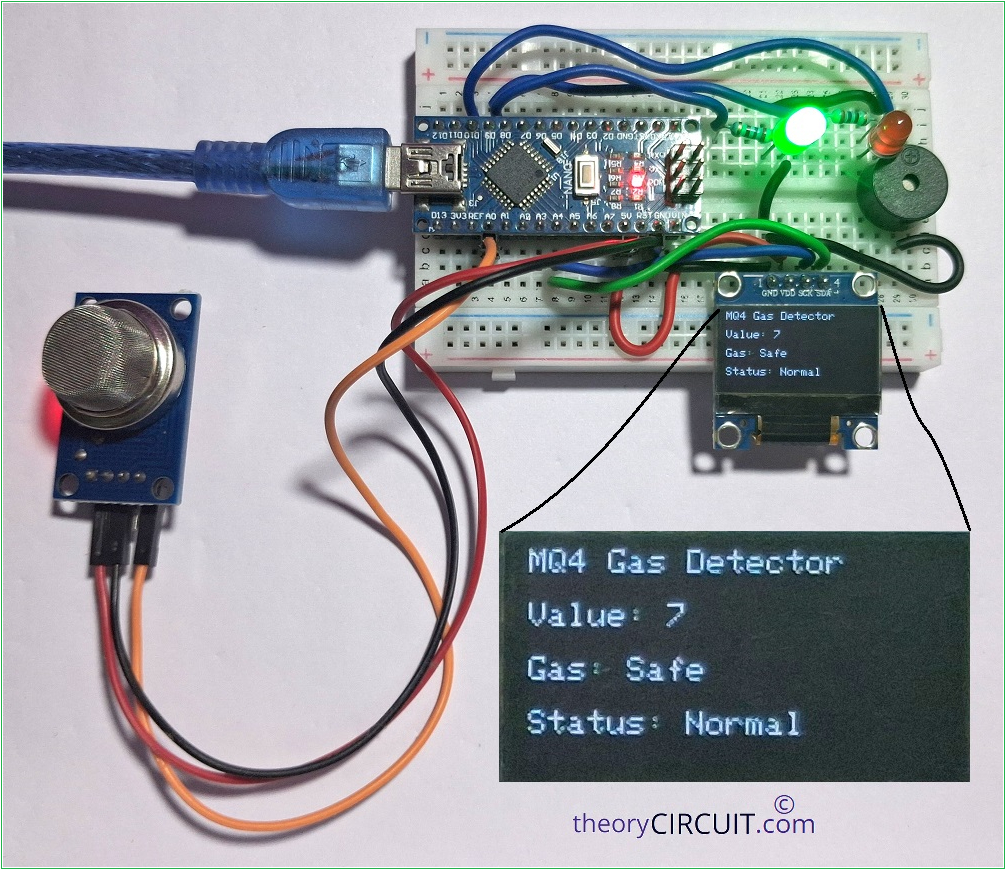
- If the sensor value is below the Threshold = No Gas detected = Green LED ON, Red LED and Buzzer OFF, then OLED shows “Gas: Safe”.
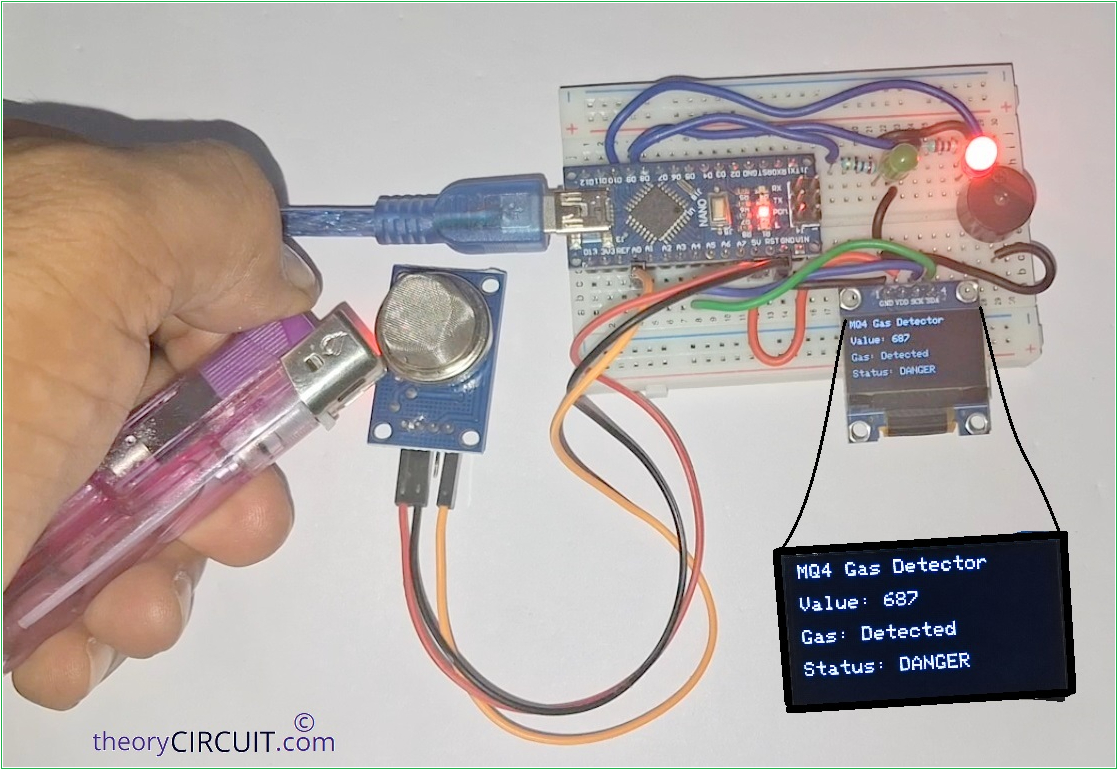
- If the sensor value is above the Threshold = Gas detected = Red LED ON, Buzzer ON, Green LED OFF, OLED shows “Gas: Detected”.
- For each condition the OLED will display the live raw sensor value. So that you can see how the concentration changes in real time.
Interfacing MQ4 Gas Sensor with Arduino Code
#include <Wire.h>
#include <Adafruit_GFX.h>
#include <Adafruit_SSD1306.h>

#define SCREEN_WIDTH 128
#define SCREEN_HEIGHT 64
#define OLED_RESET -1

Adafruit_SSD1306 display(SCREEN_WIDTH, SCREEN_HEIGHT, &Wire, OLED_RESET);

const int mq4Pin = A0;
const int greenLed = 8;
const int redLed = 9;
const int buzzer = 10;

int gasValue = 0;
int threshold = 100;   // adjust this value after testing your sensor

void setup() {
  Serial.begin(9600);

  pinMode(greenLed, OUTPUT);
  pinMode(redLed, OUTPUT);
  pinMode(buzzer, OUTPUT);

  if (!display.begin(SSD1306_SWITCHCAPVCC, 0x3C)) {
    Serial.println("OLED not found");
    while (true);
  }

  display.clearDisplay();
  display.setTextSize(1);
  display.setTextColor(SSD1306_WHITE);
  display.setCursor(0, 0);
  display.println("MQ4 Gas Detector");
  display.println("Warming up sensor...");
  display.display();

  delay(20000);  // sensor warm-up time
}

void loop() {
  gasValue = analogRead(mq4Pin);
  Serial.print("Gas Value: ");
  Serial.println(gasValue);

  display.clearDisplay();
  display.setCursor(0, 0);
  display.println("MQ4 Gas Detector");

  display.setCursor(0, 16);
  display.print("Value: ");
  display.println(gasValue);

  if (gasValue > threshold) {
    digitalWrite(redLed, HIGH);
    digitalWrite(greenLed, LOW);
    digitalWrite(buzzer, HIGH);

    display.setCursor(0, 32);
    display.println("Gas: Detected");
    display.setCursor(0, 48);
    display.println("Status: DANGER");
  } else {
    digitalWrite(redLed, LOW);
    digitalWrite(greenLed, HIGH);
    digitalWrite(buzzer, LOW);

    display.setCursor(0, 32);
    display.println("Gas: Safe");
    display.setCursor(0, 48);
    display.println("Status: Normal");
  }

  display.display();
  delay(500);
}
Note: The MQ4 sensor need 10 to 40 Seconds warmup time after getting ON, test and calibrate your MQ4 gas sensor before setting the threshold level in the code, because it changes depends on the sensitivity level of sensor, room air content and concentration.
Testing