Last Updated on March 28, 2024
In order to find the temperature, we have several option but the first choice will be LM 35 temperature sensing IC. Interfacing Temperature Sensor LM35 with Arduino is super easy process and it requires no external interfacing components. The LM35 sense the temperature between -55 °C to 150 °C with ±5% accuracy. It can be easily connected with Arduino board.
The LM35 from Texas Instruments is a precision integrated circuit temperature sensor, renowned for their accuracy and ease of use. These devices generate an output voltage that is linearly proportional to the Centigrade temperature, eliminating the need for complex conversions and constant voltage subtractions typically associated with sensors calibrated in Kelvin. One of LM35’s key advantages lies in its user-friendly design. Unlike sensors calibrated in Kelvin, the LM35 doesn’t necessitate the subtraction of a constant voltage from the output for convenient Centigrade scaling. This simplicity streamlines the integration process, making it exceptionally user-friendly.
This LM35 Sensor works without any external components or signal conditioning circuit. This sensors offer typical accuracies of ± 1/4°C at room temperature and ± 3/4°C across a broad temperature range, spanning from -55°C to 150°C. LM35 and Temperature sensor series comes in different types of packages. Refer datasheet for more information.
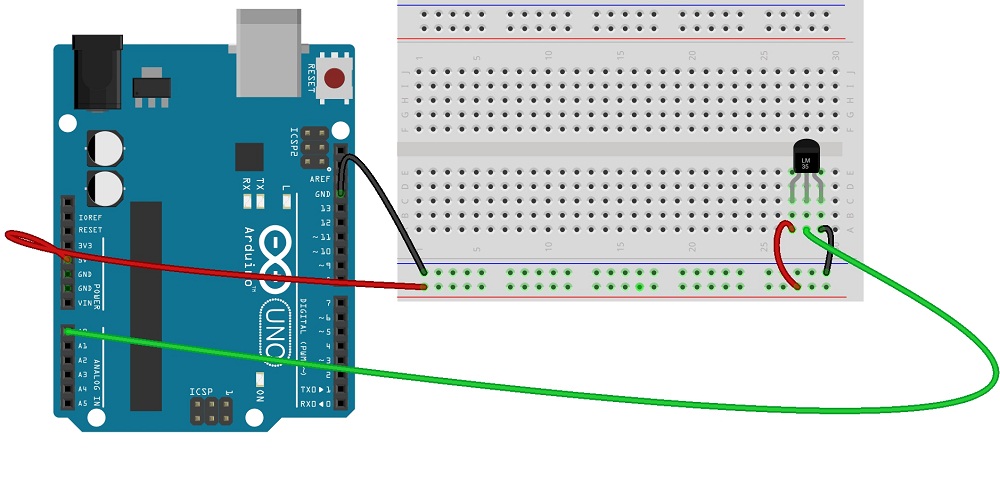
Temperature Sensor LM35 with Arduino Hookup
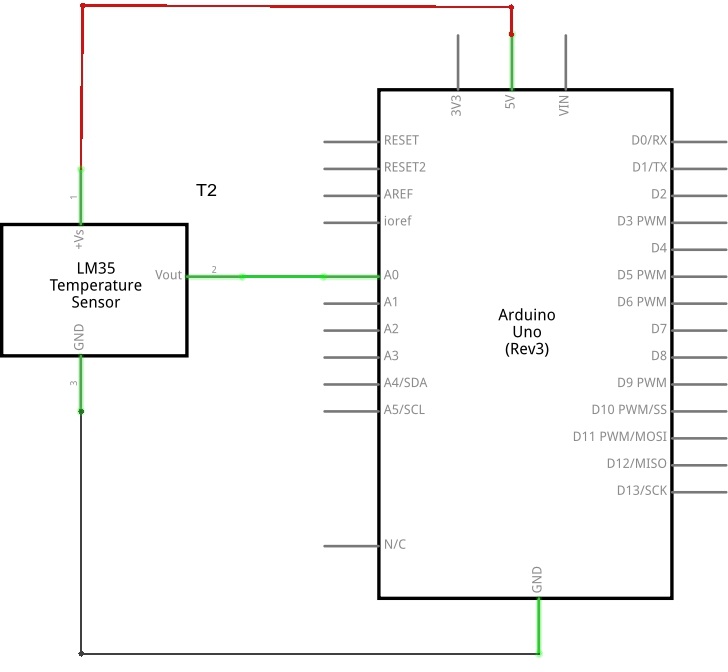
Temperature Sensor LM35 with Arduino Circuit
Components List
| S.No | Name | Quantity |
| 1. | Arduino uno | 1 |
| 2. | LM 35 temperature sensor | 1 |
| 3. | Connecting wires | as required |
Temperature Sensor LM35 Arduino Interface
Here we have given basic interface circuit with arduino and sketch code to display sensor reading in serial port of arduino. In arduino board the output terminal of LM 35 connected to A0 that is analog input pin. +Vcc and Gnd from the arduino board can be given to temperature sensor as bias supply.
As We know LM35 Sensor gives an analog voltage proportional to the temperature sensed. In order to take that analog voltage as input to the Arduino board we use analog input pin A0, By reading this analog voltage using analogRead(), you get a value between 0 and 1023. The analog value between 0 and 1023 is converted to temperature in Celsius using the formula provided in the datasheet of LM35. Then, it is further converted to Fahrenheit.
float mv = ( val/1023.0)*5000;
float cel = mv/10;
float farh = (cel*9)/5 + 32;
Final output Temperature values are sent to the Serial Monitor for viewing through serial print cammand. You can see the result by opening Serial Monitor in the Arduino IDE. Compile and upload the following code and you must see the temperature changes in serial monitor. you can extend the output to LED, or LCD or automate any output actuators depends on temperature range conditions.
Temperature Sensor LM35 with Arduino-code
/*
 * Temperature Sensor LM35 with Arduino
 * Source: www.theorycircuit.com
 */
int val;
int tempPin = 1;
void setup()
{

Serial.begin(9600);
}
void loop()
{
val = analogRead(tempPin);

float mv = ( val/1023.0)*5000;
float cel = mv/10;
float farh = (cel*9)/5 + 32;
Serial.print("TEMPRATURE = ");
Serial.print(cel);
Serial.print("*C");
Serial.println();
delay(1000);
/* uncomment this to get temperature in farenhite
Serial.print("TEMPRATURE = ");
Serial.print(farh);
Serial.print("*F");
Serial.println();
*/
}
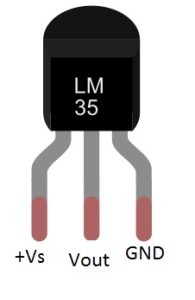
Pin Configuration of LM35


Hallo,
How about a sub Zero temperature ( Celsius ).
The Arduino ADC can not handle negative voltages!!!
Better use an TMP36.
Can use TMP36 also.