
Last Updated on August 24, 2024
We know that the ESP32 Microcontroller from Espressif have integrated WiFi and Bluetooth controllers, so that we can easily employ this ESP32 Microcontroller in our IoT (Internet of Things) and Bluetooth connectivity projects. Here is the simple and most common project you can build and experiment. Use any output actuators as target, keep in mind that this ESP32 will give 3.3V output only, through GPIO pins. You can use level shifter or relay to control high voltage loads.
This simple ESP32 web server to control LED project requires Wi-Fi local network that is controlling device and ESP32 board should be connected in same WiFi. Following Arduino Code contains all the HTML code to display the user interface in browser and it is responsive so that you can use it on any computer or mobile device browser.
From this simple project you can learn about setting up a web server on the ESP32 to turn two LEDs ON and OFF remotely, and to create an HTML web Interface and then handling HTML requests in the ESP32’s firmware by the way manipulating the GPIO pins connected to the LEDs.
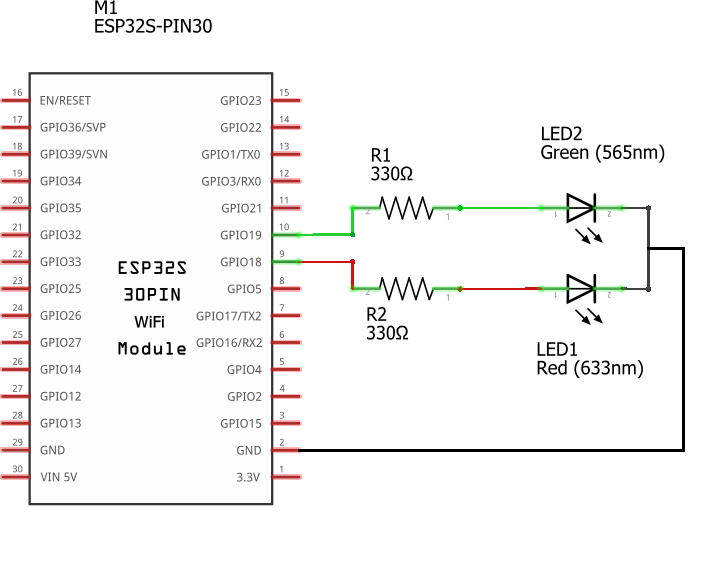
Circuit Diagram
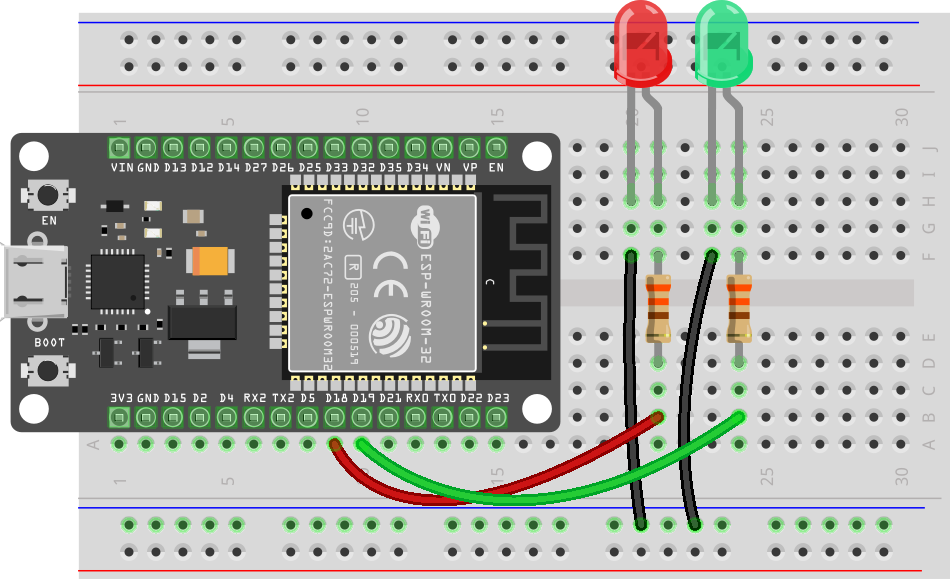
Wiring
Components Required
- ESP32 Board
- LED 5mm (Red, Green)
- 330Ω Resistor = 2
- Breadboard
- Connecting Wires
Working Video
Construction & Working
A Computer which Serves Website through Internet is called Web Server. Here we are going to use ESP32 microcontroller to serve a basic HTML web page which contains simple user interface ON / OFF button. On board memory is enough for this code, you can serve large size webpage by Increasing ESP32 memory.
This project starts with connecting two LEDs in two different GPIO pins of ESP32 board. Red LED Anode is connected to GPIO 18 through 330Ω Resistor then Green LED Anode is connected to GPIO 19 through 330Ω Resistor, two LEDs cathode is connected to Ground.
Now connect ESP32 board with computer through USB port. Identify the Port number of your board in device manager. If you are new to use ESP32 board with Arduino IDE then read here to get started.
Ensure that you have the ESP32 support installed in your Arduino IDE. After all setup (Board, Port) done, it is time to write code.
Arduino Code
#include <WiFi.h>

// Replace with your network credentials
const char* ssid = "Your SSID (WiFi Name)";
const char* password = "Your WiFi Password";

// Set web server port number to 80
WiFiServer server(80);

// Variable to store the HTTP request
String header;

// Auxiliar variables to store the current output state
String led1State = "OFF";
String led2State = "OFF";

// Assign output variables to GPIO pins
const int led1 = 18;
const int led2 = 19;

// Current time
unsigned long currentTime = millis();
// Previous time
unsigned long previousTime = 0;
// Define timeout time in milliseconds (example: 2000ms = 2s)
const long timeoutTime = 2000;

void setup() {
  Serial.begin(115200);
  delay(1000); // Wait for a second for the serial monitor to initialize
  Serial.println("Starting setup...");

  // Initialize the output variables as outputs
  pinMode(led1, OUTPUT);
  pinMode(led2, OUTPUT);
  // Set outputs to LOW
  digitalWrite(led1, LOW);
  digitalWrite(led2, LOW);

  // Connect to Wi-Fi network with SSID and password
  Serial.print("Connecting to ");
  Serial.println(ssid);
  WiFi.begin(ssid, password);
  int retryCount = 0;
  while (WiFi.status() != WL_CONNECTED) {
    delay(500);
    Serial.print(".");
    retryCount++;
    if (retryCount >= 60) { // Timeout after 30 seconds
      Serial.println("\nFailed to connect to WiFi");
      return;
    }
  }
  // Print local IP address and start web server
  Serial.println("");
  Serial.println("WiFi connected.");
  Serial.println("IP address: ");
  Serial.println(WiFi.localIP());
  server.begin();
}

void loop() {
  WiFiClient client = server.available();   // Listen for incoming clients

  if (client) {                             // If a new client connects,
    currentTime = millis();
    previousTime = currentTime;
    Serial.println("New Client.");          // print a message out in the serial port
    String currentLine = "";                // make a String to hold incoming data from the client
    while (client.connected() && currentTime - previousTime <= timeoutTime) {  // loop while the client's connected
      currentTime = millis();
      if (client.available()) {             // if there's bytes to read from the client,
        char c = client.read();             // read a byte, then
        Serial.write(c);                    // print it out the serial monitor
        header += c;
        if (c == '\n') {                    // if the byte is a newline character
          // if the current line is blank, you got two newline characters in a row.
          // that's the end of the client HTTP request, so send a response:
          if (currentLine.length() == 0) {
            // HTTP headers always start with a response code (e.g. HTTP/1.1 200 OK)
            // and a content-type so the client knows what's coming, then a blank line:
            client.println("HTTP/1.1 200 OK");
            client.println("Content-type:text/html");
            client.println("Connection: close");
            client.println();

            // turns the GPIOs on and off
            if (header.indexOf("GET /18/on") >= 0) {
              Serial.println("GPIO 18 on");
              led1State = "ON";
              digitalWrite(led1, HIGH);
            } else if (header.indexOf("GET /18/off") >= 0) {
              Serial.println("GPIO 18 off");
              led1State = "OFF";
              digitalWrite(led1, LOW);
            } else if (header.indexOf("GET /19/on") >= 0) {
              Serial.println("GPIO 19 on");
              led2State = "ON";
              digitalWrite(led2, HIGH);
            } else if (header.indexOf("GET /19/off") >= 0) {
              Serial.println("GPIO 19 off");
              led2State = "OFF";
              digitalWrite(led2, LOW);
            }

            // Display the HTML web page
            client.println("<!DOCTYPE html><html>");
            client.println("<head><meta name=\"viewport\" content=\"width=device-width, initial-scale=1\">");
            client.println("<link rel=\"icon\" href=\"data:,\">");
            client.println("<style>html { font-family: Helvetica; display: inline-block; margin: 0px auto; text-align: center;}");
            client.println(".button { background-color: #4CAF50; border: none; color: white; padding: 16px 40px;");
            client.println("text-decoration: none; font-size: 30px; margin: 2px; cursor: pointer;}");
            client.println(".button2 {background-color: #555555;}</style></head>");

            // Web Page Heading
            client.println("<body><h1>ESP32 Web Server</h1>");
            client.println("<body><h2>To Control LED</h2>");
            client.println("<body><h2>theoryCIRCUIT</h2>");

            // Display current state, and ON/OFF buttons for GPIO 18
            client.println("<p>GPIO 18 - State " + led1State + "</p>");
            // If the led1State is off, it displays the ON button
            if (led1State == "OFF") {
              client.println("<p><a href=\"/18/on\"><button class=\"button\">ON</button></a></p>");
            } else {
              client.println("<p><a href=\"/18/off\"><button class=\"button button2\">OFF</button></a></p>");
            }

            // Display current state, and ON/OFF buttons for GPIO 19
            client.println("<p>GPIO 19 - State " + led2State + "</p>");
            // If the led2State is off, it displays the ON button
            if (led2State == "OFF") {
              client.println("<p><a href=\"/19/on\"><button class=\"button\">ON</button></a></p>");
            } else {
              client.println("<p><a href=\"/19/off\"><button class=\"button button2\">OFF</button></a></p>");
            }
            client.println("</body></html>");

            // The HTTP response ends with another blank line
            client.println();
            // Break out of the while loop
            break;
          } else { // if you got a newline, then clear currentLine
            currentLine = "";
          }
        } else if (c != '\r') {  // if you got anything else but a carriage return character,
          currentLine += c;      // add it to the end of the currentLine
        }
      }
    }
    // Clear the header variable
    header = "";
    // Close the connection
    client.stop();
    Serial.println("Client disconnected.");
    Serial.println("");
  }
}
Code Explanation
In this ESP32 web server LED code following setup are crucial.
- Include WiFi Library.
- Define Variables for WiFi (Name and Password)
- Define GPIO Pins for LED
- Define the Web server Instance to serve local network
- Setting up the HTML Interface.
- Handling HTTP Requests
- Setting up the WiFi and Webserver
- Running the web server in loop mode to continuously listen for incoming request.
- After uploading the Aduino code, then watch serial monitor to display IP address like 192.168.1.X and use that IP in local wifi connected device browser to control LEDs.
- If IP not showing in serial monitor then press EN button in the ESP32 board and watch serial monitor in Arduino IDE.

Example Page
