Last Updated on March 15, 2025
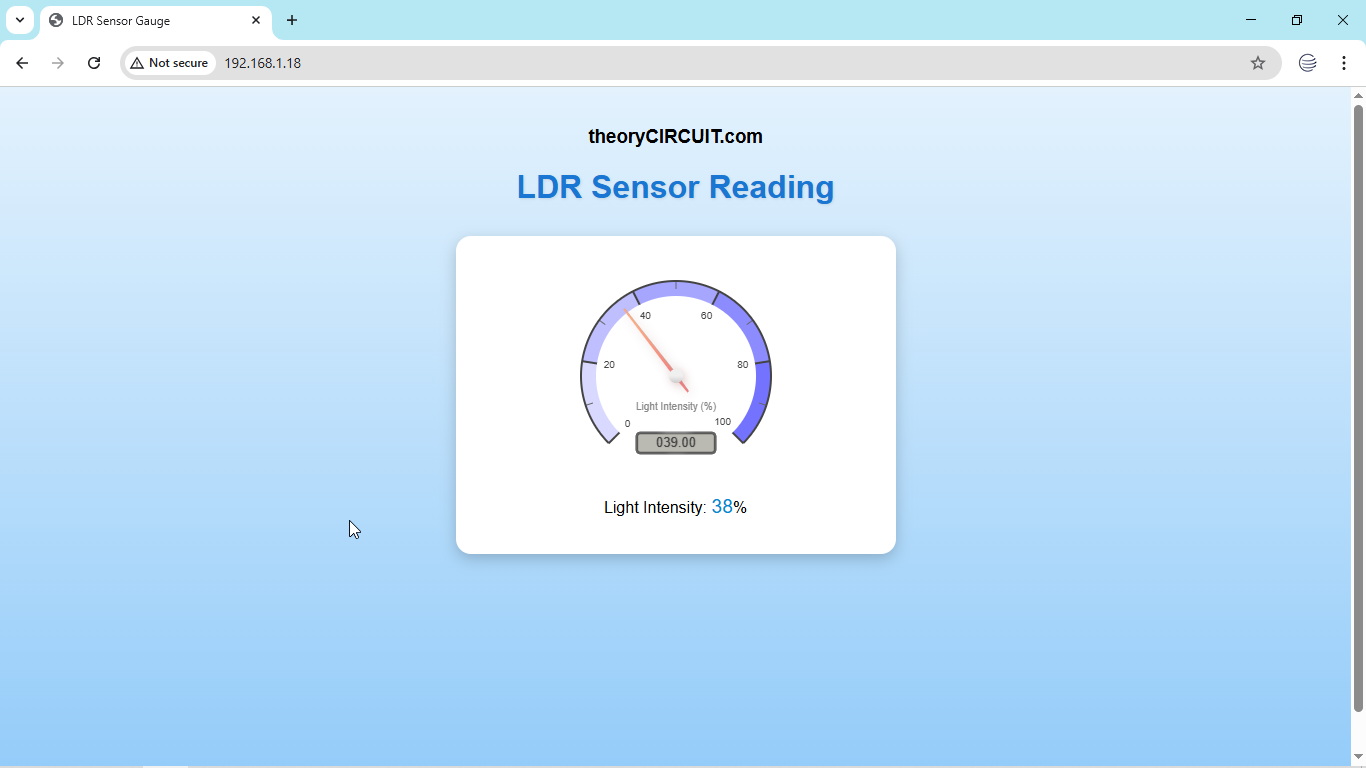
Displaying sensor readings on gauges using an ESP32 web server makes monitoring multiple sensors effortless at a glance. Let’s build Simple Sensor Gauge using ESP32 Web Server and understand it. Here we used ESP32 Microcontroller (DevKit V1) to make a web based monitoring application for a LDR (Light Dependent Resistor) you can use any sensor but changes on the code must be done before uploading code. The Web page using HTML will display real time light intensity readings on the Analog Radial Gauge and also in the text. It can be accessed from any device on the local network (Same Wifi).
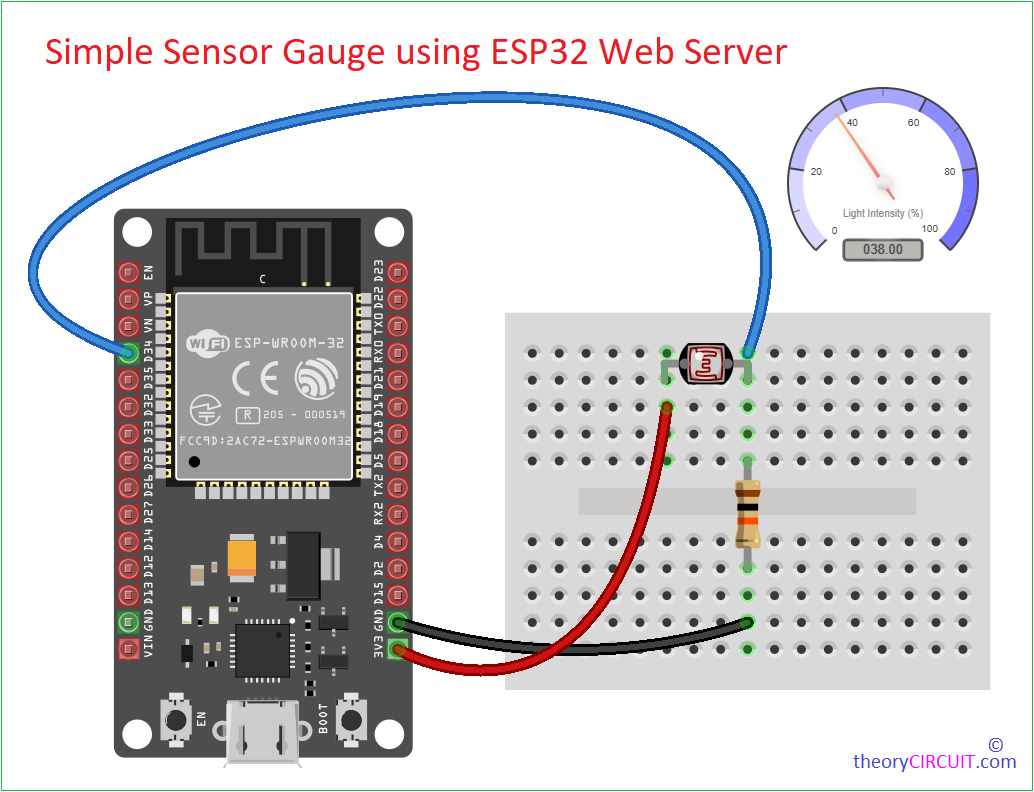
This experiment is to show the simple way of building Analog type reading gauge for sensor attached with GPIO pin of ESP32. Here LDR as a sensor connected in GPIO34 and code made for reading percentage arranged from 0 to 100 and visualizes the data using the Canvas-Gauges library with custom styled interface. It can be easily made by any level maker.
Circuit Diagram
Components Required
- ESP32 Microcontroller board (here DOIT DevKit V1)
- LDR
- Resistor 10KΩ
- Breadboard and connecting wires
- Computer with Arduino IDE
- Wi-Fi network
- Browser (chrome)
Construction & Working
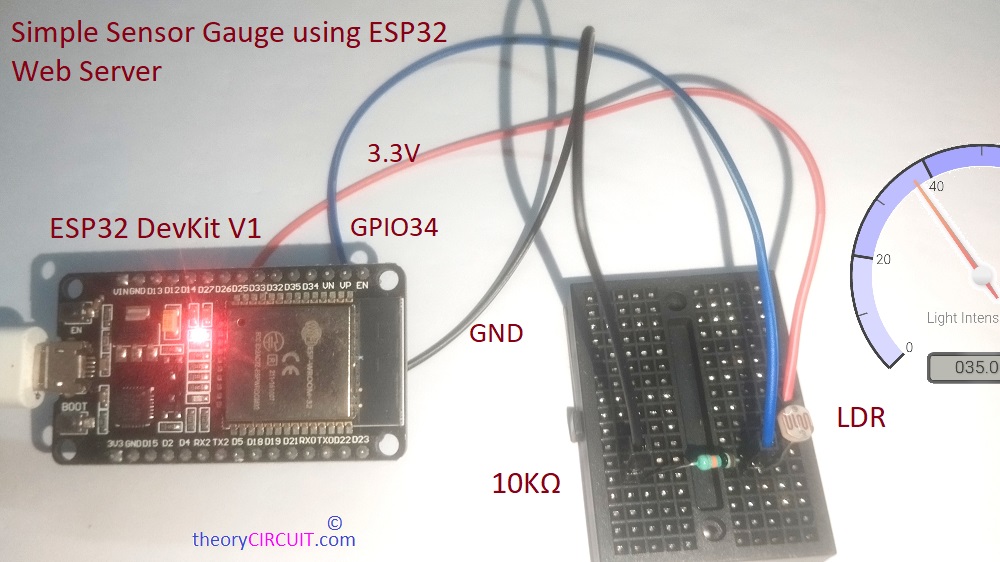
To Read the LDR Changes we have to form a voltage divider, so the LDR is serially connected with 10KΩ Resistor, now another pin of LDR is connected to 3.3V power supply and another Resistor terminal is connected to GND. Hence we formed voltage divider, by the changes in light intensity conductivity and Resistance level in LDR changes, by detecting this changes using internal ADC of ESP32 we can get readings in digits, for that LDR, Resistor Junction point should be connected to the ESP32 ADC enabled GPIO pin.
To make code we used Arduino IDE, so you should have ESP32 board support installed on your Arduino IDE, if you are new then refer here.
You need following Libraries also,
- wifi.h (mostly pre-installed with ESP32 core)
- ESPAsyncwebserver (Install it via Library manager)
- AsyncTCP Library
Other than this, the following code and web based gauge works on local wi-fi network (same wi-fi for ESP32 and browser device).
Output from the LDR voltage divider setup is calculated as,
Vout = (R2 / R1+R2)*Vin
Here, Vin = 3.3V, R1 = LDR Resistance (Changes with light), R2 = fixed Resistor 10KΩ, Vout = Voltage at GPIO34.
ESP32 Microcontroller internal 12 bit ADC converts Vout to a Value between 0 and 4095 depends on the voltage range from 0 to 3.3V. Let’s write the code, In code each steps are explained with // comment that will be ignored by the compiler.
Sensor Gauge Web Server ESP32 Arduino Code
#include <WiFi.h>
#include <ESPAsyncWebServer.h>
#include <AsyncTCP.h>

// Replace with your network credentials
const char* ssid = "Your SSID";       // Replace with your Wi-Fi SSID
const char* password = "Wi-Fi Password"; // Replace with your Wi-Fi password

// Create AsyncWebServer and WebSocket objects
AsyncWebServer server(80);
AsyncWebSocket ws("/ws");

// LDR pin
const int ldrPin = 34;  // GPIO34 (Analog Input)

// HTML, CSS, and JavaScript for the web interface
const char index_html[] PROGMEM = R"rawliteral(
<!DOCTYPE html>
<html>
<head>
  <title>LDR Sensor Gauge</title>
  <meta name="viewport" content="width=device-width, initial-scale=1">
  <script src="https://cdn.rawgit.com/Mikhus/canvas-gauges/gh-pages/download/2.1.7/all/gauge.min.js"></script>
  <style>
    body {
      font-family: Arial, sans-serif;
      text-align: center;
      background: linear-gradient(to bottom, #e3f2fd, #90caf9);
      margin: 0;
      padding: 20px;
      min-height: 100vh;
    }
    h1 {
      color: #1976d2;
      text-shadow: 1px 1px 3px rgba(0, 0, 0, 0.1);
      margin-bottom: 30px;
    }
    .container {
      background: white;
      border-radius: 15px;
      padding: 20px;
      box-shadow: 0 5px 15px rgba(0, 0, 0, 0.2);
      max-width: 400px;
      margin: 0 auto;
    }
    #ldrGauge {
      margin: 20px auto;
      display: block;
    }
    #ldrValue {
      font-size: 1.2em;
      color: #0288d1;
      margin-top: 10px;
    }
    .error {
      color: red;
      font-weight: bold;
      display: none;
    }
  </style>
</head>
<body>
  <h3>theoryCIRCUIT.com</h3>
  <h1>LDR Sensor Reading</h1>
  <div class="container">
    <canvas id="ldrGauge" width="200" height="200"></canvas>
    <p>Light Intensity: <span id="ldrValue">0</span>%</p>
    <p class="error" id="errorMsg">Connection lost</p>
  </div>

  <script>
    // Initialize RadialGauge
    var ldrGauge = new RadialGauge({
      renderTo: 'ldrGauge',
      width: 200,
      height: 200,
      units: "Light Intensity (%)",
      minValue: 0,
      maxValue: 100,
      majorTicks: ["0", "20", "40", "60", "80", "100"],
      minorTicks: 2,
      strokeTicks: true,
      highlights: [
        { from: 0, to: 20, color: "rgba(0,0,255,.15)" },
        { from: 20, to: 40, color: "rgba(0,0,255,.25)" },
        { from: 40, to: 60, color: "rgba(0,0,255,.35)" },
        { from: 60, to: 80, color: "rgba(0,0,255,.45)" },
        { from: 80, to: 100, color: "rgba(0,0,255,.55)" }
      ],
      colorPlate: "#fff",
      borderShadowWidth: 0,
      borders: false,
      needleType: "arrow",
      needleWidth: 2,
      needleCircleSize: 7,
      needleCircleOuter: true,
      needleCircleInner: false,
      animationDuration: 1500,
      animationRule: "linear"
    }).draw();

    // WebSocket connection
    var ws = new WebSocket("ws://" + location.hostname + "/ws");
    ws.onopen = function() {
      console.log("WebSocket connected");
      document.getElementById("errorMsg").style.display = "none";
    };
    ws.onmessage = function(event) {
      var lightIntensity = parseInt(event.data);
      ldrGauge.value = lightIntensity;
      document.getElementById("ldrValue").innerText = lightIntensity;
    };
    ws.onerror = function() {
      document.getElementById("errorMsg").style.display = "block";
    };
    ws.onclose = function() {
      document.getElementById("errorMsg").style.display = "block";
    };
  </script>
</body>
</html>
)rawliteral";

// Function to read LDR value
int readLDR() {
  int ldrValue = analogRead(ldrPin);          // Read analog value (0-4095)
  int lightIntensity = map(ldrValue, 0, 4095, 0, 100);  // Map to 0-100 range
  return lightIntensity;
}

void setup() {
  // Start Serial Monitor
  Serial.begin(115200);

  // Initialize ADC
  analogReadResolution(12);  // Set ADC resolution to 12 bits

  // Connect to Wi-Fi with retry mechanism
  WiFi.begin(ssid, password);
  int retryCount = 0;
  while (WiFi.status() != WL_CONNECTED && retryCount < 20) {
    delay(1000);
    Serial.println("Connecting to WiFi...");
    retryCount++;
  }
  if (WiFi.status() == WL_CONNECTED) {
    Serial.println("Connected to WiFi");
    Serial.println(WiFi.localIP());
  } else {
    Serial.println("Failed to connect to WiFi. Check credentials.");
    return;  // Exit setup if Wi-Fi fails
  }

  // WebSocket event handler
  ws.onEvent([](AsyncWebSocket *server, AsyncWebSocketClient *client, AwsEventType type, void *arg, uint8_t *data, size_t len) {
    if (type == WS_EVT_CONNECT) {
      Serial.println("WebSocket client connected");
    } else if (type == WS_EVT_DISCONNECT) {
      Serial.println("WebSocket client disconnected");
    }
  });
  server.addHandler(&ws);

  // Route for root / web page
  server.on("/", HTTP_GET, [](AsyncWebServerRequest *request){
    request->send_P(200, "text/html", index_html);
  });

  // Start server
  server.begin();
}

void loop() {
  // Send LDR reading to all WebSocket clients
  if (WiFi.status() == WL_CONNECTED) {
    int lightIntensity = readLDR();
    String message = String(lightIntensity);
    ws.textAll(message);
    delay(500);  // Update every 500ms
  }
}
After uploading, see the serial monitor for IP address of ESP32 Web Server, if there is no text then press ‘EN’ button on the ESP32 board and see.