
Last Updated on March 16, 2024
Simple and easy to Construct Arduino IR Sensor Obstacle Detection Project described in few steps. Here this setup will detect object that is obstacle in way, range between 2 Cm to 30 Cm with 35° Degree range Angle.
IR Infrared Obstacle Sensor Module

This Sensor module sends Infrared light (which can’t seen through naked eye) through IR LED and detects bounce back or Reflected Infrared light waves from objects with IR Receiver (Photo diode). Here Current flow from photodiode differs according to the Received IR light. IC LM393 comparator gives output with respect to voltage from Variable Resistor (Detection Distance Adjustment) and IR Receiver diode. On IR sensor module there is a output LED which indicates the detection of obstacle. If LED ON – obstacle detected or LED OFF – no obstacle in range. We can use this module as Digital output sensor or Analog output Sensor with changes in Arduino Wiring and Code.
Arduino IR Sensor Module Wiring
For Analog Output

For Digital Output
Tools Need
- Arduino Board
- IR Infrared Obstacle Sensor Module
- Connecting Wires
Construction & Working
For to Obtain Analog output from IR Sensor Connect VCC to +5V and Gnd to GND of Arduino board and Connect out pin to Analog pin A0 then upload the following program through Arduino IDE select Arduino board and port according to your hardware. This will glow on board LED 13 of Arduino board while detecting obstacle and gives status on Serial monitor.
IR Sensor module Analog Code
/* Arduino IR Sensor Obstacle Detection Code
 *  www.theorycircuit.com
 *  Analog Mode Code
 */
int LED = 13; // Onboard LED for Detection Indication

void setup() {
pinMode(LED, OUTPUT);
Serial.begin(9600);
}
void loop() {
int sensorValue = analogRead(A0); // Analog A0 Pin as Input pin (Connect IRmodule Out - A0)
Serial.println(sensorValue);
delay(100);
if (sensorValue>200)
{
Serial.print("OBSTACLE DETECTED...!");
digitalWrite(LED, HIGH);
}
else
{
Serial.print("no obstacle");
digitalWrite(LED, LOW);
}
delay(200);
}
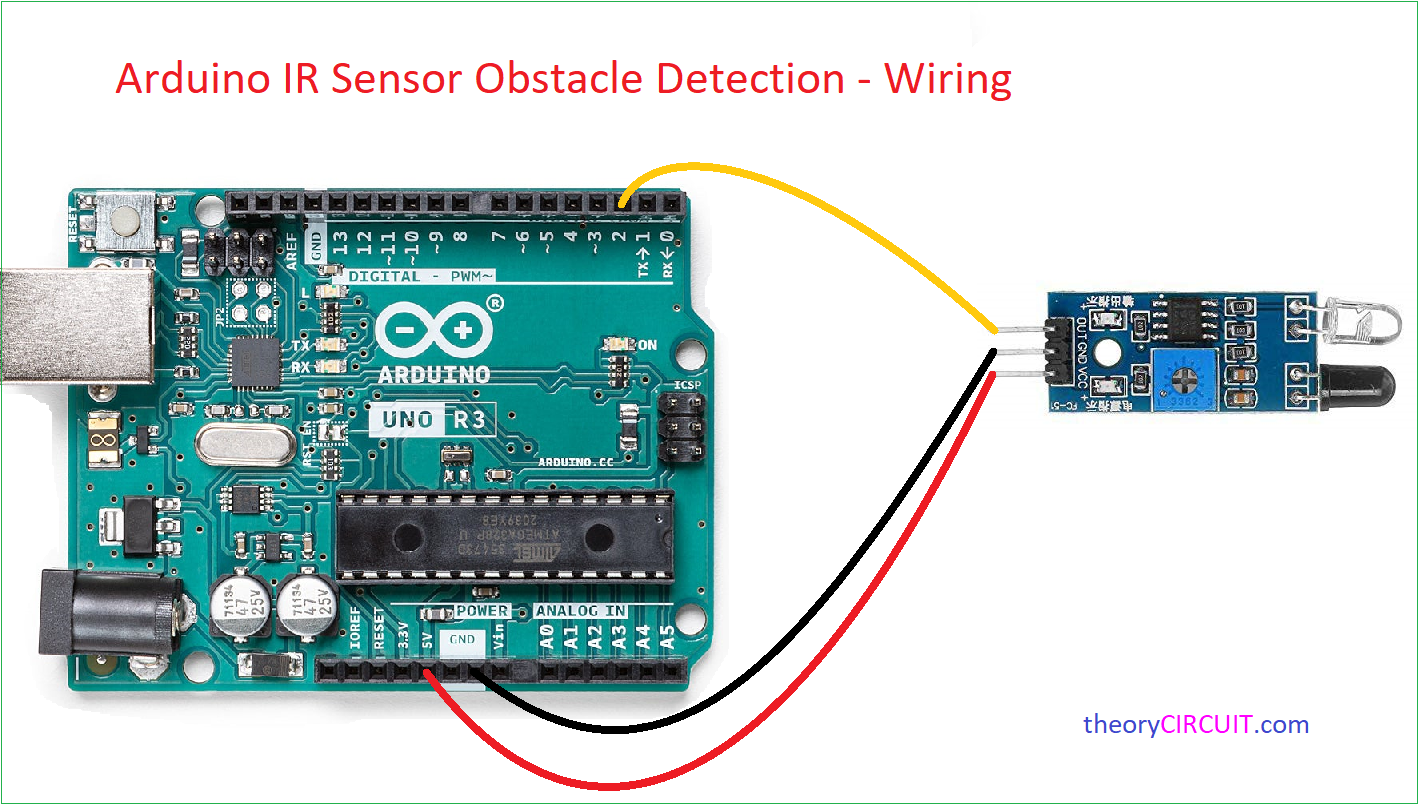
For to Obtain Digital output from IR Sensor Connect VCC to +5V and Gnd to GND of Arduino board and Connect out pin to Digital pin 2 then upload the following program through Arduino IDE select Arduino board and port according to your hardware. This will glow on board LED 13 of Arduino board while detecting obstacle and gives status on Serial monitor.
IR Sensor module Digital Code
/* Arduino IR Sensor Obstacle Detection Code
 *  www.theorycircuit.com
 *  Digital Mode Code
 */
int LED = 13; // Onboard LED for Detection Indication
int IRsensorPin = 2; // Naming Digital Pin 2
void setup() {
pinMode(LED, OUTPUT);
pinMode(IRsensorPin, INPUT); // Digital 2 Pin as Input pin (Connect IRmodule Out - 2)
Serial.begin(9600);  // initialize serial communication at 9600 bits per second:
}
void loop() {
int IRsensorVal = digitalRead(IRsensorPin);
Serial.println(IRsensorVal);
delay(100);
if (IRsensorVal==1)
{
Serial.print("OBSTACLE DETECTED...!");
digitalWrite(LED, HIGH);
}
else
{
Serial.print("no obstacle");
digitalWrite(LED, LOW);
}
delay(200);
}
Connect Output actuators to Arduino and mention in Arduino Code accordingly to customize this project.
thanks for comprehensive information that you explained in this projects working well for any projecs making