
Last Updated on March 16, 2024
Water is precious resource and hence we need to more conscious in utilizing and handling, considerable amount of water is wasted due to improper handling. Here this article gives a simple and easy to make numeric water level Indicator and controller circuit by using Arduino.
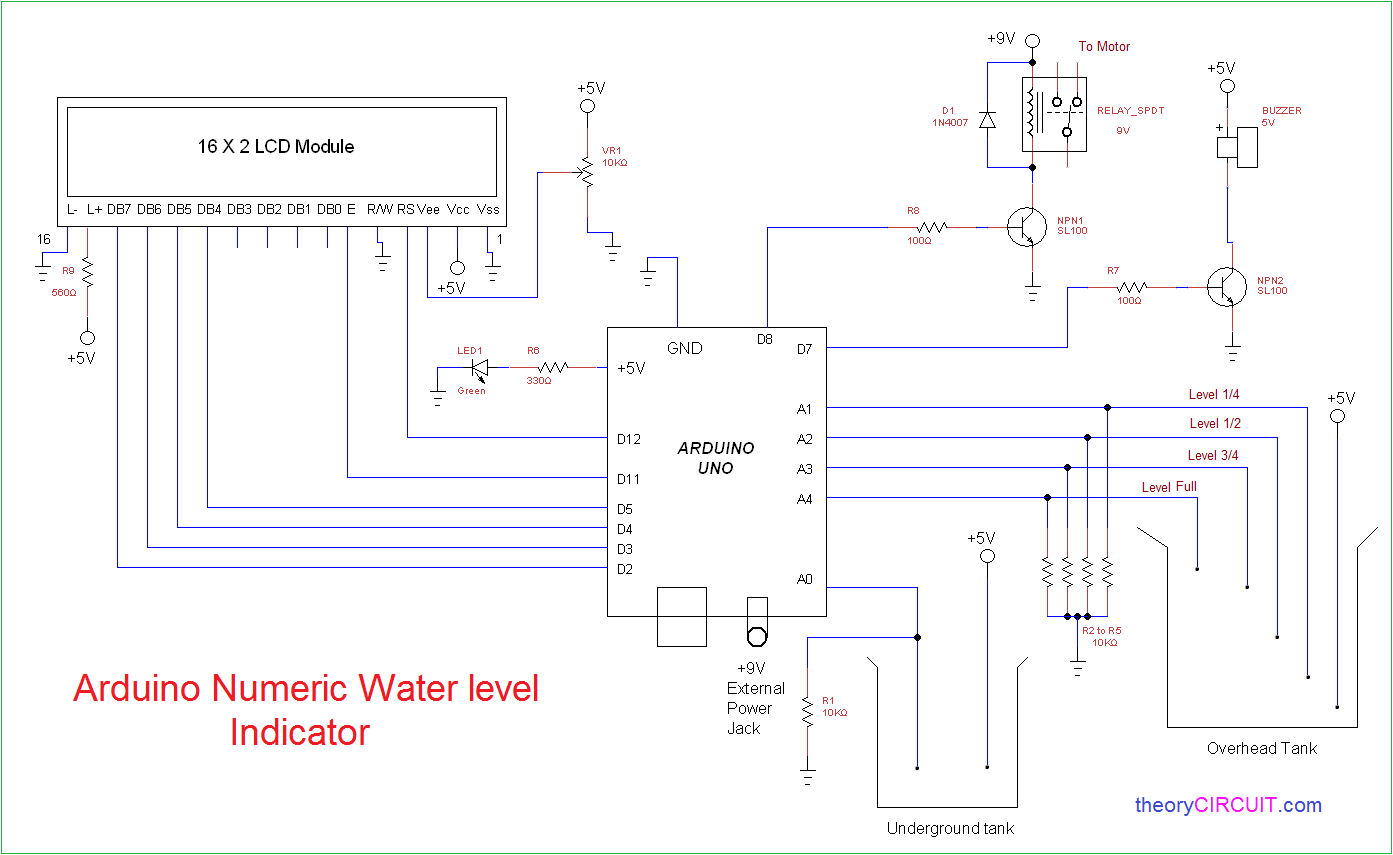
This circuit is designed to monitor the water level in under ground tank and overhead tank and displays the water level in 16X2 LCD display and also triggers the relay and turn ON or OFF the motor depends on the water level as we need.
Connection diagram
Construction and Working
The Arduino uno board is programmed to display the level of water depends on the sensor wire arrangement (Sleeve less aluminium wire in both tanks) and controls the buzzer and Relay depends on predetermined water level.
Analog pins A0 measures the level of underground tank and A1,A2,A3,A4 pins are measures the water level of overhead tank, Digital pin D7 is controls the buzzer and it gives sound alert when the tank is full/empty, Digital pin D8 is controls the Relay to turn ON or OFF the motor. Digital pins D2,D3,D4,D5,D11 and D12 are connected with 16 X2 LCD display, External 9V battery source can be connected after uploading and setup of control circuit.
Arduino Code
#include <LiquidCrystal.h>
int ugnd=A0;
int quarter=A1;
int half=A2;
int threfrth=A3;
int full=A4;
int relay=8;
int buzzer=7;
int i;     //relay status flag
int v=100; //comparison variable and give some adjustment for to get proper value
int b=0;   //buzzerzer flag
int m=0;   //relay flag
int c=0;   //ugnd flag
int s;
int q;
int h;
int t;
int f;

LiquidCrystal lcd(12, 11, 5, 4, 3, 2);

void setup()
{

pinMode(quarter,INPUT);
pinMode(half,INPUT);
pinMode(quarter,INPUT);
pinMode(full,INPUT);
pinMode(ugnd,INPUT);
pinMode(relay,OUTPUT);
pinMode(buzzer,OUTPUT);
lcd.begin(16, 2);
digitalWrite(buzzer,LOW);
}

void loop()
{

i=digitalRead(relay);
s=analogRead(ugnd);
q=analogRead(quarter);
h=analogRead(half);
t=analogRead(threfrth);
f=analogRead(full);
lcd.clear();

if(f>v && t>v && h>v && q>v ) //Statement to compare water levels from Arduino Analog pins
{
lcd.setCursor(0,0);
lcd.print(char(219));
lcd.print(char(219));
lcd.print(char(219));
lcd.print(char(219));
lcd.setCursor(5,0);
lcd.print("fullL");
m=0;
b=0;
}
else
{
if(f<v && t>v && h>v && q>v)//Statement to compare water levels from Arduino Analog pins
{
lcd.setCursor(0,0);
lcd.print(char(219));
lcd.print(char(219));
lcd.print(char(219));
lcd.print("_");
lcd.setCursor(5,0);
lcd.print("3/4th");
b=0;
}
else
{
if(f<v && t<v && h>v && q>v)//Statement to compare water levels from Arduino Analog pins
{
lcd.setCursor(0,0);
lcd.print(char(219));
lcd.print(char(219));
lcd.print("_");
lcd.print("_");
lcd.setCursor(5,0);
lcd.print("HALF");
m=1;
b=0;
}
else
if(f<v && t<v && h<v && q>v)//Statement to compare water levels from Arduino Analog pins
{
lcd.setCursor(0,0);
lcd.print(char(219));
lcd.print("_");
lcd.print("_");
lcd.print("_");
lcd.setCursor(5,0);
lcd.print("1/4th");
b=0;
}
else
{
if(f<v && t<v && h<v && q<v)//Statement to compare water levels from Arduino Analog pins
{
lcd.setCursor(0,0);
lcd.print("_");
lcd.print("_");
lcd.print("_");
lcd.print("_");
lcd.setCursor(5,0);
lcd.print("LOW");
b=0;
}
else

{
digitalWrite(relay,LOW);
lcd.setCursor(0,0);
lcd.print("ERROR!");
b=1;
}
}}}
if(i==HIGH)
{
lcd.setCursor(0,1);
lcd.print("relay ON");
}
else
{
lcd.setCursor(0,1);
lcd.print("relay OFF");
}


if(s>v && m==1)//Statement to compare water levels from Arduino Analog pins
{
digitalWrite(relay,HIGH);
}
if(s<v)
{
digitalWrite(relay,LOW);
lcd.setCursor(11,0);
lcd.print("Low");
lcd.setCursor(11,1);
lcd.print("ugnd");
c=1;
}
if(s>v)
{
c=0;
}

if(m==0)
{
digitalWrite(relay,LOW);
}

if(b==1 || c==1)//Statement to compare water levels from Arduino Analog pins
{
digitalWrite(buzzer,HIGH);
delay(500);
digitalWrite(buzzer,LOW);
}
else
{
digitalWrite(buzzer,LOW);
}
delay(100);
lcd.clear();
}
Note:-
- Use sleeve less aluminium wires as sensor from tip of water level.
- Do not place wires too near in water and give proper space between wires.
- Protect Arduino board and circuits from water.
I have tested this circuit and it works well.. Please add a manual switch to start the motor.. Analog pin A5 can be used..
.
Hi, I wonder if I can use three wire (C, Min, Max) on sump tank and overhead tank?
bro i have a problem lcd show full half automatically
i am also try to this project but not success,lcd automatically show full,low and i am not connect the output A0_A4 PIN but why the lcd show it…plz response
I am also try this project but not success,when I on airdino uno motor automatically on still sump low and upper tank low