Last Updated on March 16, 2024
Mini tesla coil circuit made with few easily available components, and it will acts as a mini electrical resonant transformer circuit and produce high voltage, low current, high frequency alternating current electricity. We can make CFL bulb to glow near tesla coil with out any physical or electrical contact.
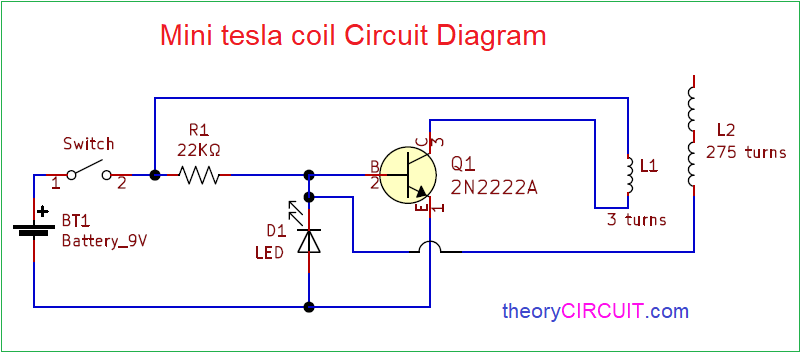
This simple mini tesla coil circuit will have two sections, one is switching section and another one is step up winding setup. Single Transistor 2N2222A (NPN) is acts as switching device coil L1 or primary winding is connected at the collector terminal of Q1 transistor. Hence L1 acts as magnetic flux inducing element.
Circuit Diagram
Components Required
- Battery 9V
- Switch
- Resistor 22KΩ
- LED red
- Transistor 2N2222A (NPN)
- Connecting Wire
- Enamelled Copper Wire 22 SWG
Construction & Working
In this mini tesla coil circuit important part is tesla coil winding setup before proceeding with circuit make the winding setup. For that we need non conducting cylindrical material in our case we used 3 inch and half feet PVC pipe (size may vary little) and Primary coil made with conducting wire (Use the insulated wire used to make the circuit).
Tesla Coil Winding Setup
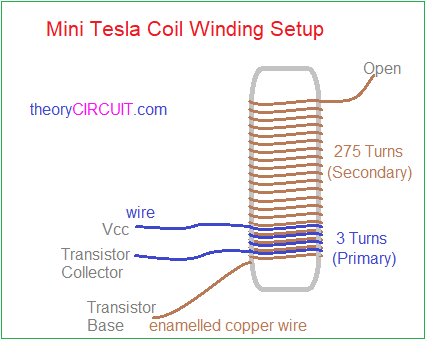
For primary winding make 3 to 6 turns after completing secondary winding, Here we have used 22 SWG (Standard Wire Gauge ) Enamelled Copper Wire for Secondary winding and made 275 turns around PVC pipe. One side wire of secondary coil is connected with Transistor base and another side wire is kept open.
Battery power supply is applied to the Primary coil and Base terminal of Q1 transistor Through Switch and make sure to connect 22KΩ Resistor at the base terminal. Connect a LED (Red color) between base and negative supply to indicate the oscillating pulse level. Emitter terminal is connected to the battery negative supply and collector terminal is connected to the L1 coil. L2 coil is connected with the base terminal.
When we apply power supply to this circuit initially Q1 stays is off condition and coil L1 gets supply due to the threshold level supply flow on the base Q1 slowly gets turn ON and completes the power supply flow of L1 coil and we know whenever the coil gets supply it will produce magnetic flux and hence due to the magnetic flux near L2 coil also induced and it produce high voltage because it has more turns than L1 coil. EMF through L2 makes more supply appear at Base terminal and hence Transistor Q1 becomes Active, and so the maximum power connected to battery negative supply through L1 coil, hence power supply through R1 resistor to base gets drop so Q1 becomes saturated condition, again EMF through L2 makes more supply appear at Base terminal and so on this cycle continues upto the presence of power supply to the circuit.
Avoid Direct contact to the tesla coil, it produce high voltage and its dangerous.
how do you connect the transistor?
Use Common PCB board.