
Last Updated on November 9, 2026
Circular RGB LED rings can be usd in smart clocks, voice assistant lights, desk lamp, DIY wall art etc.., Here the most popular 16 LED WS2812B ring is interfaced with ESP32 and you can make one by following this article.
Before we start, lets know what is “16 bit WS2812B ring”. The 16 in the name is the number of LEDs on the ring and not a bit depth. WS2812B is a addressable RGB LED, which consumes 5V and packed with tiny control circuit. Each WS2812B LED actually uses 24 bit color that is 8 bits for Red, 8 bits for Green and 8 bits for blue, which gives 16.7 million colors. Here the Arduino library we use is “Adafruit NeoPixel library” for rainbow effects (0 to 65535) – 16 bit.
16 LED WS2812B RGB LED Ring
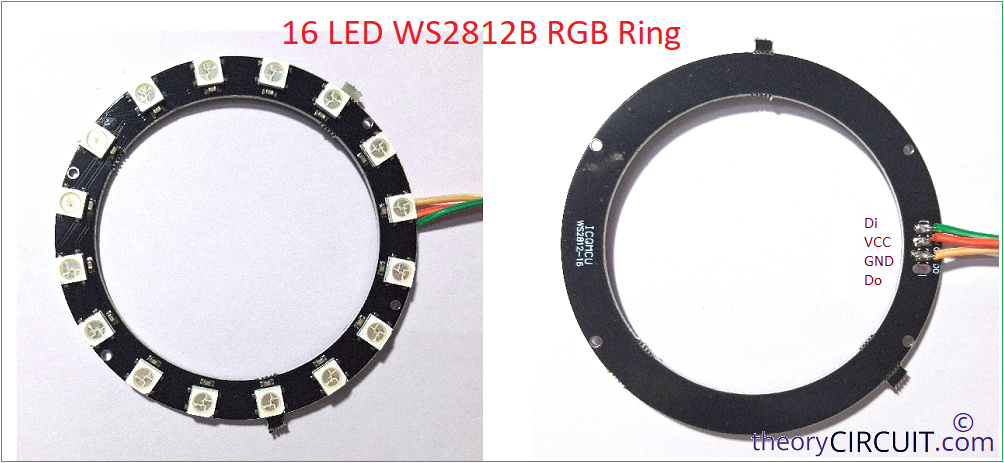
It contains 16 individually addressable RGB LEDs arranged in a circle and only one data pin needed from the ESP32 no mater how many LEDs you use. It contains built in driver so no need for external driver. With 24 bit color per LED, we can adjust 256 levels for each color R, G, B.
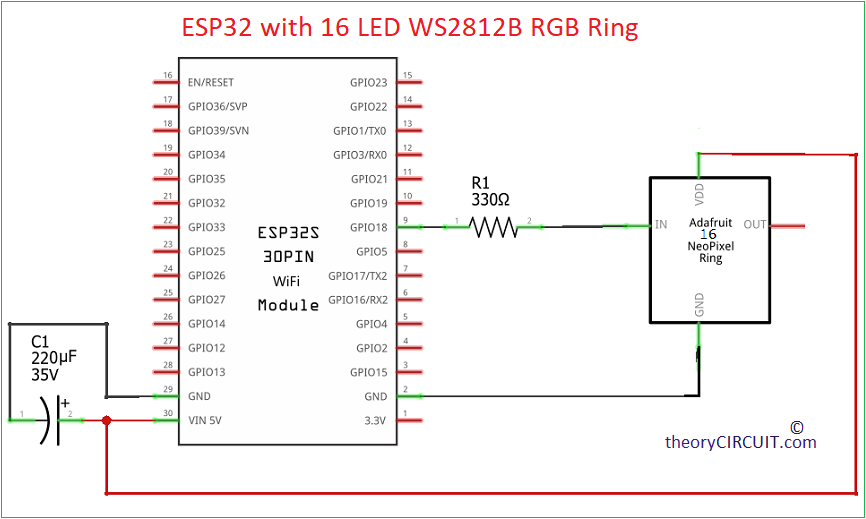
Circuit Diagram
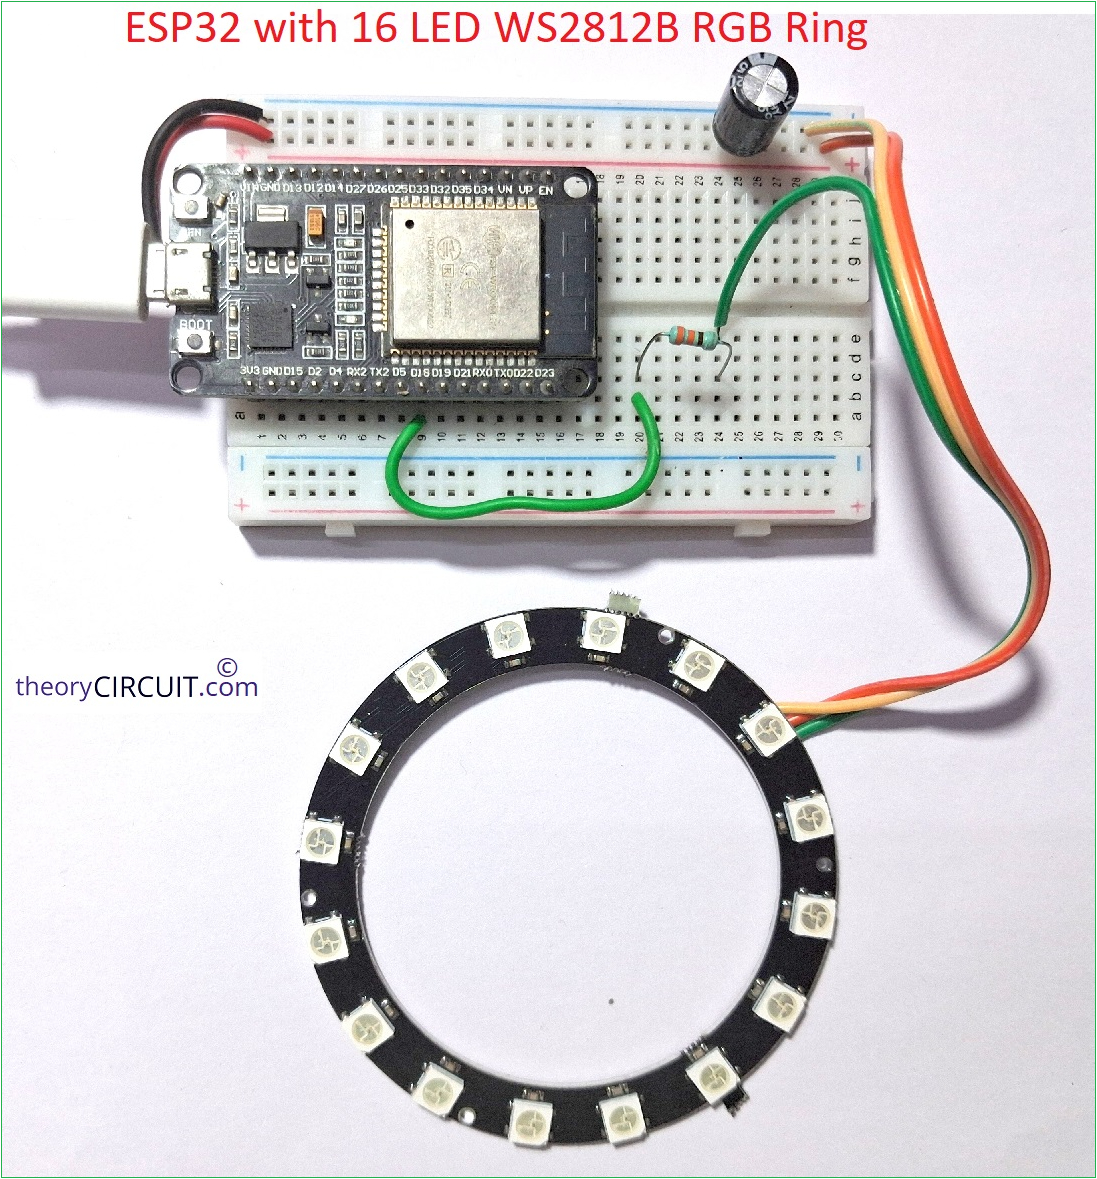
Wiring
Components Required
- ESP32 board (here we used DOIT DevKit V1)
- 16 LED WS2812B RGB ring
- 330Ω Resistor
- 220μF/35V Capacitor
- Breadboard and jumper wires
- Micro USB cable (data capable) for to interface and code ESP32
Working Video
Construction & Working
Note: Here the ESP32 output is 3.3V logic in all GPIO pins but a WS2812B powered from 5V, so it expects a high level input volt atleast from 3.5V according to the datasheet but 3.3V from GPIO pin is enough when you connect with short wire (ESP32 and WS2812B LED ring), for long distance wire it is recomended to use level shifter from 3.3V to 5V.
Another shortcut i can say is, just use schottkey diode in series with the 5V line between WS2812B LED ring so the ring runs at 4.5V and the logic threshold drops to around 3.15V which a 3.3V ESP32 GPIO pin can satisfy. But use level shifter for professional output.
While connecting the circuit keep in mind, common ground is important between ESP32 and LED ring ground. use 220μF to 1000μF Capacitor across 5V and GND supply close to the ring. use 330Ω series resistor on the data line.
As we know inside every WS2812B package there are three LEDs and a tiny control IC, that IC contains a data latch, a signal reshaping circuit and a constant current driver for each color. Here each LED needs 24 bits of data, starting from Green, Red and Blue each 8 bit. The ESP32 sends a stream of bits on one wire so the first LED reads the first 24 bits and keeps them and then passes everything after that to the second LED, here after cleaning and reshaping the signal, the second LED does the same and so on down the chain upto 16 LEDs. So the reshaping is the reason you can chain hundreds of LEDs without the signal getting weaker. (But you have to mention the last LED count in the code)
Bit Timing
Here the WS2812B has no clock wire, A logic 0 and a logic 1 are separated by how long the signal stays high within a 1.25 microsecond bit period that is 800 KHz.
| Bit Type | High Time | Low Time |
|---|---|---|
| Logic 0 | About 0.4 µs | About 0.85 µs |
| Logic 1 | About 0.8 µs | About 0.45 µs |
| Reset / Latch | none | Longer than about 50 µs |
Here the tolenrance is about plus or minus 150 nano seconds. A normal digitalWrite() is far too slow and in accurate for this, so libraries use cycle – counted code or the ESP32 RMT hardware peripheral to generate these pulses. When the line stays low longer than the reset time, all the LEDs copy their data into their output drivers at the same moment. That is how the whole ring updates together when you call show().
For 16 LEDs the frame is calculated as 16×24=384 bits. At 1.25 microseconds per bit totally 480 microseconds plus the reset gap equals to half a millisecond. So the animation speed is therefore limited by your delay() values not the LEDs.
Power Consumption
Here in the 16 WS2812B LED ring each color channel draws roughly 20mA at full brightness, so one LED showing full white draws about 60mA and for 16 LEDs the worst case is about 960mA, and depends on the brightness it varies, here is the table to understand.
| setBrightness() Value | Approx. Ring Current (All White) |
|---|---|
| 255 (100%) | About 960 mA |
| 128 (50%) | About 480 mA |
| 50 (About 20%) | About 190 mA |
| 25 (About 10%) | About 95 mA |
If you want to make dedicated color display using this ESP32 and 16 WS2812B LED ring then use 5V 2A DC adapter and connect the grounds together because the ESP32 it self draw around 80mA to 240mA + All LEDs in the ring may go beyound 1A. For the test purpose we used computer USB port which normally supplies 500mA. For a long term full brightness use the stated power source.
Before Code Check
If you are new to code the ESP32 with Arduino IDE then read here.
Make sure you have installed ESP32 by7 espressif systems from the boards manager.
Install Adafruit NeoPixel library and connect ESP32 with your computer and choose the right port and board in the Arduino IDE and then set srial monitor speed to 115200.
Arduino Code for 16 WS2812B LED Ring
#include <Adafruit_NeoPixel.h>

#define LED_PIN     18      // Data pin connected to ring DIN
#define LED_COUNT   16      // Number of LEDs on the ring
#define BRIGHTNESS  50      // 0 to 255 (keep low on USB power)

Adafruit_NeoPixel ring(LED_COUNT, LED_PIN, NEO_GRB + NEO_KHZ800);

void setup() {
  Serial.begin(115200);
  ring.begin();
  ring.setBrightness(BRIGHTNESS);
  ring.clear();
  ring.show();
  Serial.println("ESP32 + 16 LED WS2812B ring ready");
}

void loop() {
  Serial.println("Effect 1: Color wipe");
  colorWipe(ring.Color(255, 0, 0), 60);
  colorWipe(ring.Color(0, 255, 0), 60);
  colorWipe(ring.Color(0, 0, 255), 60);

  Serial.println("Effect 2: Spinner");
  spinner(0, 150, 255, 40, 3);

  Serial.println("Effect 3: Breathing");
  breathe(255, 80, 0, 3);

  Serial.println("Effect 4: Rainbow");
  rainbowCycle(10, 3);
}

// Fill the ring one LED at a time, then turn it off
void colorWipe(uint32_t color, int wait) {
  for (int i = 0; i < LED_COUNT; i++) {
    ring.setPixelColor(i, color);
    ring.show();
    delay(wait);
  }
  delay(300);
  ring.clear();
  ring.show();
}

// A bright head with a fading tail that rotates around the ring
void spinner(uint8_t r, uint8_t g, uint8_t b, int wait, int rounds) {
  for (int round = 0; round < rounds; round++) {
    for (int head = 0; head < LED_COUNT; head++) {
      ring.clear();
      for (int t = 0; t < 4; t++) {
        int index = (head - t + LED_COUNT) % LED_COUNT;
        int level = 255 - (t * 70);          // 255, 185, 115, 45
        ring.setPixelColor(index,
                           (r * level) / 255,
                           (g * level) / 255,
                           (b * level) / 255);
      }
      ring.show();
      delay(wait);
    }
  }
  ring.clear();
  ring.show();
}

// Smooth fade in and fade out of the whole ring
void breathe(uint8_t r, uint8_t g, uint8_t b, int cycles) {
  for (int c = 0; c < cycles; c++) {
    for (int level = 0; level <= 255; level += 5) {
      setAll((r * level) / 255, (g * level) / 255, (b * level) / 255);
      delay(15);
    }
    for (int level = 255; level >= 0; level -= 5) {
      setAll((r * level) / 255, (g * level) / 255, (b * level) / 255);
      delay(15);
    }
  }
}

void setAll(uint8_t r, uint8_t g, uint8_t b) {
  for (int i = 0; i < LED_COUNT; i++) {
    ring.setPixelColor(i, r, g, b);
  }
  ring.show();
}

// Rainbow spread evenly around the ring, using the 16-bit hue value
void rainbowCycle(int wait, int rounds) {
  for (long firstHue = 0; firstHue < rounds * 65536L; firstHue += 256) {
    for (int i = 0; i < LED_COUNT; i++) {
      uint16_t pixelHue = firstHue + (i * 65536L / LED_COUNT);
      ring.setPixelColor(i, ring.gamma32(ring.ColorHSV(pixelHue)));
    }
    ring.show();
    delay(wait);
  }
  ring.clear();
  ring.show();
}
This 16 LED WS2812B ring is one of the easiest ways to add colorful programmable lighting to your project with just one wire. Share your thoughts in the comments after login.