Last Updated on March 25, 2024
Colorful LED lights are plays important role in decoration, attraction and entertainment. You may noticed some LED light strip makes colorful animation like effects, rainbow effects and also chasing effects. Those kind of LED strips are probably made with Neopixel like LEDs. The WS2812B Neopixel is a very popular RGB LED Module. Within Small size package it contains a Red, Green and Blue LED along with tiny Chip called WS2812B. This Chip controls each LED independently based on Data Input. Due to the internal Microchip this LED requires minimal external components to make color light effects and also eye catching animations. All these good things about WS2812B Neopixel makes it very popular among electronics makers community.
With multiple options for Addressable RGB LEDs, WS2812B stands out with its notable features like, Reverse supply protection, One power source for Control circuit and to the LED, Comes in 5050 package, Built-in electric reset circuit and power lost reset circuit. Each pixel of the three primary color can achieve 256 brightness display, completed 16777216 color full color display, and scan frequency not less than 400Hz/s. Send data at speeds of 800Kbps. The data transfer protocol use single NZR communication mode (1 wire).
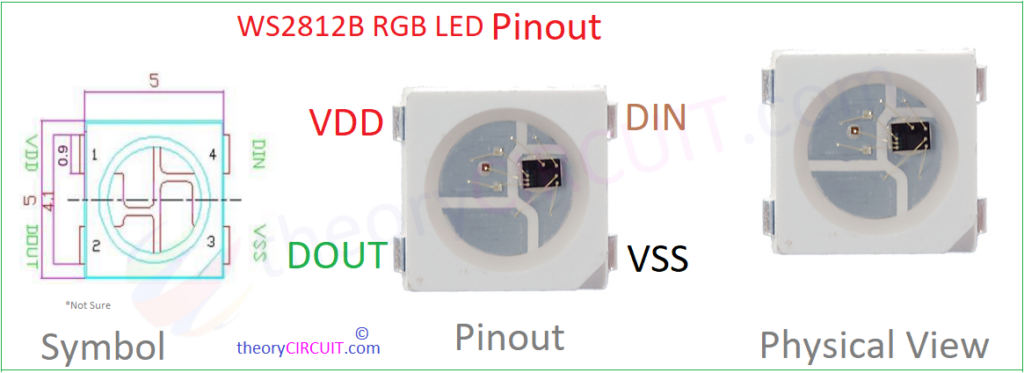
WS2812B Neopixel LED Module Pinout
Most WS2812B Neopixel LED comes in a breakout board and epoxy LED strips, even though if you want to know the individual pin details of WS2812B LED then refer the above illustration.
Interfacing WS2812B Neopixel LED strip with ESP32
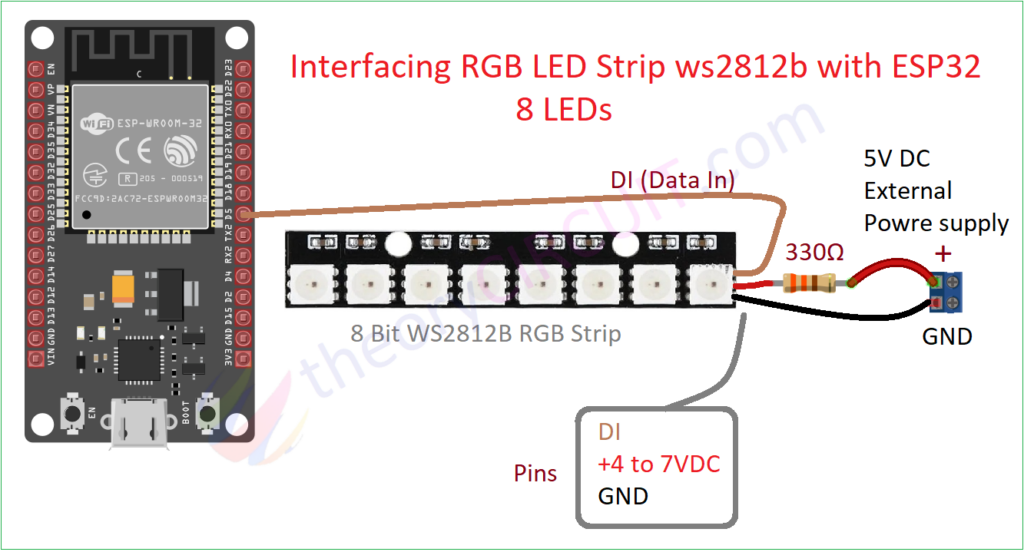
Use External Power supply (5V DC) if your microcontroller board don’t have it,
Required Components
- ESP32 Development board
- WS2812B Neopixel LED strip (here we used 8 – bit)
- Resistor 330Ω
- External power supply (5V – we used bread board power supply)
- Computer with Arduino IDE
Construction & Working
If you unaware of Initial setup for ESP32 Dev Module and Arduino IDE. Get started with ESP32 and Arduino IDE Initiation.
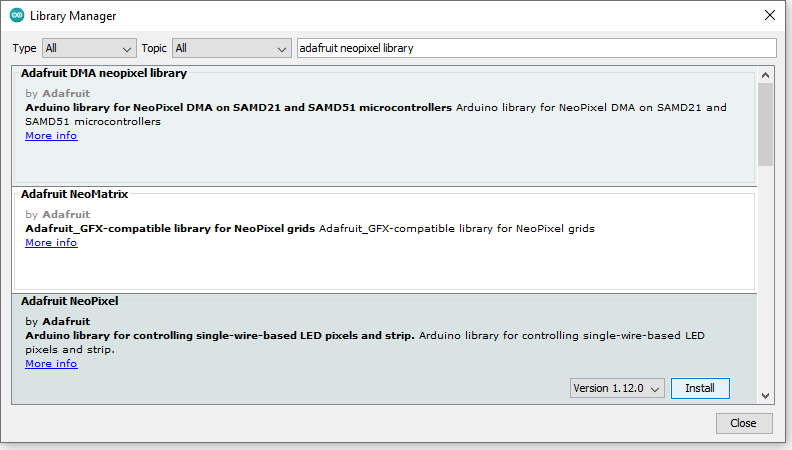
For to control the WS2812B Neopixel with either Arduino or ESP32 board, we need library so go to Arduino IDE then Tools -> click Manage Libraries…
Then type Adafruit neopixel library and choose the latest version and then Install.
Now your Arduino IDE understand #include <Adafruit_NeoPixel.h> header file and Adafruit_NeoPixel strip(LED_COUNT, LED_PIN, NEO_RGB + NEO_KHZ800); Initialize the NeoPixel object.
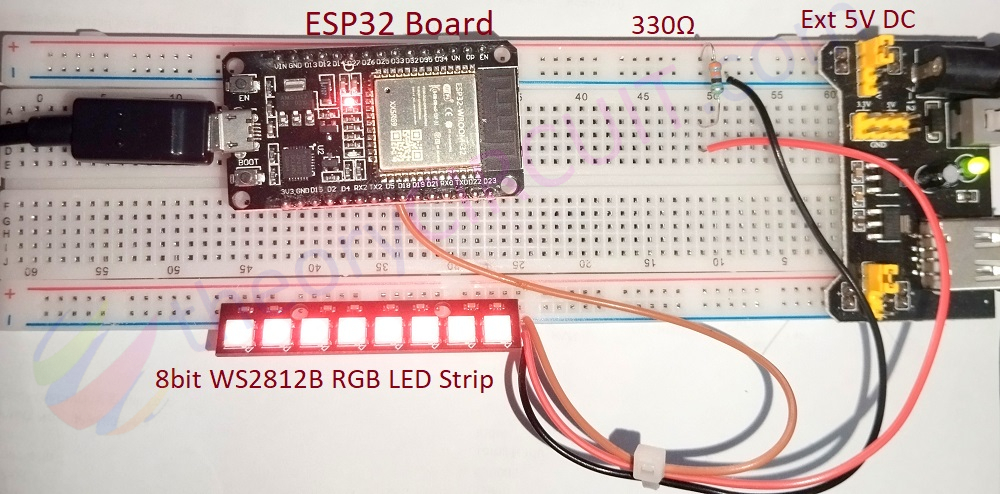
Connect ESP32 board D5 Pin (GPIO5) to DI Pin (Data In) of 8 bit WS2812B Neopixel LED strip (you have to solder), then connect +5V positive pin to (4-7V)DC Pin then -V of external powre supply to GND of LED strip. Now the hardware setup completed. It is time to test it by simple Arduino code.
Simple Arduino Code for ESP32 and WS2812B Neopixel LED strip
The following program is for 8 numbers of LED in a strip. You have to change the number of LEDs according to Neopixel LED strip you holding.
#include <Adafruit_NeoPixel.h>

#define LED_PIN    5
#define LED_COUNT  8

Adafruit_NeoPixel strip(LED_COUNT, LED_PIN, NEO_RGB + NEO_KHZ800);

void setup() {
  strip.begin();
  strip.show();
  strip.setBrightness(50);
}

void loop() {
  colorWipe(strip.Color(255,   0,   0), 50); // Red
  colorWipe(strip.Color(  0, 255,   0), 50); // Green
  colorWipe(strip.Color(  0,   0, 255), 50); // Blue

  colorWipe(strip.Color(100,   0,   0), 50); // Red
  colorWipe(strip.Color(  0, 100,   0), 50); // Green
  colorWipe(strip.Color(  0,   0, 100), 50); // Blue
  }

void colorWipe(uint32_t color, int wait) {
  for(int i=0; i<strip.numPixels(); i++) {
    strip.setPixelColor(i, color);
    strip.show();
    delay(wait);
  }
}
Choose the right board and port in Arduino IDE then upload the above code, If it Uploaded without error then the result will be,
There are numbers of Example in Adafruit Neopixel Library to make experiments.


1. And where is GND from (external power supply+led strip) to ESP32 connected? Unless your ESP and ext. power are supplied from the same source, for example your PC USB – it should not work. Or the GND is sent wireless?
2. Additional 330R resistor – bad idea. LED strip has its own resistors for each LED. Another one, in series for all LEDs, will bring voltage drop dependent on number of LEDs switched simultaneously, so LEDs will be lighter or dimmer. Use solid 5V and that’s enough.
Thank you so much Greg.
My question is why is author even operating this? look at the demonstration at the end and it looks exactly like mine did after many years of trying to work it out but FOLLOwING peoples advice of using resistor.
Thanks again GREG!
I think your 330 ohm resistor was not meant for the 5 volt power line, but for the data line. The resistor should be close to the led’s, on the data line from the ESP32.